15 - Sliding Table, страница 4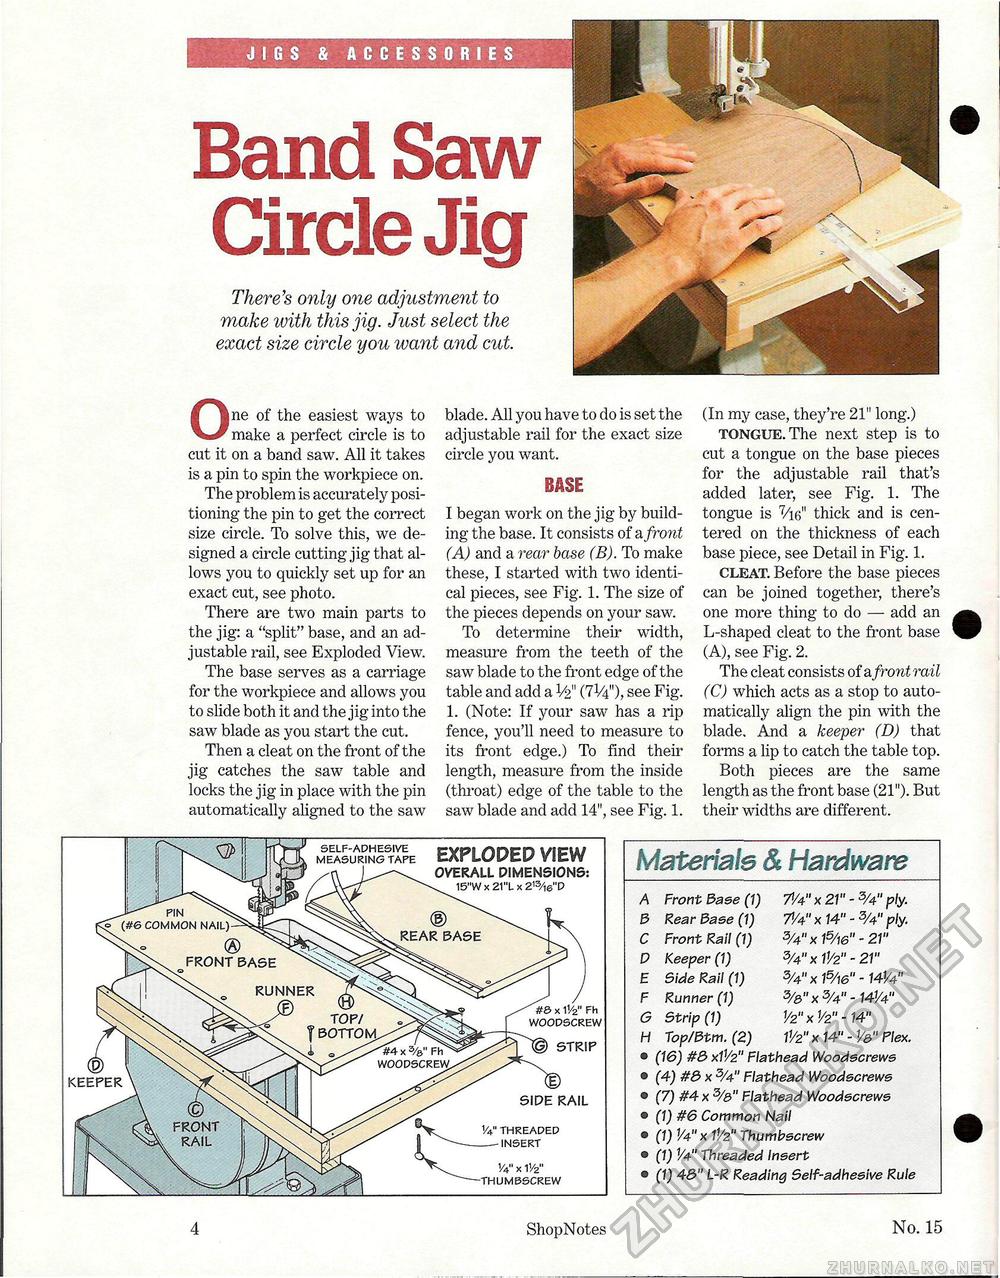
Band Saw Circle Jig There's only one adjustment to make with this jig. Just select the exact size circle you want and cut. One of the easiest ways to make a perfect circle is to cut it on a band saw. All it takes is a pin to spin the workpiece on. The problem is accurately positioning the pin to get the correct size circle. To solve this, we designed a circle cutting jig that allows you to quickly set up for an exact cut, see photo. There are two main parts to the jig: a "split" base, and an adjustable rail, see Exploded View. The base serves as a carriage for the workpiece and allows you to slide both it and the jig into the saw blade as you start the cut. Then a cleat on the front of the jig catches the saw table and locks the jig in place with the pin automatically aligned to the saw blade. All you have to do is set the adjustable rail for the exact size circle you want. base I began work on the jig by building the base. It consists of a front (A) and a rear base (B). To make these, I started with two identical pieces, see Fig. 1. The size of the pieces depends on your saw. To determine their width, measure from the teeth of the saw blade to the front edge of the table and add a V2" (7V4"), see Fig. 1. (Note: If your saw has a rip fence, you'll need to measure to its front edge.) To find their length, measure from the inside (throat) edge of the table to the saw blade and add 14", see Fig. 1. (In my case, they're 21" long.) tongue. The next step is to cut a tongue on the base pieces for the adjustable rail that's added later, see Fig. 1. The tongue is Vie" thick and is centered on the thickness of each base piece, see Detail in Fig. 1. cleat. Before the base pieces can be joined together, there's one more thing to do — add an L-shaped cleat to the front base (A), see Fig. 2. The cleat consists of a front rail (C) which acts as a stop to automatically align the pin with the blade. And a keeper (D) that forms a lip to catch the table top. Both pieces are the same length as the front base (21"). But their widths are different. SELF-ADHESIVE MEASURING TAPE EXPLODED VIEW OVERALL DIMENSIONS: 15"W x 21 "L x 213/i6"D #8 x 11/2" Fh WOODSCREW STRIP SIDE RAIL V THREADED INSERT V4" X V/z" THUMBSCREW Materials & Hardware A Front 3a se (1) W x 21" - 3U" ply. 3 Rear Base (1) 7V4" x 14" - 3U" ply. C Front Rail (1) x P/w" - 21" D Keeper (1) 3A" x IV2" - 21" E Side Rail (1) 3U" x 15/w" - 14Va" F Runner (1) x 3A" -141/4" O Strip (1) V2" x V2" -14" H Top/3tm. (2) V/2" x 14" - V&" Flex. • (16) #& x11/2" Flathead Woodscrews • (4) #8> x 3U" Flathead Woodscrews • (7) #4x3/&" Flathead Woodscrews • (1) #6 Common Nail © (1) 1/4"x V/2" Thumbscrew • (1) V4" Threaded Insert • (1) 43" L-R Reading Self-adhesive Rule 4 ShopNotes No. 15 |


