50 - Table Saw Workstation, страница 5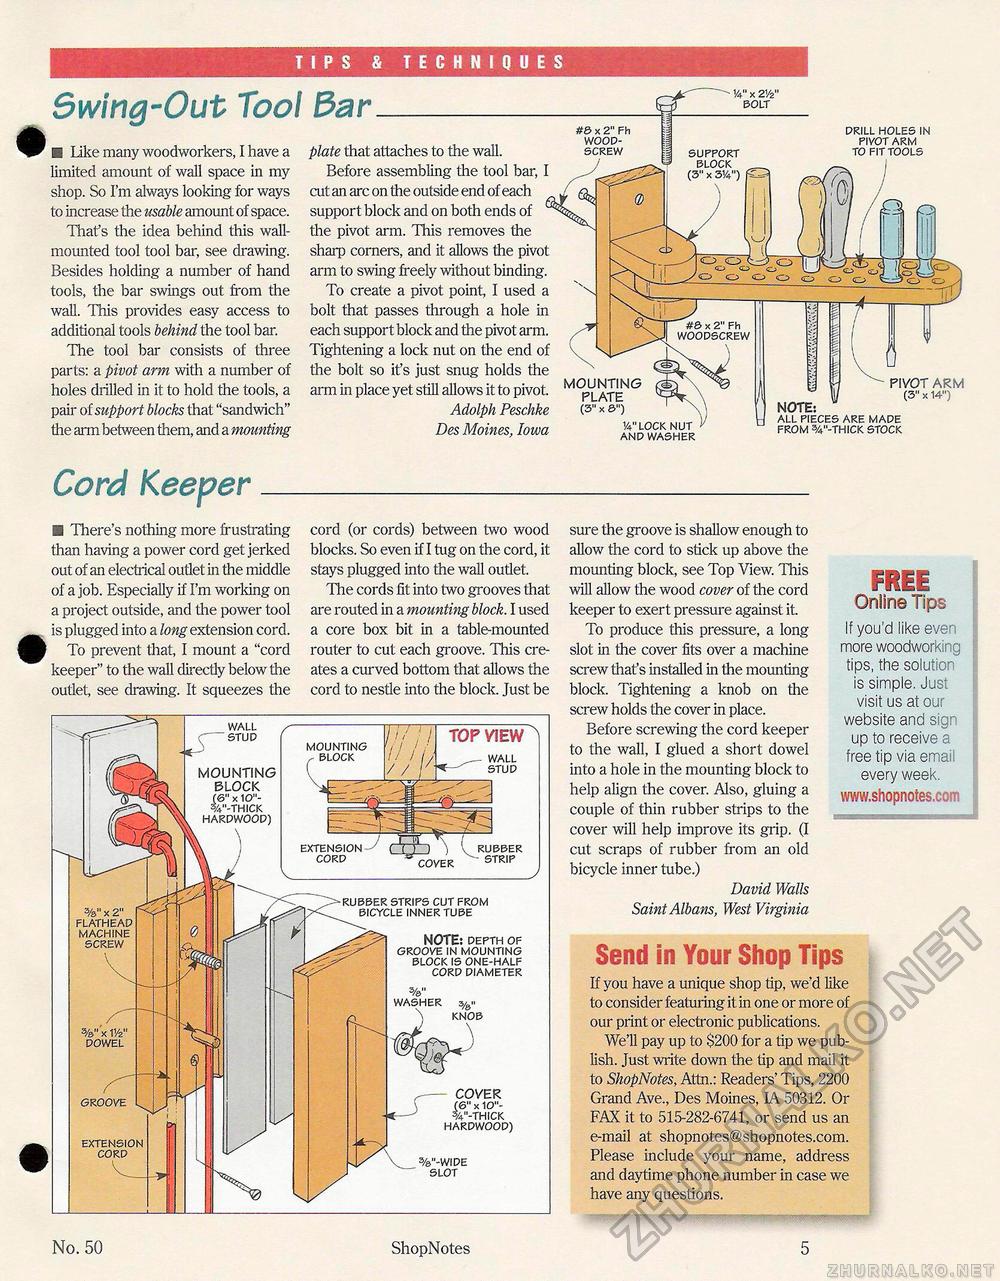
TIPS & TECHNIQUES Swing-Out ToolM Like many woodworkers, I have a limited amount of wall space in my shop. So I'm always looking for ways to increase the usable amount of space. That's the idea behind this wall-mounted tool tool bar, see drawing. Besides holding a number of hand tools, the bar swings out from the wall. This provides easy access to additional tools behind the tool bar. The tool bar consists of three parts: a pivot arm with a number of holes drilled in it to hold the tools, a pair of support blocks that "sandwich" the arm between them, and a mounting Cord Keepergfl There's nothing more frustrating than having a power cord get jerked out of an electrical outlet in the middle of a job. Especially if I'm working on a project outside, and the power tool is plugged into a long extension cord. To prevent that, I mount a "cord keeper" to the wall directly below the outlet, see drawing. It squeezes the cord (or cords) between two wood blocks. So even if I tug on the cord, it stays plugged into the wall outlet. The cords fit into two grooves that are routed in a mounting block. I used a core box bit in a table-mounted router to cut each groove. This creates a curved bottom that allows the cord to nestle into the block. Just be sure the groove is shallow enough to allow the cord to stick up above the mounting block, see Top View. This will allow the wood cover of the cord keeper to exert pressure against it. To produce this pressure, a long slot in the cover fits over a machine screw that's installed in the mounting block. Tightening a knob on the screw holds the cover in place. Before screwing the cord keeper to the wall, I glued a short dowel into a hole in the mounting block to help align the cover. Also, gluing a couple of thin rubber strips to the cover will help improve its grip. (I cut scraps of rubber from an old bicycle inner tube.) David Walls Saint Albans, West Virginia FREE Online Tips If you'd like even more woodworking tips, the solution is simple. Just visit us at our website and sign up to receive a free tip via email every week, www.shopnotes.com Send in Your Shop TipsIf you have a unique shop tip, we'd like to consider featuring it in one or more of our print or electronic publications. We'll pay up to $200 for a tip we publish. Just write down the tip and mail it to ShopNotes, Attn.: Readers' Tips, 2200 Grand Ave., Des Moines, IA 50312. Or FAX it to 515-282-6741, or send us an e-mail at shopnotes@shopnotes.com. Please include your name, address and daytime phone number in case we have any questions. 14" x 2Vz" DOLT plate that attaches to the wall. Before assembling the tool bar, I cut an arc on the outside end of each support block and on both ends of the pivot arm. This removes the sharp corners, and it allows the pivot arm to swing freely without binding. To create a pivot point, I used a bolt that passes through a hole in each support block and the pivot arm. Tightening a lock nut on the end of the bolt so it's just snug holds the arm in place yet still allows it to pivot. Adolph Peschke Des Moines, Iowa #& x 2" Fh WOOD-SCREW / SUPPORT DRILL HOLES IN PIVOT ARM TO FIT TOOLS MOUNTING PLATE (3" x 8") V4" LOCK NUT AND WASHER NOTE: ALL PIECES ARE MADE FROM %"-THICK STOCK PIVOT ARM (3" x 14") EXTENSION( 1 )' ) \ ( RUBBER CORD COVER " 6TRIP TOP VIEW WALL STUD %" x 2" FLATHEAD MACHINE SCREW %"'x 1Yz" DOWEL COVER (6" x 10"-%"-THICK HARDWOOD) MOUNTING WALL STUD MOUNTING BLOCK (&• X 10"-%"-THICK WAt?r>wOOD) RUBBER STRIPS CUT FROM ICYCLE INNER TUBE NOTE: DEPTH OF GROOVE IN MOUNTING BLOCK IS ONE-HALF CORD DIAMETER WASHER 3/a" KNOB GROOVE EXTENSION CORD No. 50 ShopNotes 5 |


