51 - Band Saw Upgrade, страница 14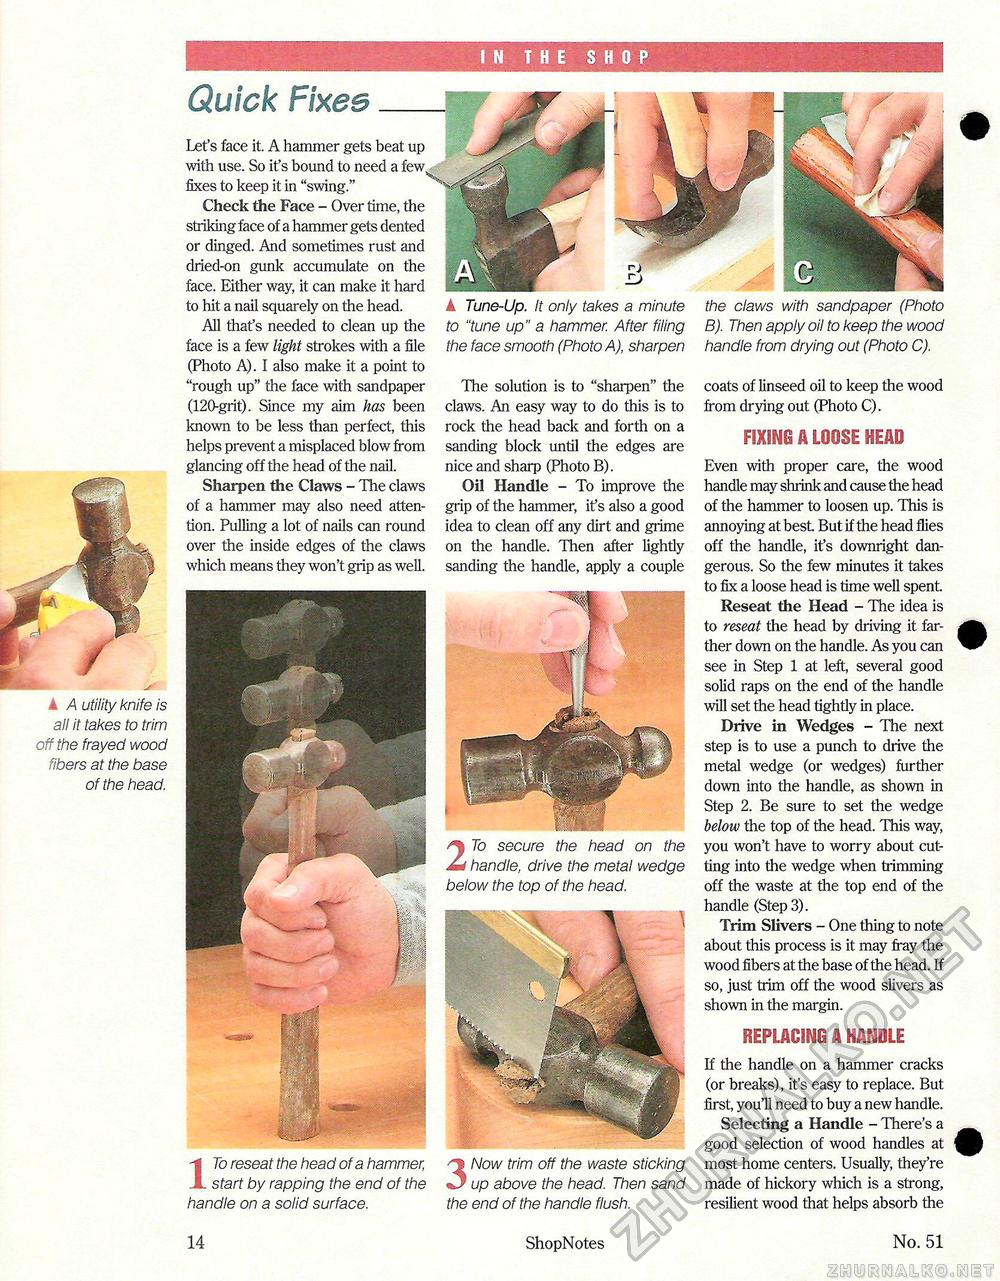
IN THE SHOP Quick Fixes Let's face it. A hammer gets beat up with use. So it's bound to need a fixes to keep it in "swing." Check the Face - Over time, the striking face of a hammer gets dented or dinged. And sometimes rust and dried-on gunk accumulate on the face. Either way, it can make it hard to hit a nail squarely on the head. All that's needed to clean up the face is a few light strokes with a file (Photo A). I also make it a point to "rough up" the face with sandpaper (120-grit). Since my aim has been known to be less than perfect, this helps prevent a misplaced blow from glancing off the head of the nail. Sharpen the Claws - The claws of a hammer may also need attention. Pulling a lot of nails can round over the inside edges of the claws which means they won't grip as well. k Tune-Up. It only takes a minute to "tune up" a hammer. After filing the face smooth (Photo A), sharpen The solution is to "sharpen" the claws. An easy way to do this is to rock the head back and forth on a sanding block until the edges are nice and sharp (Photo B). Oil Handle - To improve the grip of the hammer, ifs also a good idea to clean off any dirt and grime on the handle. Then after lightly sanding the handle, apply a couple the claws with sandpaper (Photo B). Then apply oil to keep the wood handle from drying out (Photo C). coats of linseed oil to keep the wood from drying out (Photo C). FIXING A LOOSE HEAD Even with proper care, the wood handle may shrink and cause the head of the hammer to loosen up. This is annoying at best But if the head flies off the handle, it's downright dangerous. So the few minutes it takes to fix a loose head is time well spent. Reseat the Head - The idea is to reseat the head by driving it farther down on the handle. As you can see in Step 1 at left, several good solid raps on the end of the handle will set the head tightly in place. Drive in Wedges - The next step is to use a punch to drive the metal wedge (or wedges) further down into the handle, as shown in Step 2. Be sure to set the wedge below the top of the head. This way, you won't have to worry about cutting into the wedge when trimming off the waste at the top end of the handle (Step 3). Trim Slivers - One thing to note about this process is it may fray the wood fibers at the base of the head. If so, just trim off the wood slivers as shown in the margin. ITo reseat the head of a hammer, start by rapping the end of the handle on a solid surface. 14 REPLACING A HANDLE If the handle on a hammer cracks (or breaks), it's easy to replace. But first, you'll need to buy a new handle. Selecting a Handle - There's a good selection of wood handles at most home centers. Usually, they're made of hickory which is a strong, resilient wood that helps absorb the No. 51 A utility knife is all it takes to trim off the frayed wood fibers at the base of the head. 3 Now trim off the waste sticking up above the head. Then sand the end of the handle flush. ShopNotes 2 To secure the head on the handle, drive the metal wedge below the top of the head. |


