51 - Band Saw Upgrade, страница 15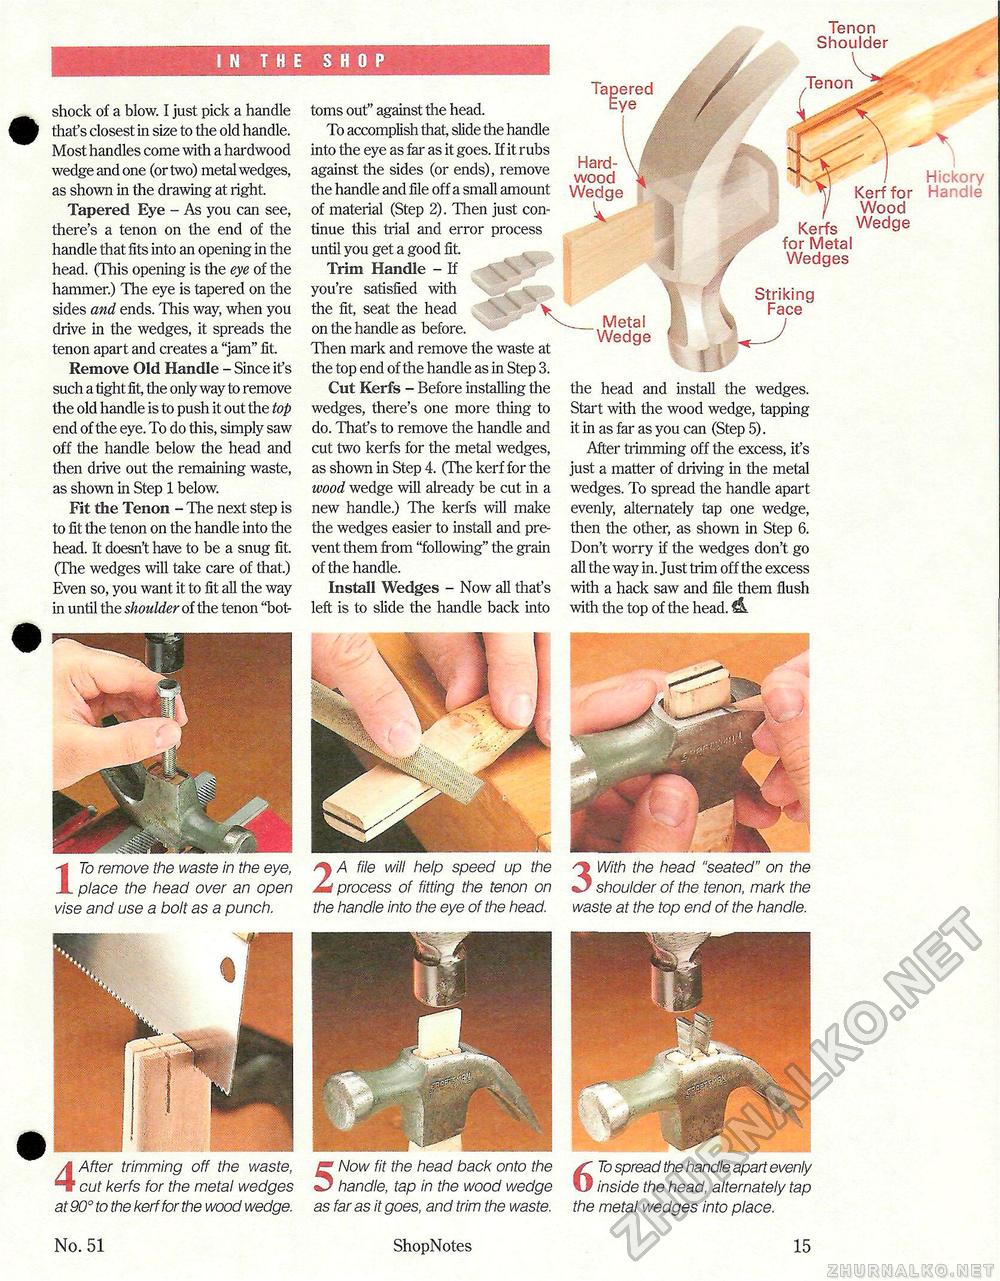
Tenon Shoulder IN THE SHOP shock of a blow. I just pick a handle that's closest in size to the old handle. Most handles come with a hardwood wedge and one (or two) metal wedges, as shown in the drawing at right. Tapered Eye - As you can see, there's a tenon on the end of the handle that fits into an opening in the head. (This opening is the eye of the hammer.) The eye is tapered on the sides and ends. This way, when you drive in the wedges, it spreads the tenon apart and creates a "jam" fit. Remove Old Handle - Since it's such a tight fit, the only way to remove the old handle is to push it out the top end of the eye. To do this, simply saw off the handle below the head and then drive out the remaining waste, as shown in Step 1 below. Fit the Tenon - The next step is to fit the tenon on the handle into the head. It doesn't have to be a snug fit. (The wedges will take care of that.) Even so, you want it to fit all the way in until the shoulder of the tenon "bot toms out" against the head. To accomplish that, slide the handle into the eye as far as it goes. If it rubs against the sides (or ends), remove the handle and file off a small amount of material (Step 2). Then just continue this trial and error process until you get a good fit. Trim Handle - If you're satisfied with the fit, seat the head on the handle as before. Then mark and remove the waste at the top end of the handle as in Step 3. Cut Kerfs - Before installing the wedges, there's one more thing to do. That's to remove the handle and cut two kerfs for the metal wedges, as shown in Step 4. (The kerf for the wood wedge will already be cut in a new handle.) The kerfs will make the wedges easier to install and prevent them from "following" the grain of the handle. Install Wedges - Now all that's left is to slide the handle back into Tapered Eye Hardwood Wedge V Hickory Kerf for Handle Wood Kerfs Wed9e for Metal Wedges Metal Wedge : Striking Face f i the head and install the wedges. Start with the wood wedge, tapping it in as far as you can (Step 5). After trimming off the excess, it's just a matter of driving in the metal wedges. To spread the handle apart evenly, alternately tap one wedge, then the other, as shown in Step 6. Don't worry if the wedges don't go all the way in. Just trim off the excess with a hack saw and file them flush with the top of the head. 4L ITo remove the waste in the eye, place the head over an open vise and use a bolt as a punch. 2 A file will help speed up the process of fitting the tenon on the handle into the eye of the head. 3 With the head "seated" on the shoulder of the tenon, mark the waste at the top end of the handle. 4 After trimming off the waste, cut kerfs for the metal wedges at 90° to the kerf for the wood wedge. 5 Now fit the head back onto the handle, tap in the wood wedge as far as it goes, and trim the waste. 6 To spread the handle apart evenly inside the head, alternately tap the metal wedges into place. No. 51 ShopNotes 15 |


