51 - Band Saw Upgrade, страница 18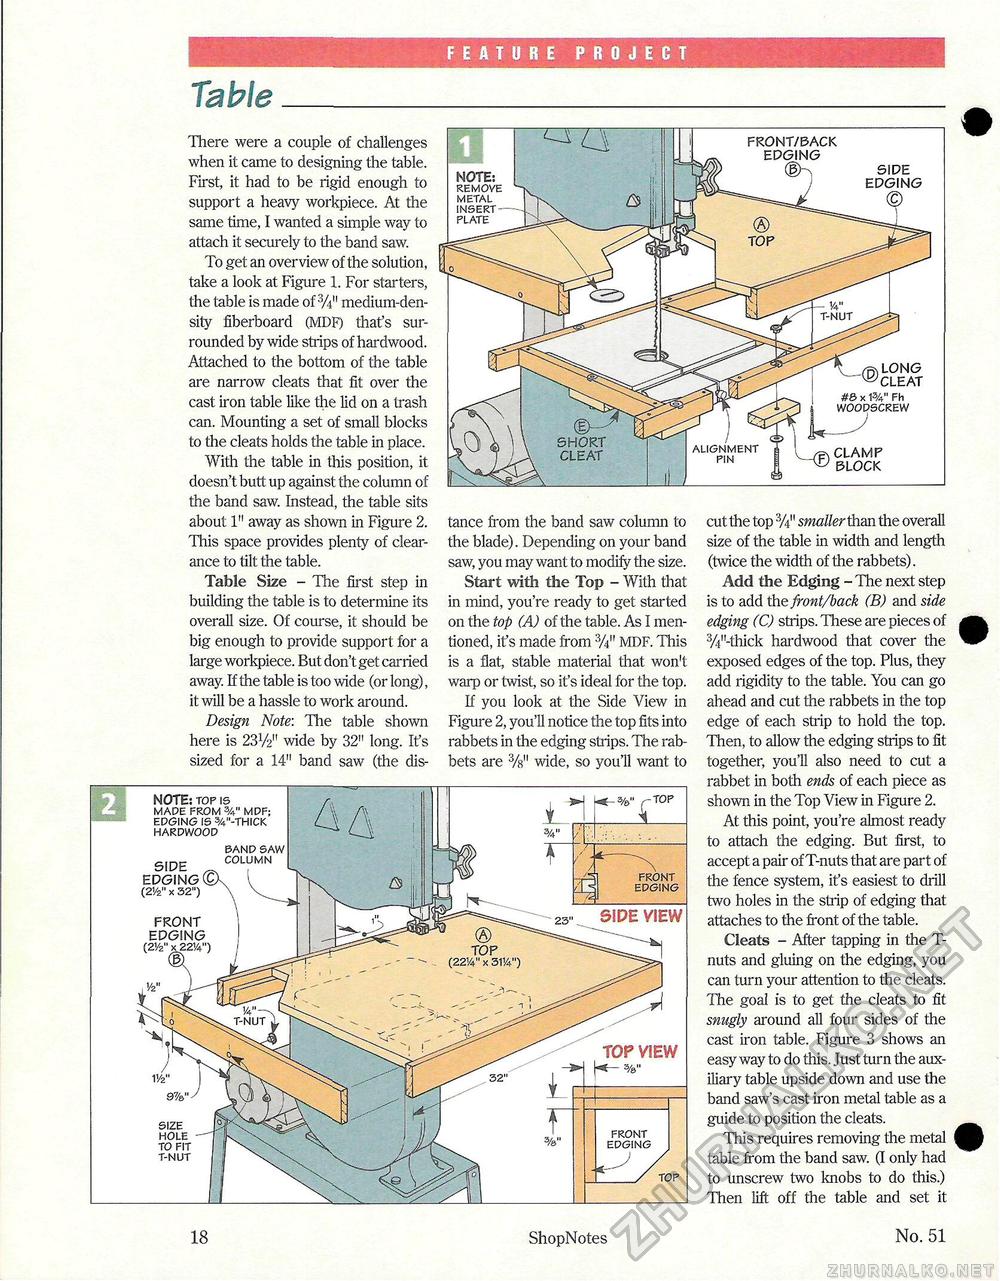
FEATURE PROJECT TableThere were a couple of challenges when it came to designing the table. First, it had to be rigid enough to support a heavy workpiece. At the same time, I wanted a simple way to attach it securely to the band saw. To get an overview of the solution, take a look at Figure 1. For starters, the table is made of 3/4l! medium-density fiberboard (MDF) that's surrounded by wide strips of hardwood. Attached to the bottom of the table are narrow cleats that fit over the cast iron table like the lid on a trash can. Mounting a set of small blocks to the cleats holds the table in place. With the table in this position, it doesn't butt up against the column of the band saw. Instead, the table sits about 1" away as shown in Figure 2. This space provides plenty of clearance to tilt the table. Table Size - The first step in building the table is to determine its overall size. Of course, it should be big enough to provide support for a large workpiece. But don't get carried away. If the table is too wide (or long), it will be a hassle to work around. Design Note: The table shown here is 231/2" wide by 32" long. It's sized for a 14" band saw (the dis tance from the band saw column to the blade). Depending on your band saw, you may want to modify the size. Start with the Top - With that in mind, you're ready to get started on the top (A) of the table. As I mentioned, ifs made from %" MDF. This is a flat, stable material that won't warp or twist, so it's ideal for the top. If you look at the Side View in Figure 2, you'll notice the top fits into rabbets in the edging strips. The rabbets are %" wide, so you'll want to cut the top smaller than the overall size of the table in width and length (twice the width of the rabbets). Add the Edging - The next step is to add the front/back (B) and side edging (C) strips. These are pieces of 3/4"-thick hardwood that cover the exposed edges of the top. Plus, they add rigidity to the table. You can go ahead and cut the rabbets in the top edge of each strip to hold the top. Then, to allow the edging strips to fit together, you'll also need to cut a rabbet in both ends of each piece as shown in the Top View in Figure 2. At this point, you're almost ready to attach the edging. But first, to accept a pair of T-nuts that are part of the fence system, it's easiest to drill two holes in the strip of edging that attaches to the front of the table. Cleats - After tapping in the T-nuts and gluing on the edging, you can turn your attention to the cleats. The goal is to get the cleats to fit snugly around all four sides of the cast iron table. Figure 3 shows an easy way to do this. Just turn the auxiliary table upside down and use the band saw's cast iron metal table as a guide to position the cleats. This requires removing the metal table from the band saw. (I only had to unscrew two knobs to do this.) Then lift off the table and set it NOTE: top is made from %" mdf; edging is 5/4n-thick hardwood SIDE EDGING (C (21/2" x 32") FRONT EDGING (2V2" band saw column SIDE VIEW VIEW size hole to fit t-nut edging 18 ShopNotes No. 51 |


