51 - Band Saw Upgrade, страница 20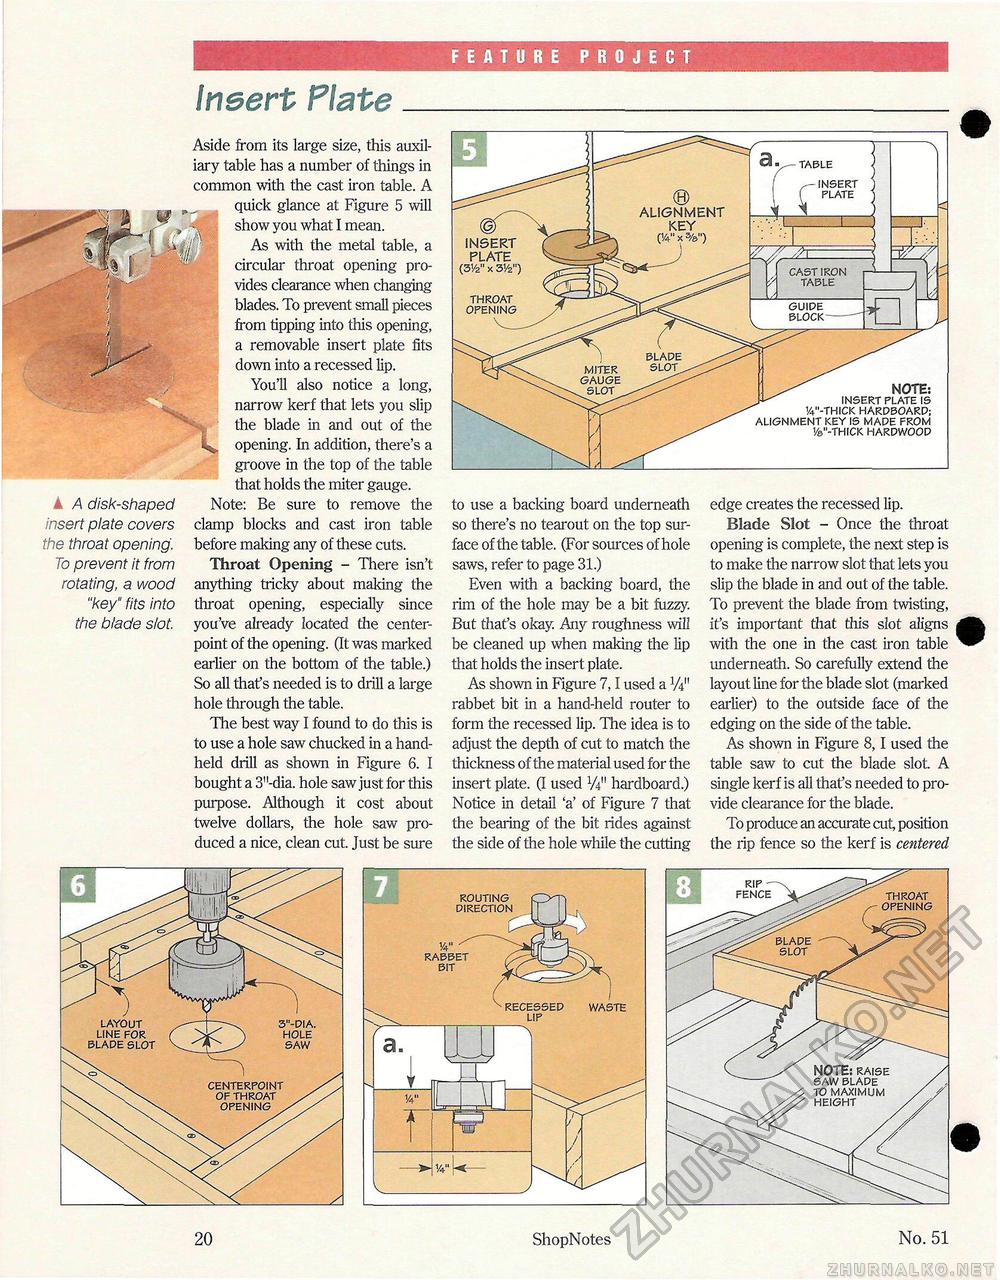
FEATURE PROJECT Insert Plate _Aside from its large size, this auxiliary table has a number of things in common with the cast iron table. A quick glance at Figure 5 will show you what I mean. As with the metal table, a circular throat opening provides clearance when changing blades. To prevent small pieces from tipping into this opening, a removable insert plate fits down into a recessed lip. You'll also notice a long, narrow kerf that lets you slip the blade in and out of the opening. In addition, there's a groove in the top of the table that holds the miter gauge. ▲ A disk-shaped Note: Be sure to remove the insert plate covers clamp blocks and cast iron table the throat opening, before making any of these cuts. To prevent it from Throat Opening - There isn't rotating, a wood anything tricky about making the "key" fits into throat opening, especially since the blade slot, you've already located the center-point of the opening. (It was marked earlier on the bottom of the table.) So all that's needed is to drill a large hole through the table. The best way I found to do this is to use a hole saw chucked in a handheld drill as shown in Figure 6. I bought a 3"-dia. hole saw just for this purpose. Although it cost about twelve dollars, the hole saw produced a nice, clean cut. Just be sure to use a backing board underneath so there's no tearout on the top surface of the table. (For sources of hole saws, refer to page 31.) Even with a backing board, the rim of the hole may be a bit fuzzy. But that's okay. Any roughness will be cleaned up when making the lip that holds the insert plate. As shown in Figure 7,1 used a W rabbet bit in a hand-held router to form the recessed lip. The idea is to adjust the depth of cut to match the thickness of the material used for the insert plate. (I used W1 hardboard.) Notice in detail 'a' of Figure 7 that the bearing of the bit rides against the side of the hole while the cutting edge creates the recessed lip. Blade Slot - Once the throat opening is complete, the next step is to make the narrow slot that lets you slip the blade in and out of the table. To prevent the blade from twisting, it's important that this slot aligns with the one in the cast iron table underneath. So carefully extend the layout line for the blade slot (marked earlier) to the outside face of the edging on the side of the table. As shown in Figure 8,1 used the table saw to cut the blade slot. A single kerf is all that's needed to provide clearance for the blade. To produce an accurate cut, position the rip fence so the kerf is centered ALIGNMENT KEY (V x %") blade slot miter GAUGE slot ALIGNMENT KEY (V x %")
NOTE: insert plate is v4"-thick hardboard; alignment key is made from '/©"-thick hardwood © iNSERT PLATE (31/2" x 3Vz") throat opening throat opening routing direction blade slot recessed waste lip layout line for blade slot 3"-dia. hole saw NOTE: raise saw blade to maximum height centerpoint of throat opening . 20 ShopNotes No. 51 |
|||||||||||||||||||||||||||||||||


