51 - Band Saw Upgrade, страница 23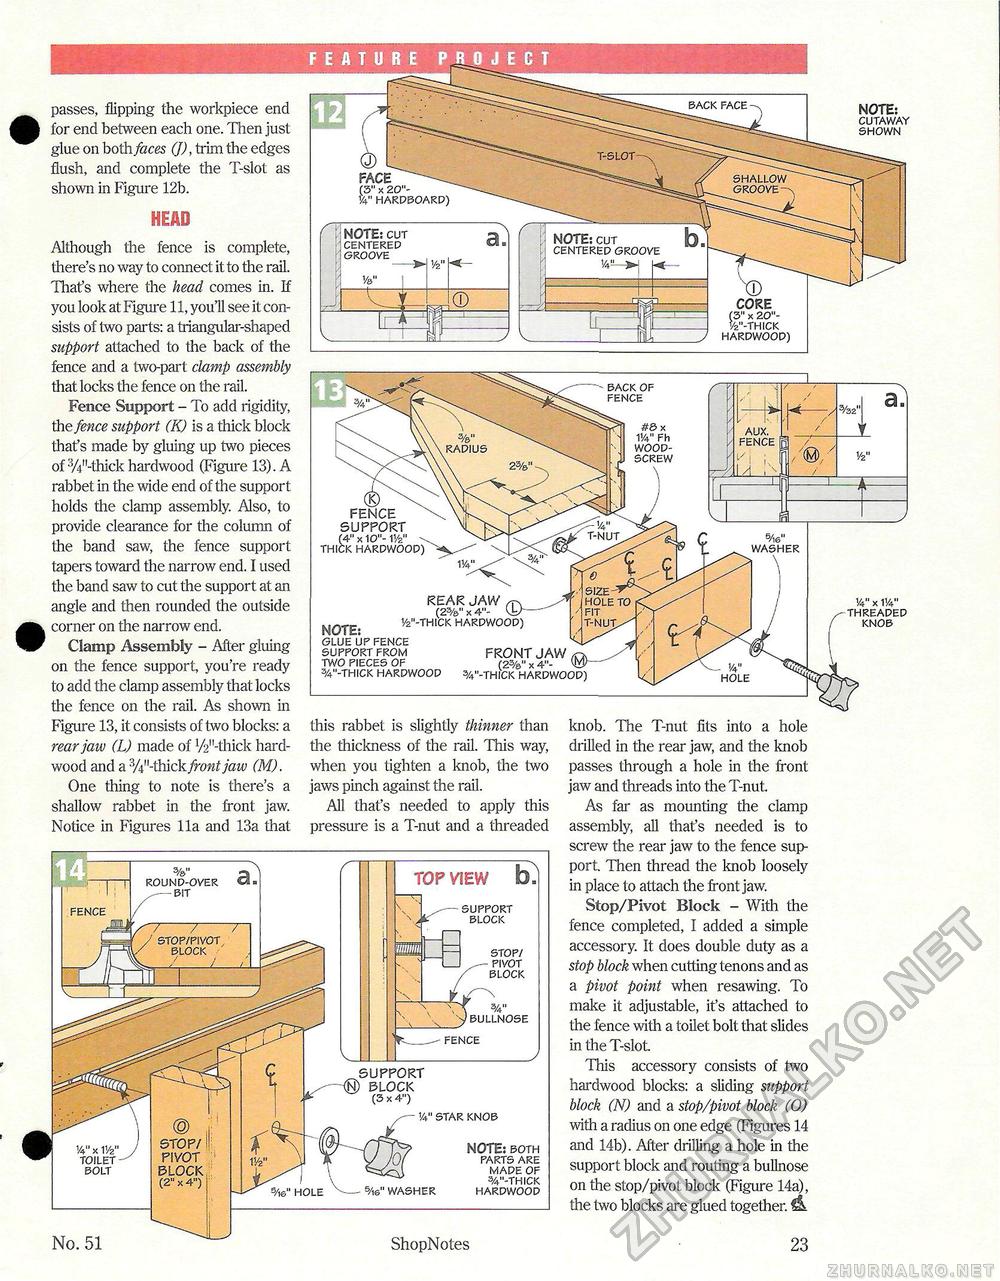
passes, flipping the workpiece end for end between each one. Then just glue on both faces (J), trim the edges flush, and complete the T-slot as shown in Figure 12b. HEAD Although the fence is complete, there's no way to connect it to the rail. That's where the head comes in. If you look at Figure 11, you'll see it consists of two parts: a triangular-shaped support attached to the back of the fence and a two-part clamp assembly that locks the fence on the rail. Fence Support - To add rigidity, the fence support (K) is a thick block that's made by gluing up two pieces of %"~thick hardwood (Figure 13). A rabbet in the wide end of the support holds the clamp assembly. Also, to provide clearance for the column of the band saw, the fence support tapers toward the narrow end. I used the band saw to cut the support at an angle and then rounded the outside corner on the narrow end. Clamp Assembly - After gluing on the fence support, you're ready to add the clamp assembly that locks the fence on the rail. As shown in Figure 13, it consists of two blocks: a rear jaw (L) made of W-thick hardwood and a %"-thick front jaw (M). One thing to note is there's a shallow rabbet in the front jaw. Notice in Figures 11a and 13a that this rabbet is slightly thinner than the thickness of the rail. This way, when you tighten a knob, the two jaws pinch against the rail. All that's needed to apply this pressure is a T-nut and a threaded knob. The T-nut fits into a hole drilled in the rear jaw, and the knob passes through a hole in the front jaw and threads into the T-nut. As far as mounting the clamp assembly, all that's needed is to screw the rear jaw to the fence support. Then thread the knob loosely in place to attach the front jaw. Stop/Pivot Block - With the fence completed, I added a simple accessory. It does double duty as a stop block when cutting tenons and as a pivot point when resawing. To make it adjustable, it's attached to the fence with a toilet bolt that slides in the T-slot. This accessory consists of two hardwood blocks: a sliding support block (N) and a stop/pivot block (0) with a radius on one edge (Figures 14 and 14b). After drilling a hole in the support block and routing a bullnose on the stop/pivot block (Figure 14a), the two blocks are glued together. ^L 23 FACE (3" x 20"-V4" HARDBOARD) NOTE: CUT 'CENTERED i GROOVE NOTE: CUTAWAY SHOWN NOTE: CUT CENTERED GROOVE (3" x 20"-y2"-THlCK HARDWOOD) 14" x 114" THREADED KNOB 5/l6" WASHER BACK OF FENCE #3x 114" Fh WOOD-SCREW SUPPORT (4" x 10"- 11/z" THICK HARDWOOD) REAR JAW (2%" x 4"-NOTE* 1/2"-THICK HARDWOOD) GLUE UP FENCE SUPPORTFROM FRONT JAW TWO PIECES OF (23/a" x 4"- %"-THICK HARDWOOD 3/4"-THICK HARDWOOD) TOP VIEW b. SUPPORT BLOCK STOP/ PIVOT BLOCK B BULLNOSE V__FENCE %" 3) ROUND-OVER Ct FENCE 14" x TOILET BOLT No. 51 BLOCK (2" x 4") ShopNotes SUPPORT <N) BLOCK (3 x 4") 14" STAR KNOB 5/i6" WASHER NOTE: BOTH PARTS ARE MADE OF %"-THICK HARDWOOD |


