51 - Band Saw Upgrade, страница 25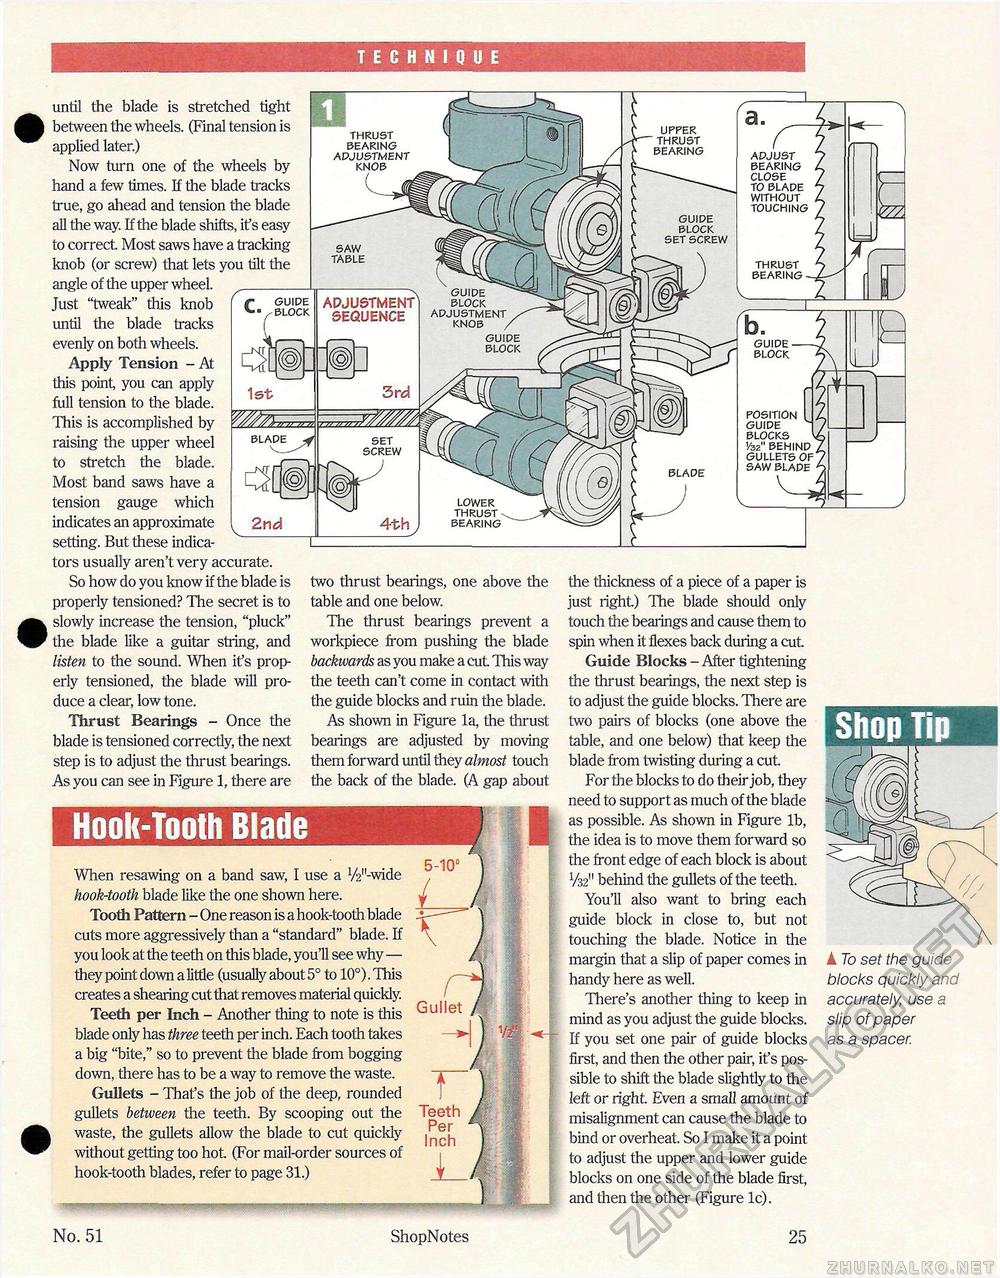
TECHNIQUE UPPER THRUST BEARING THRUST BEARING ADJUSTMENT KNOB ADJUST BEARING CLOSE TO BLADE WITHOUT TOUCHING GUIDE BLOCK SET SCREW SAW TABLE THRUST BEARING GUIDE ^ BLOCK ADJUSTMENT / KNOB / GUIDE BLOCK ADJUSTMENT SEQUENCE GUIDE BLOCK POSITION GUIDE BLOCKS 1/32" BEHIND GULLETS OF SAW BLADE BLADE LOWER THRUST-BEARING tors usually aren't very accurate. So how do you know if the blade is properly tensioned? Hie secret is to slowly increase the tension, "pluck" the blade like a guitar string, and listen to the sound. When it's properly tensioned, the blade will produce a clear, low tone. Thrust Bearings - Once the blade is tensioned correctly, the next step is to adjust the thrust bearings. As you can see in Figure 1, there are two thrust bearings, one above the table and one below. The thrust bearings prevent a workpiece from pushing the blade backwards as you make a cut. This way the teeth can't come in contact with the guide blocks and ruin the blade. As shown in Figure la, the thrust bearings are adjusted by moving them forward until they almost touch the back of the blade. (A gap about the thickness of a piece of a paper is just right) The blade should only touch the bearings and cause them to spin when it flexes back during a cut. Guide Blocks - After tightening the thrust bearings, the next step is to adjust the guide blocks. There are two pairs of blocks (one above the table, and one below) that keep the blade from twisting during a cut. For the blocks to do their job, they need to support as much of the blade as possible. As shown in Figure lb, the idea is to move them forward so the front edge of each block is about V32" behind the gullets of the teeth. You'll also want to bring each guide block in close to, but not touching the blade. Notice in the margin that a slip of paper comes in handy here as well. There's another thing to keep in mind as you adjust the guide blocks. If you set one pair of guide blocks first, and then the other pair, it's possible to shift the blade slightly to the left or right Even a small amount of misalignment can cause the blade to bind or overheat. So I make it a point to adjust the upper and lower guide blocks on one side of the blade first, and then the other (Figure lc). Shop Tip Hook-Tooth Blade When resawing on a band saw, I use a V^'-wide hook-tooth blade like the one shown here. Tooth Pattern - One reason is a hook-tooth blade cuts more aggressively than a "standard" blade. If you look at the teeth on this blade, you'll see why— they point down a little (usually about 5° to 10°). This creates a shearing cut that removes material quickly. Teeth per Inch - Another thing to note is this blade only has three teeth per inch. Each tooth takes a big "bite," so to prevent the blade from bogging down, there has to be a way to remove the waste. Gullets - That's the job of the deep, rounded gullets between the teeth. By scooping out the waste, the gullets allow the blade to cut quickly without getting too hot. (For mail-order sources of hook-tooth blades, refer to page 31.) A To set the guide blocks quickly and accurately, use a slip of paper as a spacer. No. 51 ShopNotes 25 |


