51 - Band Saw Upgrade, страница 22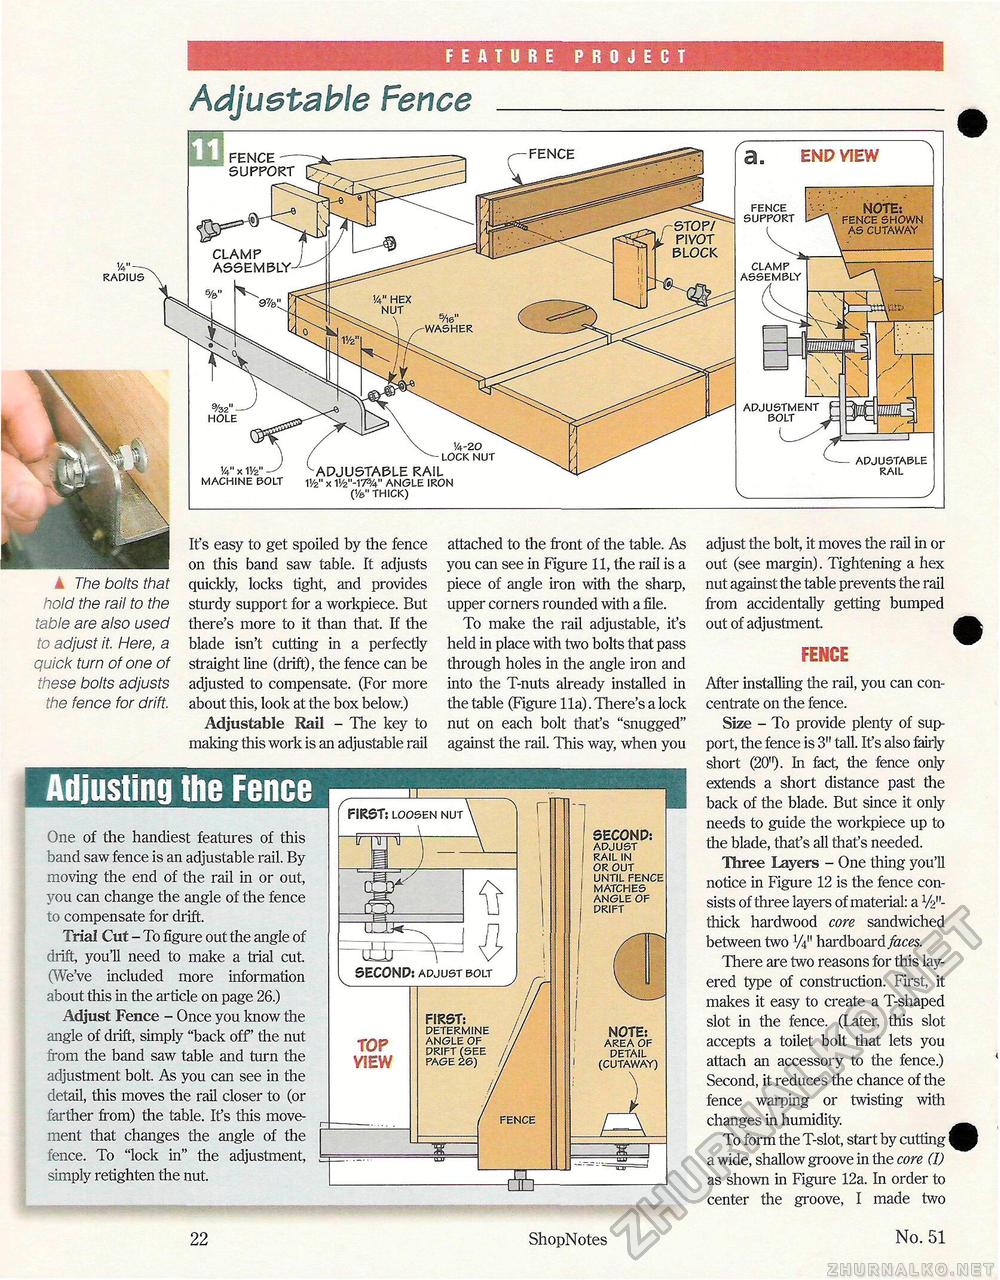
FEATURE PROJECT Adjustable Fence RADIUS 14-20 LOCK NUT 14"X11/2" ^ADJUSTABLE RAIL MACHINE BOLT V/2" x W'-IT3// ANGLE IRON (1/6" THICK) END VIEW A fence vv • NOTE: support fence shown as cutaway ADJUSTABLE RAIL ▲ The bolts that hold the rail to the table are also used to adjust it. Here, a quick turn of one of these bolts adjusts the fence for drift. It's easy to get spoiled by the fence on this band saw table. It adjusts quickly, locks tight, and provides sturdy support for a workpiece. But there's more to it than that. If the blade isn't cutting in a perfectly straight line (drift), the fence can be adjusted to compensate. (For more about this, look at the box below.) Adjustable Rail - The key to making this work is an adjustable rail attached to the front of the table. As you can see in Figure 11, the rail is a piece of angle iron with the sharp, upper corners rounded with a file. To make the rail adjustable, it's held in place with two bolts that pass through holes in the angle iron and into the T-nuts already installed in the table (Figure 11a). There's a lock nut on each bolt that's "snugged" against the rail. This way when you Adjusting the FenceOne of the handiest features of this band saw fence is an adjustable rail. By moving the end of the rail in or out, you can change the angle of the fence to compensate for drift. Trial Cut - To figure out the angle of drift, you'll need to make a trial cut. (We've included more information about this in the article on page 26.) Adjust Fence - Once you know the angle of drift, simply "back off' the nut from the band saw table and turn the adjustment bolt. As you can see in the detail, this moves the rail closer to (or farther from) the table. It's this movement that changes the angle of the fence. To "lock in" the adjustment, simply retighten the nut. adjust the bolt, it moves the rail in or out (see margin). Tightening a hex nut against the table prevents the rail from accidentally getting bumped out of adjustment. FENCE After installing the rail, you can concentrate on the fence. Size - To provide plenty of support, the fence is 3" tall. It's also fairly short (20"). In fact, the fence only extends a short distance past the back of the blade. But since it only needs to guide the workpiece up to the blade, that's all that's needed. Three Layers - One thing you'll notice in Figure 12 is the fence consists of three layers of material: a Va"-thick hardwood core sandwiched between two W hardboard faces. There are two reasons for this layered type of construction. First, it makes it easy to create a T-shaped slot in the fence. (Later, this slot accepts a toilet bolt that lets you attach an accessory to the fence.) Second, it reduces the chance of the fence warping or twisting with changes in humidity. To form the T-slot, start by cutting I a wide, shallow groove in the core (I) as shown in Figure 12a. In order to center the groove, I made two 22 ShopNotes No. 51 |


