51 - Band Saw Upgrade, страница 26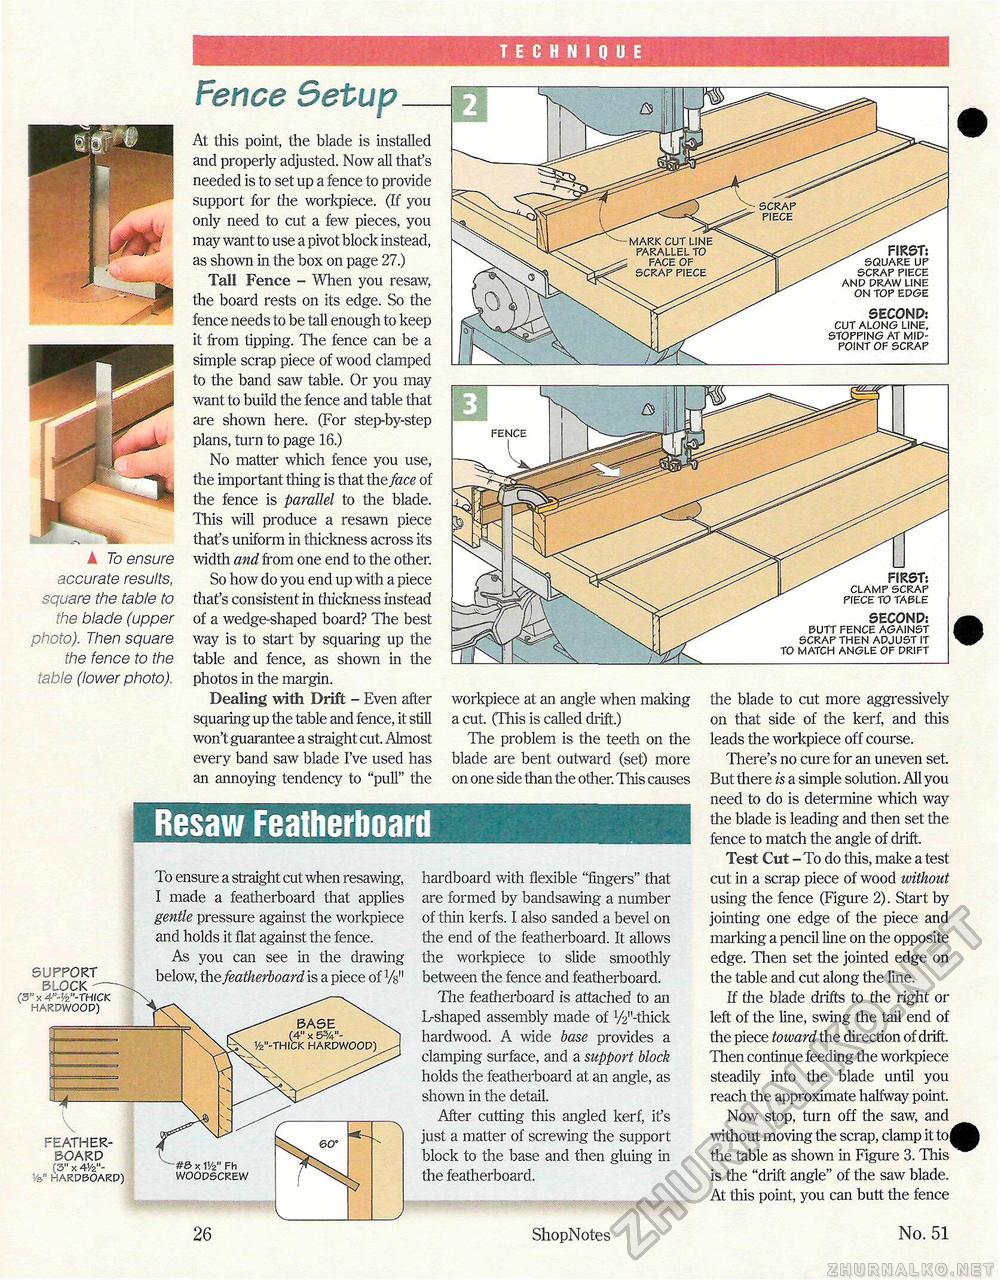
TECHNIQUE ▲ To ensure accurate results, square the table to the blade (upper photo). Then square the fence to the table (lower photo). Fence SetupAt this point, the blade is installed and properly adjusted. Now all that's needed is to set up a fence to provide support for the workpiece. (If you only need to cut a few pieces, you may want to use a pivot block instead, as shown in the box on page 27.) Tall Fence - When you resaw, the board rests on its edge. So the fence needs to be tall enough to keep it from tipping. The fence can be a simple scrap piece of wood clamped to the band saw table. Or you may want to build the fence and table that are shown here. (For step-by-step plans, turn to page 16.) No matter which fence you use, the important thing is that the face of the fence is parallel to the blade. This will produce a resawn piece that's uniform in thickness across its width and from one end to the other. So how do you end up with a piece that's consistent in thickness instead of a wedge-shaped board? The best way is to start by squaring up the table and fence, as shown in the photos in the margin. Dealing with Drift - Even after squaring up the table and fence, it still won't guarantee a straight cut. Almost every band saw blade I've used has an annoying tendency to "pull" the FIRST: SQUARE UP SCRAP PIECE AND DRAW LINE ON TOP EDGE SECOND: CUT ALONG LINE, STOPPING AT MIDPOINT OF SCRAP workpiece at an angle when making a cut. (This is called drift.) The problem is the teeth on the blade are bent outward (set) more on one side than the other. This causes the blade to cut more aggressively on that side of the kerf, and this leads the workpiece off course. There's no cure for an uneven set. But there is a simple solution. All you need to do is determine which way the blade is leading and then set the fence to match the angle of drift. Test Cut - To do this, make a test cut in a scrap piece of wood without using the fence (Figure 2). Start by jointing one edge of the piece and marking a pencil line on the opposite edge. Then set the jointed edge on the table and cut along the line. If the blade drifts to the light or left, of the line, swing the tail end of the piece toward the direction of drift. Then continue feeding the workpiece steadily into the blade until you reach the approximate halfway point. Now stop, turn off the saw, and without moving the scrap, clamp it to| the table as shown in Figure 3. This is the "drift angle" of the saw blade. At this point, you can butt the fence FIRST: CLAMP SCRAP PIECE TO TABLE SECOND: BUTT FENCE AGAINST SCRAP THEN ADJUST IT TO MATCH ANGLE OF DRIFT Resaw Featherboardhardboard with flexible "fingers" that are formed by bandsawing a number of thin kerfs. I also sanded a bevel on the end of the featherboard. It allows the workpiece to slide smoothly between the fence and featherboard. The featherboard is attached to an L-shaped assembly made of V^'-thick hardwood. A wide base provides a clamping surface, and a support block holds the featherboard at an angle, as shown in the detail. After cutting this angled kerf, it's just a matter of screwing the support block to the base and then gluing in the featherboard. w (MOT % " ' t» y SUPPORT BLOCK (3" x 4"-'/z"-THICK HARDWOOD) To ensure a straight cut when resawing, I made a featherboard that applies gentle pressure against the workpiece and holds it flat against the fence. As you can see in the drawing below, the featherboard is a piece of Vs" FEATHERBOARD (3" x 41/2"-V&" HARDBOARD) * 1/2 WOODSCREW 26 ShopNotes No. 51 |


