51 - Band Saw Upgrade, страница 29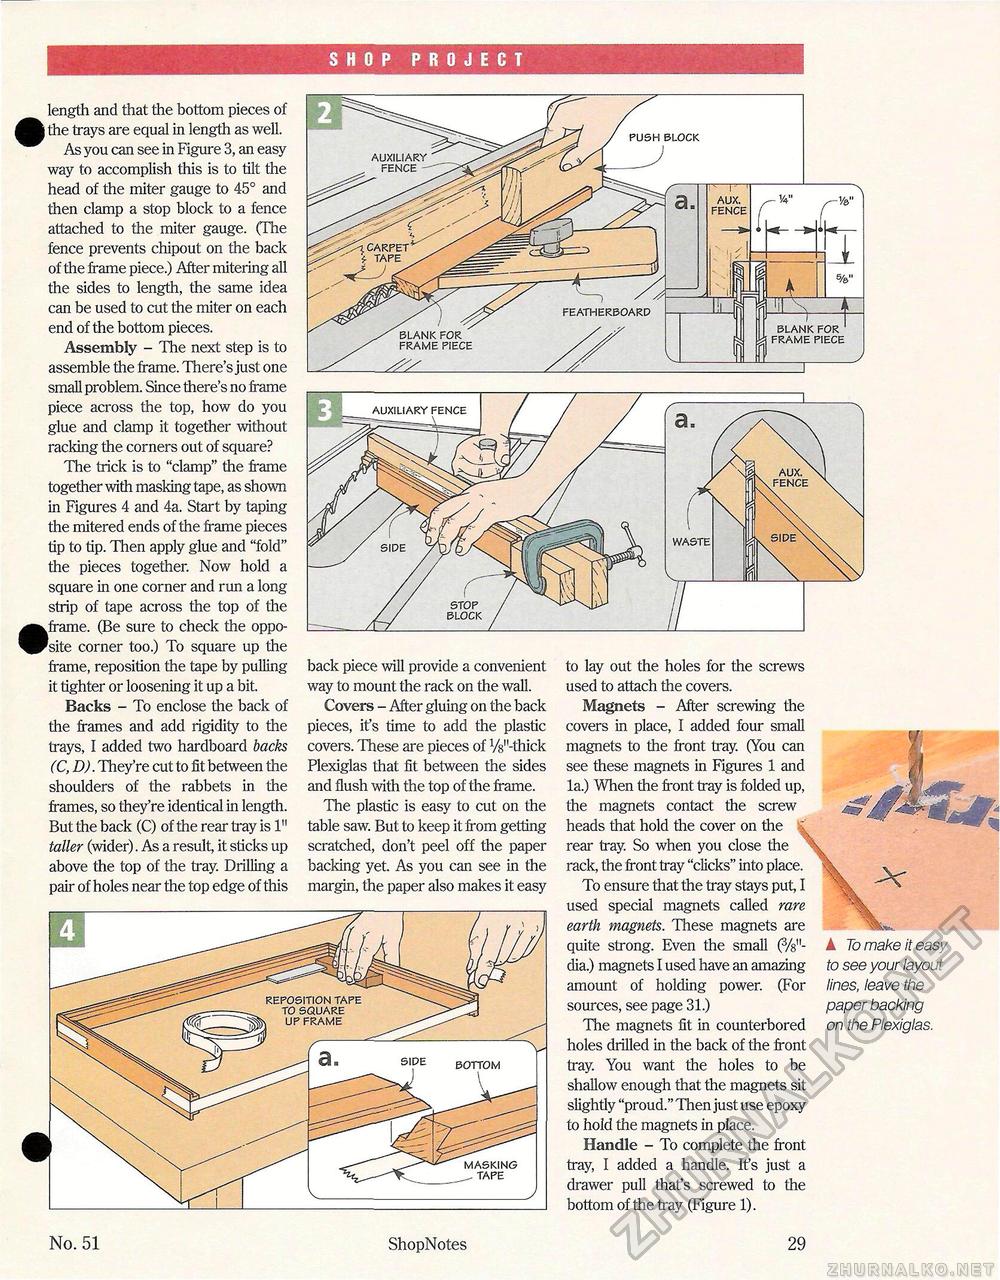
SHOP PROJECT length and that the bottom pieces of j the trays are equal in length as well. As you can see in Figure 3, an easy way to accomplish this is to tilt the head of the miter gauge to 45° and then clamp a stop block to a fence attached to the miter gauge. (The fence prevents chipout on the back of the frame piece.) After mitering all the sides to length, the same idea can be used to cut the miter on each end of the bottom pieces. Assembly - The next step is to assemble the frame. There's just one small problem. Since there's no frame piece across the top, how do you glue and clamp it together without racking the corners out of square? The trick is to "clamp" the frame together with masking tape, as shown in Figures 4 and 4a. Start by taping the mitered ends of the frame pieces tip to tip. Then apply glue and "fold" the pieces together. Now hold a square in one corner and run a long strip of tape across the top of the .frame. (Be sure to check the opposite corner too.) To square up the frame, reposition the tape by pulling it tighter or loosening it up a bit. Backs - To enclose the back of the frames and add rigidity to the trays, I added two hardboard backs (C, D). They're cut to fit between the shoulders of the rabbets in the frames, so they're identical in length. But the back (C) of the rear tray is 1" taller (wider). As a result, it sticks up above the top of the tray. Drilling a pair of holes near the top edge of this back piece will provide a convenient way to mount the rack on the wall. Covers - After gluing on the back pieces, it's time to add the plastic covers. These are pieces of V^'-thick Plexiglas that fit between the sides and flush with the top of the frame. The plastic is easy to cut on the table saw. But to keep it from getting scratched, don't peel off the paper backing yet. As you can see in the margin, the paper also makes it easy to lay out the holes for the screws used to attach the covers. Magnets - After screwing the covers in place, I added four small magnets to the front tray. (You can see these magnets in Figures 1 and la.) When the front tray is folded up, the magnets contact the screw heads that hold the cover on the rear tray. So when you close the rack, the front tray "clicks" into place To ensure that the tray stays put, I used special magnets called rare earth magnets. These magnets are quite strong. Even the small (Vs11-dia.) magnets I used have an amazing amount of holding power. (For sources, see page 31.) The magnets fit in counterbored holes drilled in the back of the front tray. You want the holes to be shallow enough that the magnets sit slightly "proud." Then just use epoxy to hold the magnets in place. Handle - To complete the front tray, I added a handle. It's just a drawer pull that's screwed to the bottom of the tray (Figure 1). ▲ To make it easy to see your layout lines, leave the paper backing on the Plexiglas. No. 51 ShopNotes 29 AUXILIARY FFKirF BLOCK FRAME PIECE ._J WASTE SIDE BOTTOM MASKING TAPE _J |


