51 - Band Saw Upgrade, страница 30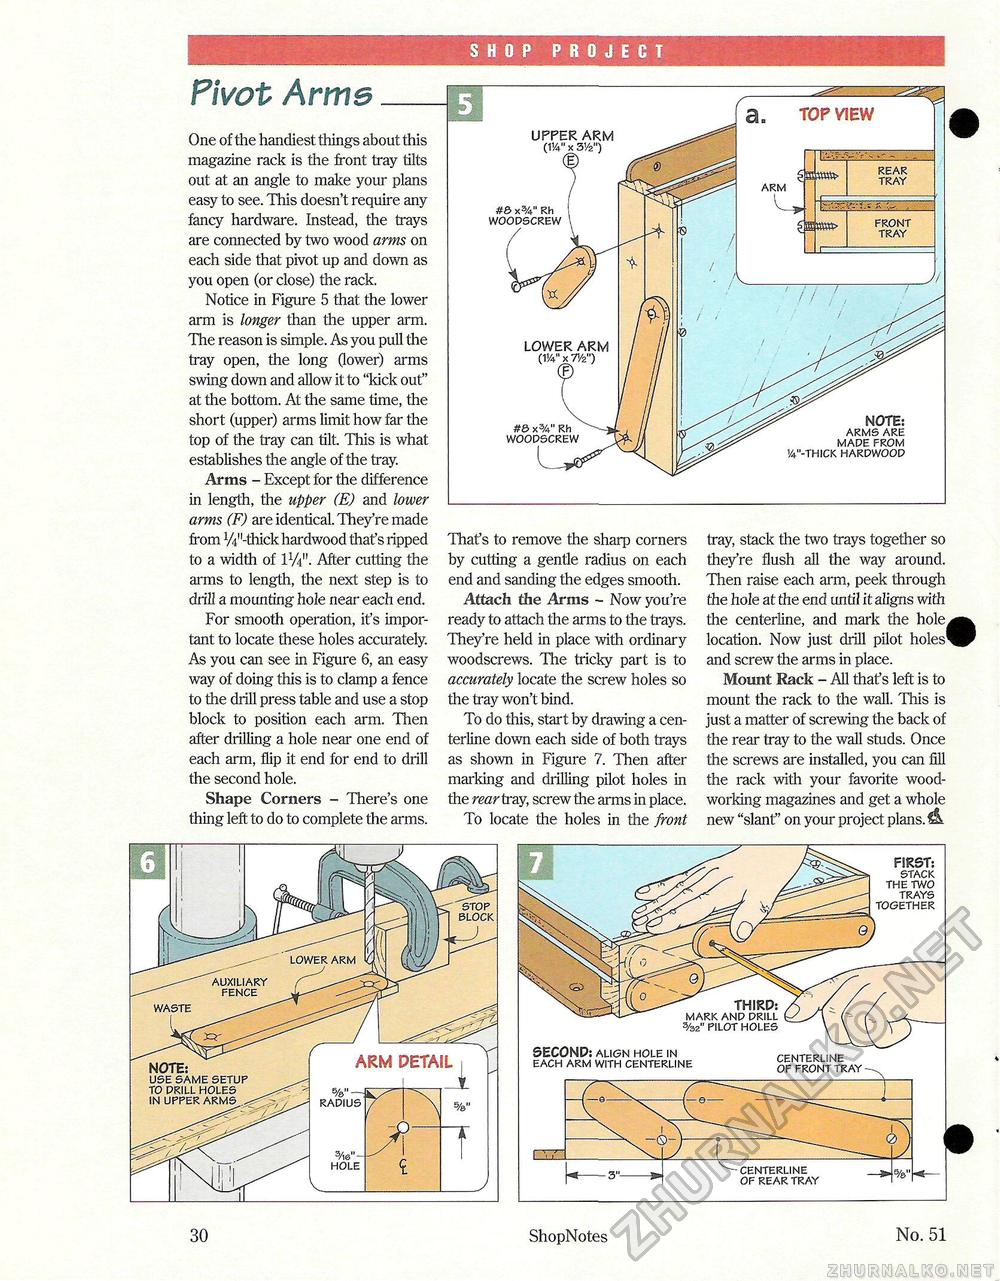
SHOP PROJECT Pivot Arms One of the handiest things about this magazine rack is the front tray tilts out at an angle to make your plans easy to see. This doesn't require any fancy hardware. Instead, the trays are connected by two wood arms on each side that pivot up and down as you open (or close) the rack. Notice in Figure 5 that the lower arm is longer than the upper arm. The reason is simple. As you pull the tray open, the long (lower) arms swing down and allow it to "kick out" at the bottom. At the same time, the short (upper) arms limit how far the top of the tray can tilt. This is what establishes the angle of the tray. Arms - Except for the difference in length, the upper (E) and lower arms (F) are identical. They're made from V41'-thick hardwood that's ripped to a width of IV4". After cutting the arms to length, the next step is to drill a mounting hole near each end. For smooth operation, it's important to locate these holes accurately. As you can see in Figure 6, an easy way of doing this is to clamp a fence to the drill press table and use a stop block to position each arm. Then after drilling a hole near one end of each arm, flip it end for end to drill the second hole. Shape Corners - There's one thing left to do to complete the arms. UPPER ARM (154" x 31/2") d #& x3/4" Rh WOODSCREW NOTE: ARMS ARE MADE FROM Va"-THICK HARDWOOD Thafs to remove the sharp corners by cutting a gentle radius on each end and sanding the edges smooth. Attach the Arms - Now you're ready to attach the arms to the trays. They're held in place with ordinary woodscrews. The tricky part is to accurately locate the screw holes so the tray won't bind. To do this, start by drawing a cen-terline down each side of both trays as shown in Figure 7. Then after marking and drilling pilot holes in the rear tray, screw the arms in place. To locate the holes in the front tray, stack the two trays together so they're flush all the way around. Then raise each arm, peek through the hole at the end until it aligns with the centerline, and mark the hole, location. Now just drill pilot holes' and screw the arms in place. Mount Rack - All that's left is to mount the rack to the wall. This is just a matter of screwing the back of the rear tray to the wall studs. Once the screws are installed, you can fill the rack with your favorite woodworking magazines and get a whole new "slant" on your project plans. NOTE: USE SAME SETUP TO DRILL HOLES IN UPPER ARMS
30 ShopNotes No. 51 |


