83, страница 14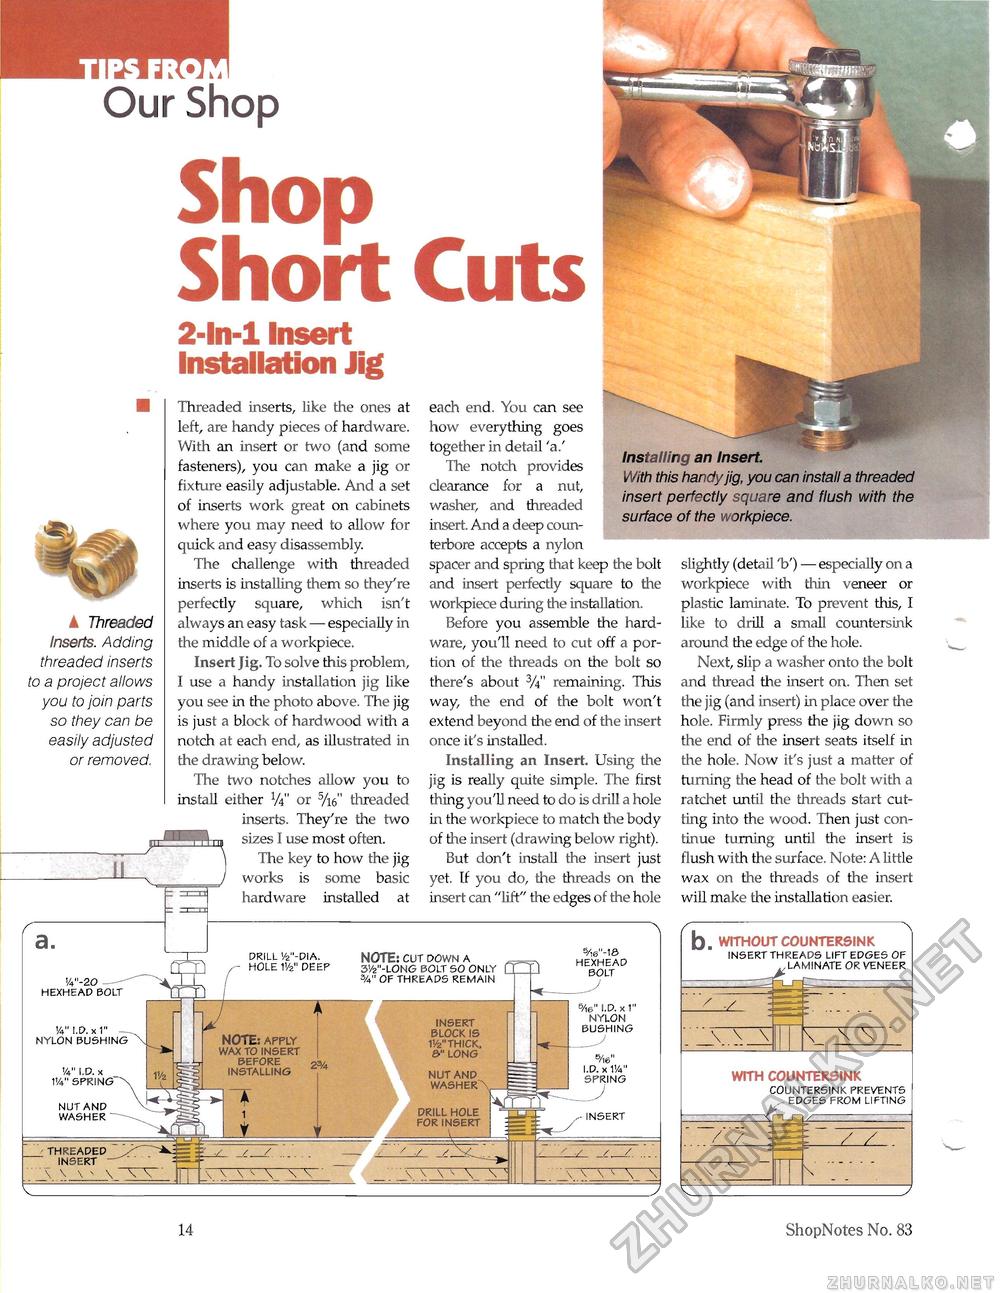
Our Shop ShopShort Cuts2-ln-l Insert Installation Jig s/t6" I.D. x 1" nylon bushing insert block is 1vfe"thick, 6" long nut and WASHER^ S/W' I.D. x VA" spring spring" drill hole for insert ▲ Threaded Inserts. Adding threaded inserts to a project allows you to join parts so they can be easily adjusted or removed. Threaded inserts, like the ones at left, are handy pieces of hardware. With an insert or two (and some fasteners), you can make a jig or fixture easily adjustable. And a set of inserts work great on cabinets where you may need to allow for quick and easy disassembly. The challenge with threaded inserts is installing them so they're perfectly square, which isn't always an easy task — especially in the middle of a workpiece. Insert Jig. To solve this problem, I use a handy installation jig like you see in the photo above. The jig is just a block of hardwood with a notch at each end, as illustrated in the drawing below. The two notches allow you to install either l/t" or 5/\fj' threaded inserts. They're the two sizes I use most often. The key to how the jig works is some basic hardware installed at each end. You can see how everything goes together in detail 'a.' The notch provides clearance for a nut, washer, and threaded insert. And a deep coun-terbore accepts a nylon spacer and spring that keep the bolt and insert perfectly square to the workpiece during the installation. Before you assemble the hardware, you'll need to cut off a portion of the threads on the bolt so there's about %" remaining. This way, the end of the bolt won't extend beyond the end of the insert once it's installed. Installing an Insert. Using the jig is really quite simple. The first thing you'll need to do is drill a hole in the workpiece to match the body of the insert (drawing below right). But don't install the insert just yet. If you do, the threads on the insert can "lift" the edges of the hole Installing an Insert. With this handy jig, you can install a threaded insert perfectly square and flush with the surface of the workpiece. slightly (detail V) — especially on a workpiece with thin veneer or plastic laminate. To prevent this, I like to drill a small coLintersink around the edge of the hole. Next, slip a washer onto the bolt and thread the insert on. Then set the jig (and insert) in place over the hole. Firmly press the jig down so the end of the insert seats itself in the hole. Now it's just a matter of turning the head of the bolt with a ratchet until the threads start cutting into the wood. Then just continue turning until the insert is flush with the surface. Note: A little wax on the threads of the insert will make the installation easier. '/4"-20 hexhead b v4"i.d. x1" — nylon bushing x nut and washer drill vfe"-dia. - hole IV2" deep NOTE: apply wax to insert before installing threaded insert__ \ \ \ \ NOTE: cut down a 3v2"-long bolt so only 3/4" of threads remain 5/,s"-ie hexhead bolt - insert b. WITHOUT COUNTERSINK insert threads lift edges of laminate or veneer WITH COUNTERSINK countersink prevents ^^^edges from lifting / / / \ 14 ShopNotes No. 83 |


