83, страница 25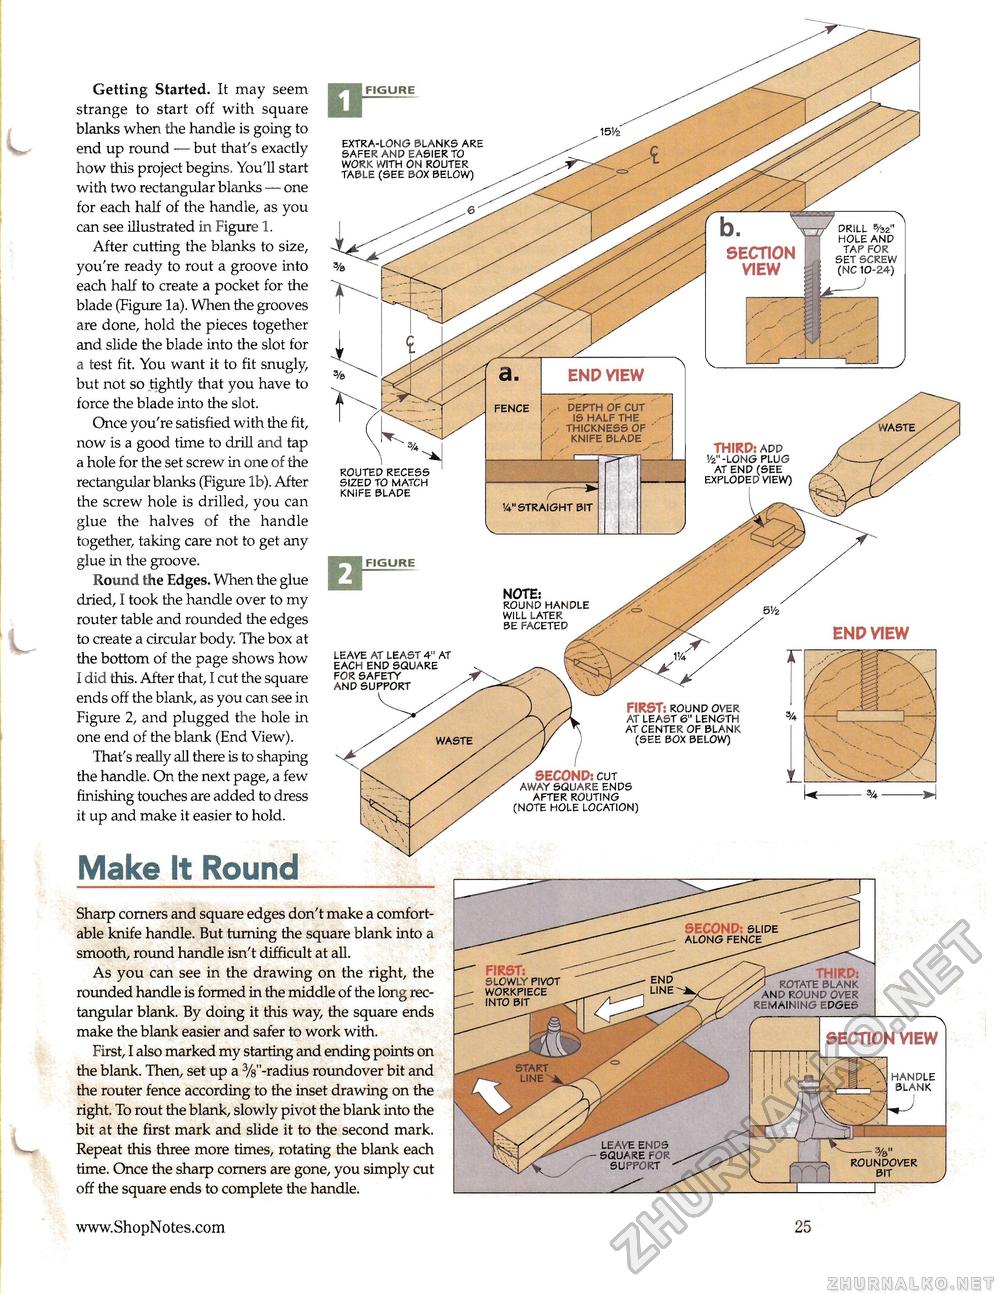
Getting Started. It may seem strange to start off with square blanks when the handle is going to end up round — but that's exactly how this project begins. You'll start with two rectangular blanks — one for each half of the handle, as you can see illustrated in Figure 1. After cutting the blanks to size, you're ready to rout a groove into each half to create a pocket for the blade (Figure la). When the grooves are done, hold the pieces together and slide the blade into the slot for a test fit. You want it to fit snugly, but not so tightly that you have to force the blade into the slot. Once you're satisfied with the fit, now is a good time to drill and tap a hole for the set screw in one of the rectangular blanks (Figure lb). After the screw hole is drilled, you can glue the halves of the handle together, taking care not to get any glue in the groove. Round the Edges. When the glue dried, I took the handle over to my router table and rounded the edges to create a circular body. The box at the bottom of the page shows how I did this. After that, I cut the square ends off the blank, as you can see in Figure 2, and plugged the hole in one end of the blank (End View). That's really all there is to shaping the handle. On the next page, a few finishing touches are added to dress it up and make it easier to hold. extra-long blanks are safer and easier to work with on router table (see box below) drill %2" hole and tap for set screw (nc 10-24) SECTION VIEW depth of cut is half the thickness of knife blade waste THIRD: add vz"-long plug at end (see exploded view) routed recess sized to match knife blade v4" straight bit NOTE: round handle will later be faceted . ENP VIEW leave at least 4" at each end square for safety and support FIRST: round over at least 6" length at center of blank (see box below) waste / SECOND: cut away square ends after routing (note hole location) Make It Round Sharp corners and square edges don't make a comfortable knife handle. But turning the square blank into a smooth, round handle isn't difficult at all. As you can see in the drawing on the right, the rounded handle is formed in the middle of the long rectangular blank. By doing it this way, the square ends make the blank easier and safer to work with. First, I also marked my starting and ending points on the blank. Then, set up a %"-radius roundover bit and the router fence according to the inset drawing on the right. To rout the blank, slowly pivot the blank into the bit at the first mark and slide it to the second mark. Repeat this three more times, rotating the blank each time. Once the sharp corners are gone, you simply cut off the square ends to complete the handle. SECOND: slide along fence , FIRST: slowly pivot workpiece into bit___ ^^ THIRD: rotate blank / and round over remaining edges SECTION VIEW handle blank leave ends square for support roundover bit 25 |


