87, страница 23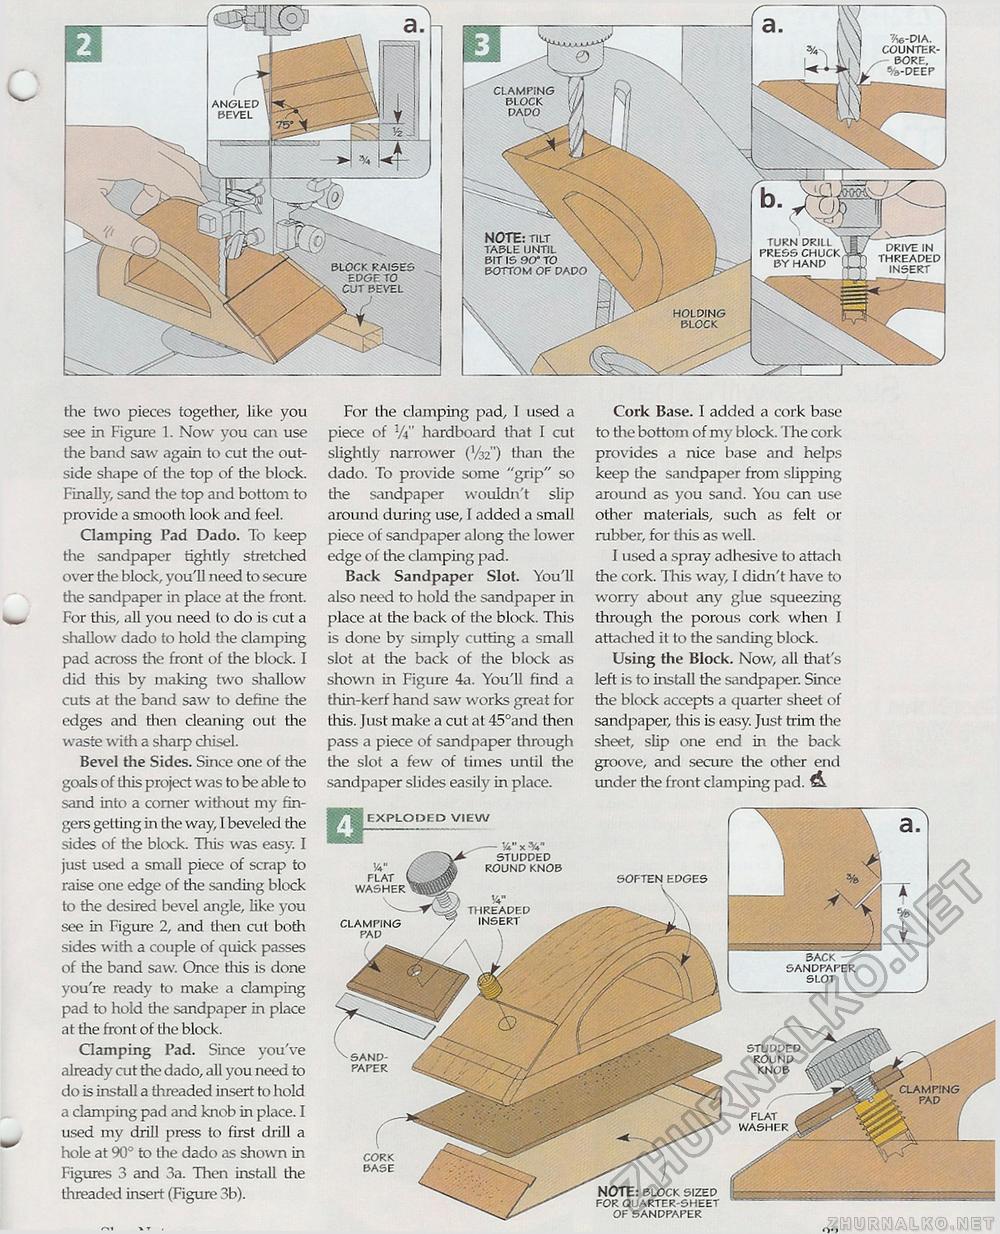
angled bevel NOTE: tilt table until bit IS 9(T to bottom of dado ?i6-dia. counter-bore. fe-deep the two pieces together, like you see in Figure 1. Now you can use the band saw again to cut the outside shape of the top of the block. Finally, sand the top and bottom to provide a smooth look and feel. Clamping Pad Dado. To keep the sandpaper tightly stretched over the block, you'll need to secure the sandpaper in place at the front. For this, all you need to do is cut a shallow dado to hold the clamping pad across the front of the block. I did this by making two shallow cuts at the band saw to define the edges and then cleaning out the waste with a sharp chisel. Bevel the Sides. Since one of the goals of this project was to be able to sand into a comer without my fingers getting in the way, 1 beveled the sides of the block. This was easy. I just used a small piece of scrap to raise one edge of the sanding block to the desired bevel angle, like you see in Figure 2, and then cut both sides with a couple of quick passes of the band saw. Once this is done you're ready to make a clamping pad to hold the sandpaper in place at the front of the block. Clamping Pad. Since you've already cut the dado, all you need to do is install a threaded insert to hold a clamping pad and knob in place. I used my drill press to first drill a hole at 90° to the dado as shown in Figures 3 and 3a. Then install the threaded insert (Figure 3b). For the clamping pad, I used a piece of Vi" hardboard that I cut slightly narrower (V32") than the dado. To provide some "grip" so the sandpaper wouldn't slip around during use, I added a small piece of sandpaper along the lower edge of the clamping pad. Back Sandpaper Slot. You'll also need to hold the sandpaper in place at the back of the block. This is done by simply cutting a small slot at the back of the block as shown in Figure 4a. You'll find a thin-kerf hand saw works great for this. Just make a cut at 45°and then pass a piece of sandpaper through the slot a few of times until the sandpaper slides easily in place. Cork Base. I added a cork base to the bottom of my block. The cork provides a nice base and helps keep the sandpaper from slipping around as you sand. You can use other materials, such as felt or rubber, for this as well. I used a spray adhesive to attach the cork. This way, I didn't have to worry about any glue squeezing through the porous cork when I attached it to the sanding block. Using the Block. Now, all that's left is to install the sandpaper. Since the block accepts a quarter sheet of sandpaper, this is easy. Just trim the sheet, slip one end in the back groove, and secure the other end under the front clamping pad. & paper cork base edges NOTE: block sized for quarter-sheet of sandpaper EXPLODED VIE:W V x studded round knob W flat washer clamping pad studded round knob flat washer |


