87, страница 21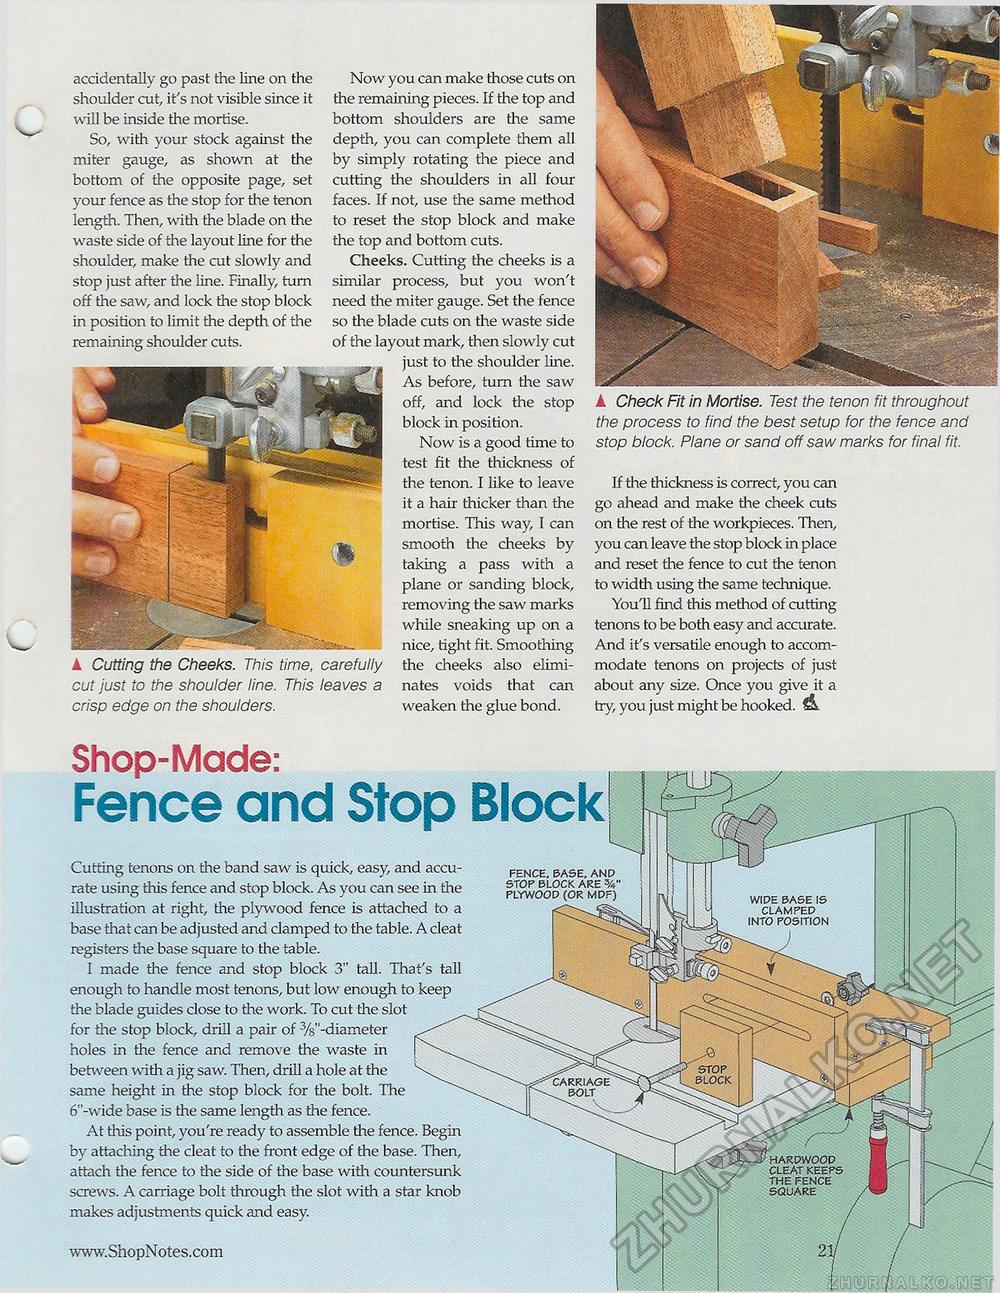
accidentally go past the line on the shoulder cut, it's not visible since it will be inside the mortise. So, with your stock against the miter gauge, as shown at the bottom of the opposite page, set your fence as the stop for the tenon length. Then, with the blade on the waste side of the layout line for the shoulder, make the cut slowly and stop just after the line. Finally, turn off the saw, and lock the stop block in position to limit the depth of the remaining shoulder cuts. ▲ Cutting the Cheeks. This time, cut just to the shoulder line. This crisp edge on the shoulders. Now you can make those cuts on the remaining pieces. If the top and bottom shoulders are the same depth, you can complete them all by simply rotating the piece and cutting the shoulders in all four faces. If not, use the same method to reset the stop block and make the top and bottom cuts. Cheeks. Cutting the cheeks is a similar process, but you won't need the miter gauge. Set the fence so the blade cuts on the waste side of the layout mark, then slowly cut just to the shoulder line. As before, turn the saw off, and lock the stop block in position. Now is a good time to test fit the thickness of the tenon. I like to leave it a hair thicker than the mortise. This way, I can smooth the cheeks by taking a pass with a plane or sanding block, removing the saw marks while sneaking up on a nice, tight fit. Smoothing carefully the cheeks also elimi-leaves a nates voids that can weaken the glue bond. A Check Fit in Mortise. Test the tenon fit throughout the process to find the best setup for the fence and stop block. Plane or sand off saw marks for final fit. If the thickness is correct, you can go ahead and make the cheek cuts on the rest of the workpieces. Then, you can leave the stop block in place and reset the fence to cut the tenon to width using the same technique. You'll find this method of cutting tenons to be both easy and accurate. And it's versatile enough to accommodate tenons on projects of just about any size. Once you give it a try, you just might be hooked. fL. STOP BLOCK CARRIAGE . BOLT HARDWOOD CLEAT KEEPS THE FENCE SQUARE Shop-Made: Fence and Stop Cutting tenons on the band saw is quick, easy, and accurate using this fence and stop block. As you can see in the illustration at right, the plywood fence is attached to a base that can be adjusted and clamped to the table. A cleat registers the base square to the table. I made the fence and stop block 3" tall. That's tall enough to handle most tenons, but low enough to keep the blade guides close to the work. To cut the slot for the stop block, drill a pair of 3/$"-diameter holes in the fence and remove the waste in I --,, between with a jig saw. Then, drill a hole at the same height in the stop block for the bolt. The 6"-wide base is the same length as the fence. At this point, you're ready to assemble the fence. Begin by attaching the cleat to the front edge of the base. Then, attach the fence to the side of the base with countersunk screws. A carriage bolt through the slot with a star knob makes adjustments quick and easy. Block! WIDE BASE IS CLAMPED INTO POSITION FENCE, BASE, AND STOP BLOCK ARE %" PLYWOOD (OR MDF) |


