87, страница 19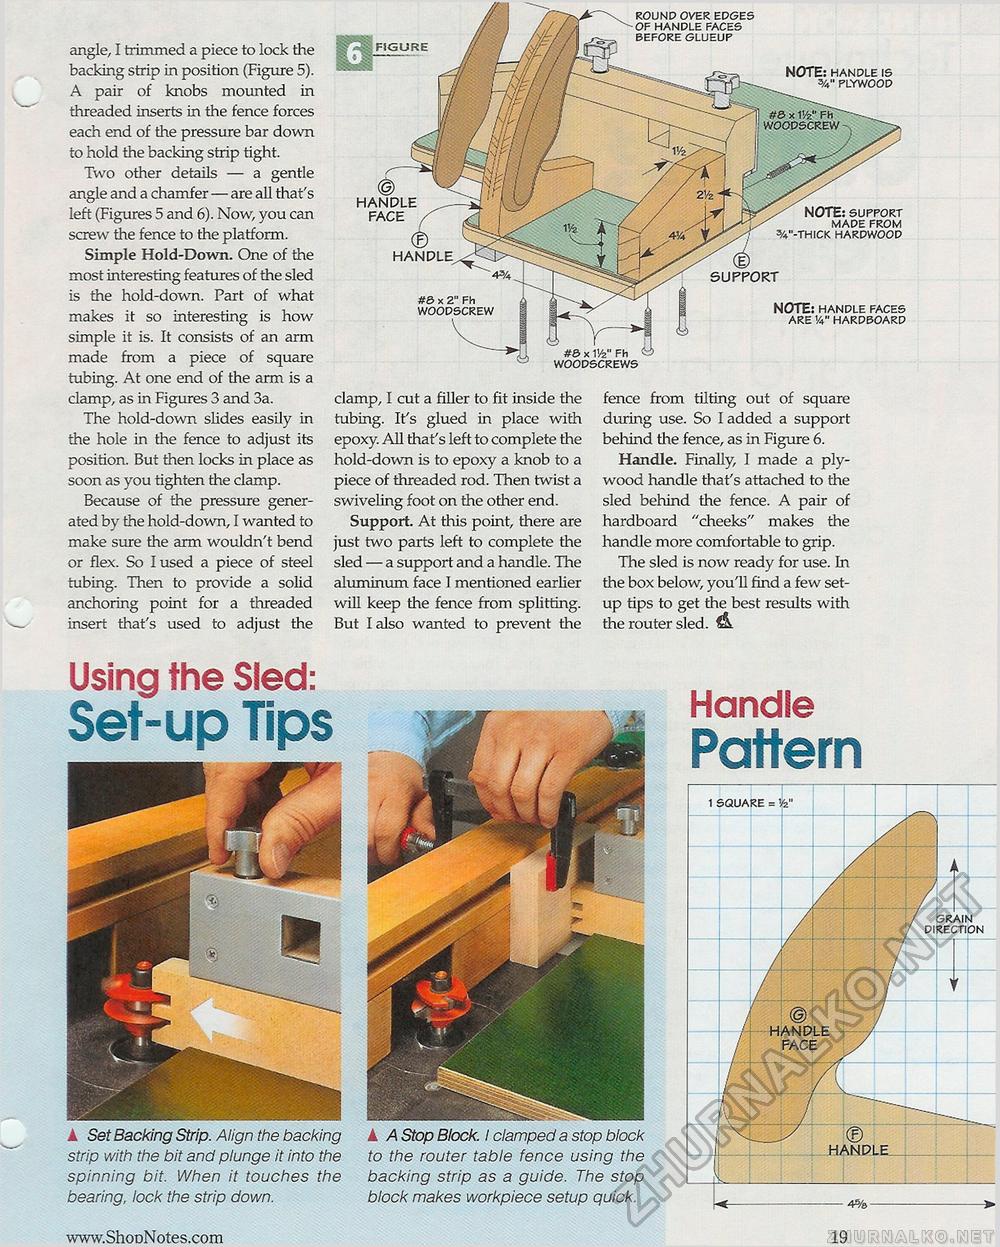
angle, I trimmed a piece to lock the backing strip in position (Figure 5). A pair of knobs mounted in threaded inserts in the fence forces each end of the pressure bar down to hold the backing strip tight. Two other details — a gentle angle and a chamfer — are all that's left (Figures 5 and 6). Now, you can screw the fence to the platform. Simple Hold-Down. One of the most interesting features of the sled is the hold-down. Part of what makes it so interesting is how simple it is. It consists of an arm made from a piece of square tubing. At one end of the arm is a clamp, as in Figures 3 and 3a. The hold-down slides easily in the hole in the fence to adjust its position. But then locks in place as soon as you tighten the clamp. Because of the pressure generated by the hold-down, I wanted to make sure the arm wouldn't bend or flex. So I used a piece of steel tubing. Then to provide a solid anchoring point for a threaded insert that's used to adjust the clamp, I cut a filler to fit inside the tubing. Ifs glued in place with epoxy. All that's left to complete the hold-down is to epoxy a knob to a piece of threaded rod. Then twist a swiveling foot on the other end. Support. At this point, there are just two parts left to complete the sled — a support and a handle. The aluminum face I mentioned earlier will keep the fence from splitting. But I also wanted to prevent the fence from tilting out of square during use. So I added a support behind the fence, as in Figure 6. Handle. Finally, 1 made a plywood handle that's attached to the sled behind the fence. A pair of hardboard "cheeks" makes the handle more comfortable to grip. The sled is now ready for use. In the box below, you'll find a few setup tips to get the best results with the router sled. Using the Sled: Set-up Tips ▲ Set Backing Strip. Align the backing strip with the bit and plunge it into the spinning bit. When it touches the bearing, lock the strip down. A A Stop Block. I clamped a stop block to the router table fence using the backing strip as a guide. The stop block makes workpiece setup quick. Handle Pattern
i&i g FIGURE ROUND OVER EDGES OF HANDLE FACES BEFORE GLUEUP NOTE: HANDLE IS V PLYWOOD WOODSCREWS NOTE: SUPPORT MADE FROM %"-THICK HARDWOOD SUPPORT NOTE: HANDLE FACES ARE !4" HARDBOARD 19 |
|||||||||||||||||||||||||||||||||||||||||||||||||||||||||||||||||||||||||||||||||||||||||||||||||||||||||||||||||||||||||||||||||||||||||||||||||||||||


