88, страница 15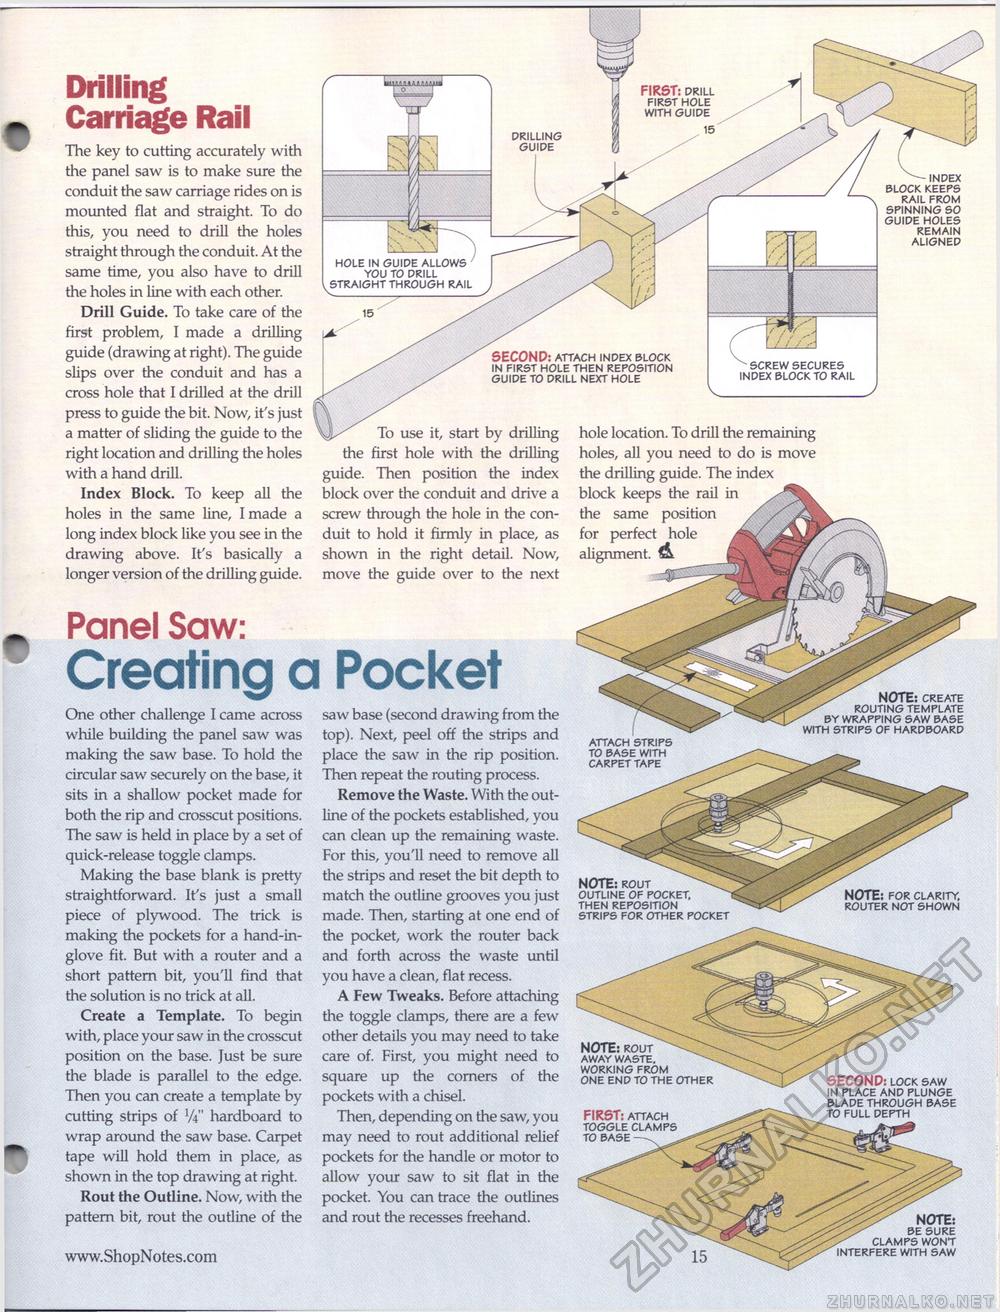
Drilling Carriage RailThe key to cutting accurately with the panel saw is to make sure the conduit the saw carriage rides on is mounted flat and straight. To do this, you need to drill the holes straight through the conduit. At the same time, you also have to drill the holes in line with each other. Drill Guide. To take care of the first problem, I made a drilling guide (drawing at right). The guide slips over the conduit and has a cross hole that I drilled at the drill press to guide the bit. Now, it's just a matter of sliding the guide to the right location and drilling the holes with a hand drill. Index Block. To keep all the holes in the same line, I made a long index block like you see in the drawing above. It's basically a longer version of the drilling guide. Panel Saw: Creating a Pocket One other challenge I came across while building the panel saw was making the saw base. To hold the circular saw securely on the base, it sits in a shallow pocket made for both the rip and crosscut positions. The saw is held in place by a set of quick-release toggle clamps. Making the base blank is pretty straightforward. It's just a small piece of plywood. The trick is making the pockets for a hand-in-glove fit. But with a router and a short pattern bit, you'll find that the solution is no trick at all. Create a Template. To begin with, place your saw in the crosscut position on the base. Just be sure the blade is parallel to the edge. Then you can create a template by cutting strips of W hardboard to wrap around the saw base. Carpet tape will hold them in place, as shown in the top drawing at right. Rout the Outline. Now, with the pattern bit, rout the outline of the saw base (second drawing from the top). Next, peel off the strips and place the saw in the rip position. Then repeat the routing process. Remove the Waste. With the outline of the pockets established, you can clean up the remaining waste. For this, you'll need to remove all the strips and reset the bit depth to match the outline grooves you just made. Then, starting at one end of the pocket, work the router back and forth across the waste until you have a clean, flat recess. A Few Tweaks. Before attaching the toggle clamps, there are a few other details you may need to take care of. First, you might need to square up the corners of the pockets with a chisel. Then, depending on the saw, you may need to rout additional relief pockets for the handle or motor to allow your saw to sit flat in the pocket. You can trace the outlines and rout the recesses freehand. FIRST: drill first hole with guide drilling guide index block keeps rail from spinning so guide holes remain aligned hole in guide allows you to drill straight through rail SECOND: attach index block in first hole then reposition guide to drill next hole ^screw secures index block to rail ^Jl^ To use it, start by drilling the first hole with the drilling guide. Then position the index block over the conduit and drive a screw through the hole in the conduit to hold it firmly in place, as shown in the right detail. Now, move the guide over to the next hole location. To drill the remaining holes, all you need to do is move the drilling guide. The index block keeps the rail in the same position / / JM for perfect hole alignment. A p\ ^^ NOTE: create routing template ^ by wrapping saw base with strips of hardboard attach strips to base with carpet tape NOTE: rout \ outline of pocket, ^ then reposition strips for other pocket NOTE: for clarity, router not shown NOTE: rout ^o^ away waste, working from one end to the other SECOND: lock saw in place and plunge blade through base to full depth FIRST: attach toggle clamps to base —^ NOTE: be sure clamps wont interfere with saw |


