88, страница 18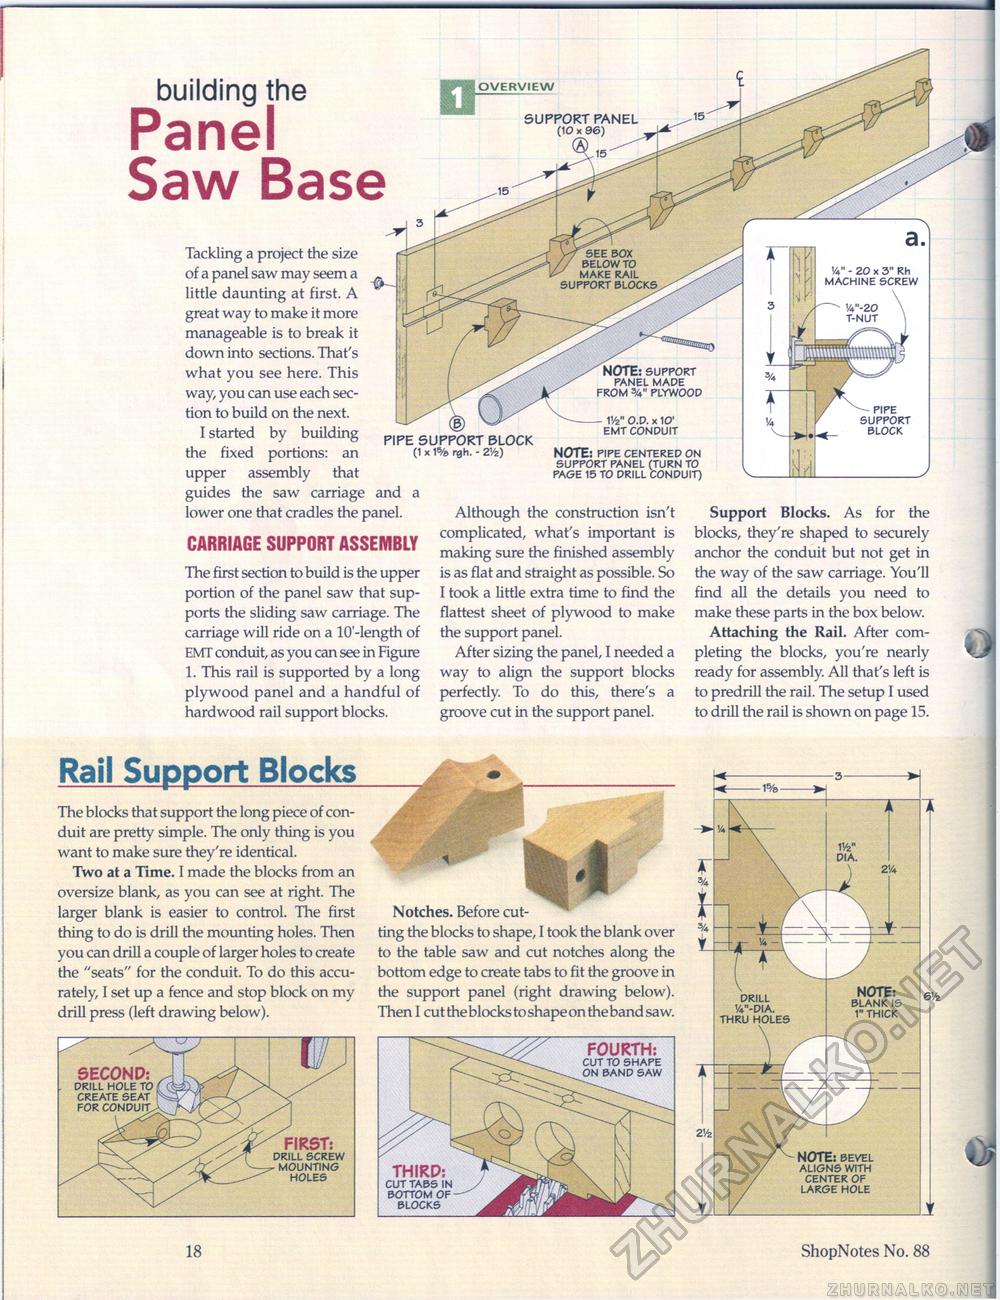
building the Panel Saw Base yfl OVERVIEW SUPPORT PANEL (10 x Tackling a project the size of a panel saw may seem a little daunting at first. A great way to make it more manageable is to break it down into sections. That's what you see here. This way, you can use each section to build on the next. I started by building the fixed portions: an upper assembly that guides the saw carriage PIPE SUPPORT BLOCK (1 x 1% rgh. - ZVz) NOTE: support panel made from 3/4" plywood v/z" o.d. x 10' emt conduit NOTE: pipe centered on support panel (turn to page 15 to drill conduit) V4" - 20 x 3" Rh MACHINE SCREW pipe support block and a lower one that cradles the panel. CARRIAGE SUPPORT ASSEMBLY The first section to build is the upper portion of the panel saw that supports the sliding saw carriage. The carriage will ride on a lO'-length of EMT conduit, as you can see in Figure 1. This rail is supported by a long plywood panel and a handful of hardwood rail support blocks. Although the construction isn't complicated, what's important is making sure the finished assembly is as flat and straight as possible. So I took a little extra time to find the flattest sheet of plywood to make the support panel. After sizing the panel, I needed a way to align the support blocks perfectly. To do this, there's a groove cut in the support panel. Support Blocks. As for the blocks, they're shaped to securely anchor the conduit but not get in the way of the saw carriage. You'll find all the details you need to make these parts in the box below. Attaching the Rail. After completing the blocks, you're nearly ready for assembly. All that's left is to predrill the rail. The setup I used to drill the rail is shown on page 15. Rail Support BlocksThe blocks that support the long piece of conduit are pretty simple. The only thing is you want to make sure they're identical. Two at a Time. I made the blocks from an oversize blank, as you can see at right. The larger blank is easier to control. The first thing to do is drill the mounting holes. Then you can drill a couple of larger holes to create the "seats" for the conduit. To do this accurately, I set up a fence and stop block on my drill press (left drawing below). 'is Notches. Before cutting the blocks to shape, I took the blank over to the table saw and cut notches along the bottom edge to create tabs to fit the groove in the support panel (right drawing below). Then I cut the blocks to shape on the band saw. SECOND: drill hole to create seat for FIRST: drill screw mounting holes 18 ShopNotes No. 88 |


