88, страница 20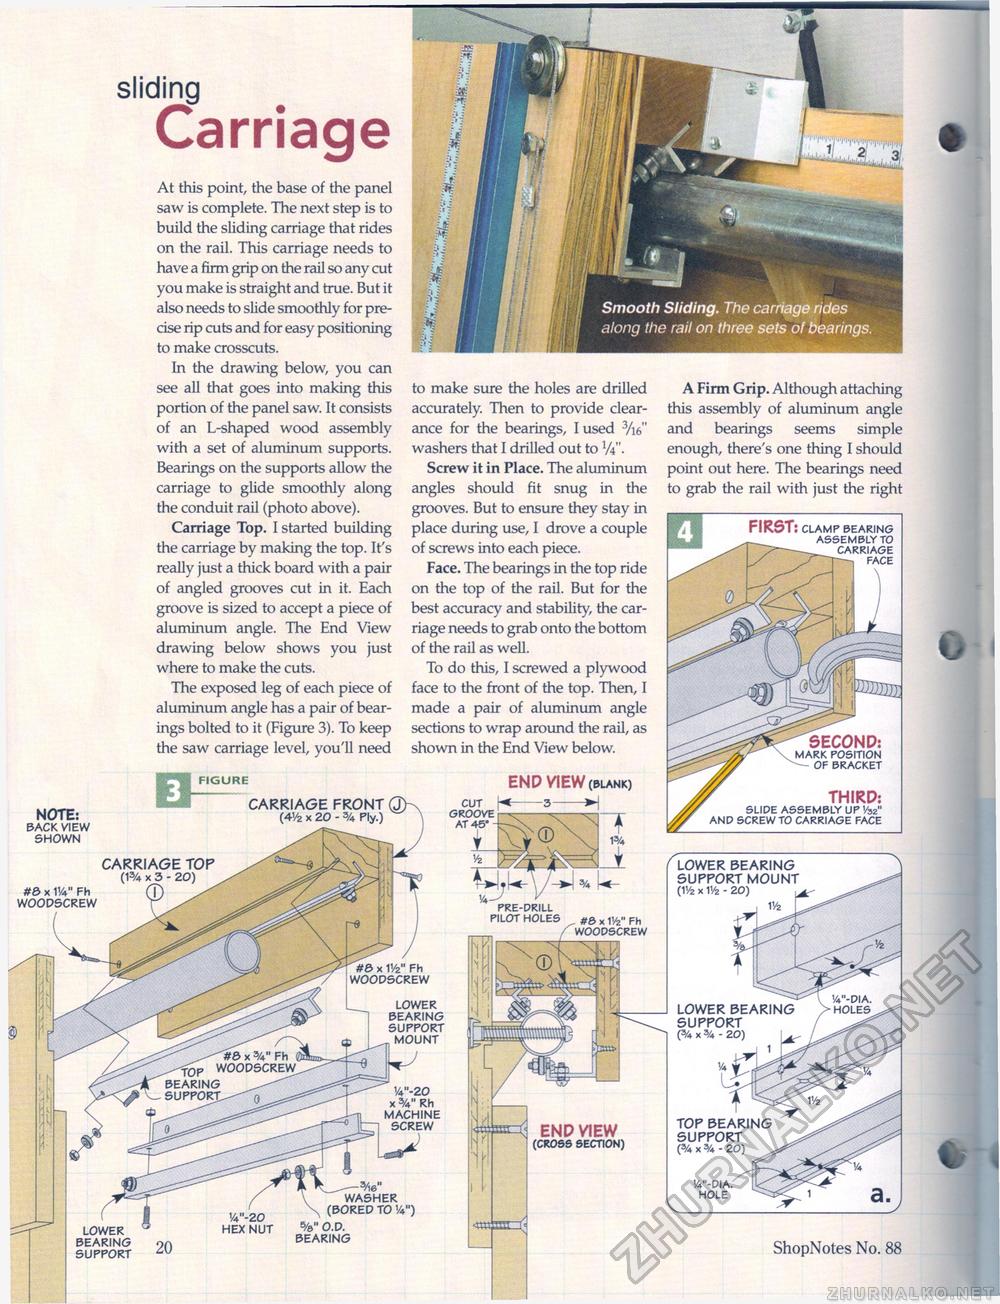
sliding CarriageAt this point, the base of the panel saw is complete. The next step is to build the sliding carriage that rides on the rail. This carriage needs to have a firm grip on the rail so any cut you make is straight and true. But it also needs to slide smoothly for precise rip cuts and for easy positioning to make crosscuts. the conduit rail (photo above). Carriage Top. I started building the carriage by making the top. It's really just a thick board with a pair of angled grooves cut in it. Each groove is sized to accept a piece of aluminum angle. The End View drawing below shows you just where to make the cuts. The exposed leg of each piece of aluminum angle has a pair of bearings bolted to it (Figure 3). To keep the saw carriage level, you'll need grooves. But to ensure they stay in place during use, I drove a couple of screws into each piece. Face. The bearings in the top ride on the top of the rail. But for the best accuracy and stability, the carriage needs to grab onto the bottom of the rail as well. To do this, I screwed a plywood face to the front of the top. Then, I made a pair of aluminum angle sections to wrap around the rail, as shown in the End View below. FIRST: CLAMP BEARING ______ASSEMBLY TO CARRIAGE - FACE SECOND: MARK POSITION -— OF BRACKET END VIEW (blank) ' THIRD: SLIDE ASSEMBLY UP Vaz" AND SCREW TO CARRIAGE FACE CARRIAGE FRONT 6 (4V2 x 20 - % Ply.) NOTE: BACK VIEW SHOWN CARRIAGE TOP (13/4 x 3 - 20) LOWER BEARING SUPPORT MOUNT (V/z x V/z - 20) #3 x V/a" Fh WOODSCREW PRE-DRILL PILOT HOLES x Fh WOODSCREW #& x V/z" Fh WOODSCREW V-DIA. HOLES LOWER SEARING SUPPORT nMOUNT LOWER BEARING SUPPORT (3/4 X 3/4 - 20) > - ' x 3/4m Fh ( WOODSCREW SEARING SUPPORT>'^0 1/4"-20 x 3/4M Rh MACHINE SCREW TOP BEARING SUPPORT (3/4 X 3/4 - 20) END VIEW (cross section) 1/4"-DIA. HOLE _--3/16" WASHER (BORED TO 1/4") O.D. BEARING LOWER BEARING SUPPORT ShopNotes No. 88 In the drawing below, you can see all that goes into making this portion of the panel saw. It consists of an L-shaped wood assembly with a set of aluminum supports. Bearings on the supports allow the carriage to glide smoothly along to make sure the holes are drilled accurately. Then to provide clearance for the bearings, I used 3/i6" washers that I drilled out to x/\ . Screw it in Place. The aluminum angles should fit snug in the A Firm Grip. Although attaching this assembly of aluminum angle and bearings seems simple enough, there's one thing I should point out here. The bearings need to grab the rail with just the right |


