88, страница 19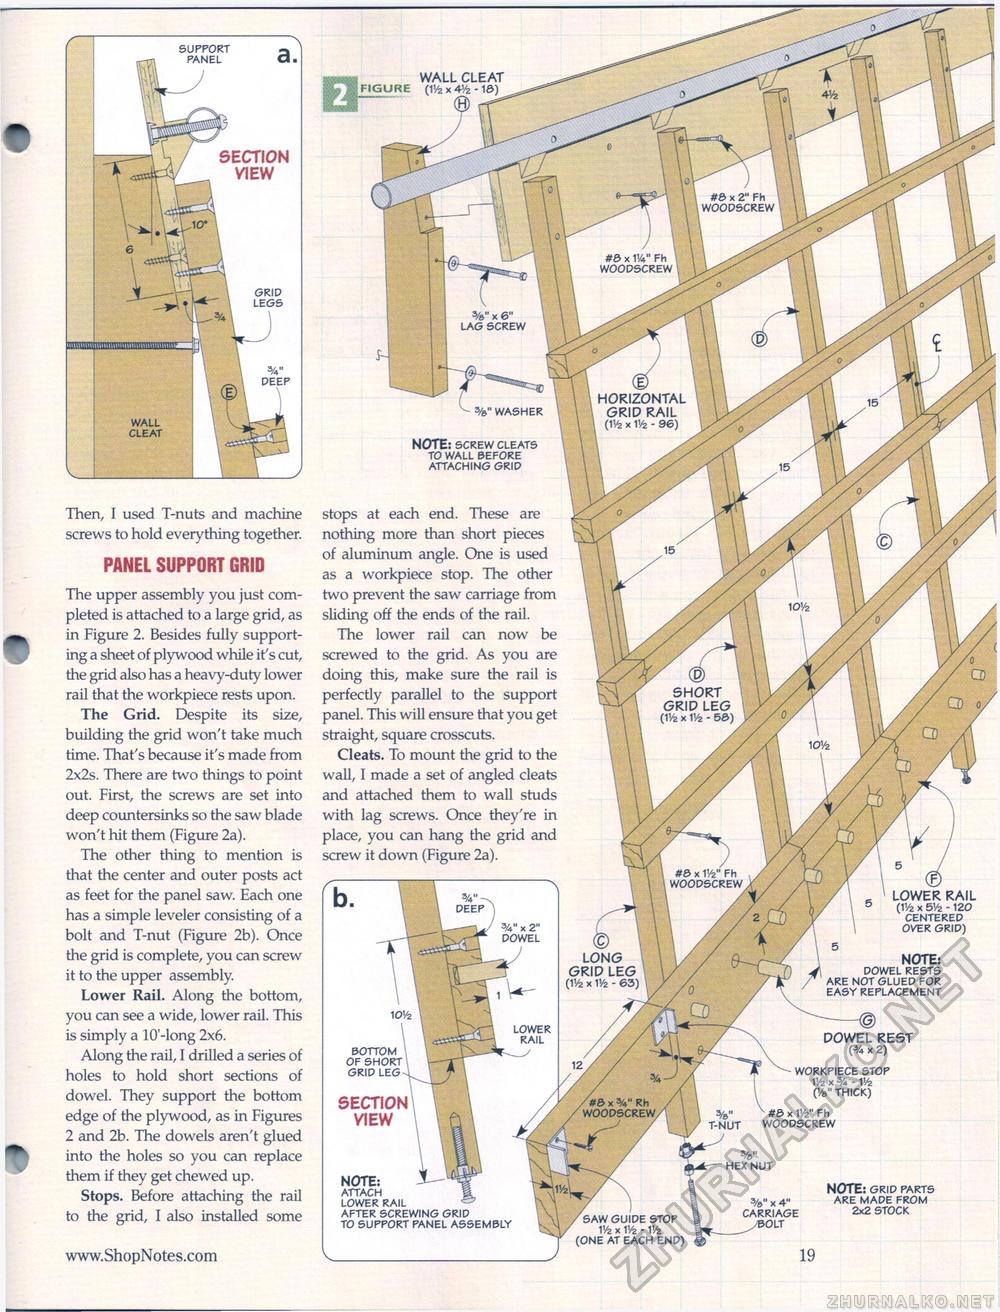
Then, I used T-nuts and machine screws to hold everything together. PANEL SUPPORT GRID The upper assembly you just completed is attached to a large grid, as in Figure 2. Besides fully supporting a sheet of plywood while it's cut, the grid also has a heavy-duty lower rail that the workpiece rests upon. The Grid. Despite its size, building the grid won't take much time. That's because it's made from 2x2s. There are two things to point out. First, the screws are set into deep countersinks so the saw blade won't hit them (Figure 2a). The other thing to mention is that the center and outer posts act as feet for the panel saw. Each one has a simple leveler consisting of a bolt and T-nut (Figure 2b). Once the grid is complete, you can screw it to the upper assembly. Lower Rail. Along the bottom, you can see a wide, lower rail. This is simply a lO'-long 2x6. Along the rail, I drilled a series of holes to hold short sections of dowel. They support the bottom edge of the plywood, as in Figures 2 and 2b. The dowels aren't glued into the holes so you can replace them if they get chewed up. Stops. Before attaching the rail to the grid, I also installed some #e> x 2" Fh WOODSCREW #3 x W Fh WOODSCREW HORIZONTAL GRID RAIL (1V2 X 11/2 - 96) SHORT GRID LEG (1V2 x V/z - 53) #& x W Fh WOODSCREW /#& x 3/4" Rh WOODSCREW /SAW GUIDE STOP 1'/2 x IV2 - 1'/2 (ONE AT EACH END) WALL CLEAT (1Vfe x 41/2 - 1S) (R %" x 6" LAG SCREW WASHER NOTE: SCREW CLEATS TO WALL BEFORE ATTACHING GRID stops at each end. These are nothing more than short pieces of aluminum angle. One is used as a workpiece stop. The other two prevent the saw carriage from sliding off the ends of the rail. The lower rail can now be screwed to the grid. As you are doing this, make sure the rail is perfectly parallel to the support panel. This will ensure that you get straight, square crosscuts. Cleats. To mount the grid to the wall, I made a set of angled cleats and attached them to wall studs with lag screws. Once they're in place, you can hang the grid and screw it down (Figure 2a). %" X 2" DOWEL (£) LONG GRID LEG (11/2 X 1V2 - 63) LOWER RAIL #& x IV2" Fh WOODSCREW T-NUT HEX NUT BOTTOM OF SHORT GRID LEG SECTION VIEW NOTE: ATTACH LOWER RAIL AFTER SCREWING GRID TO SUPPORT PANEL ASSEMBLY LOWER RAIL (1V2 X 5Vz - 120 CENTERED OVER GRID) NOTE: DOWEL RESTS ARE NOT GLUED FOR EASY REPLACEMENT --© DOWEL REST (% x 2) WORKPIECE STOP IV2 x 3/4 - 1'/2 (Ve" THICK) 3/6" x 4" CARRIAGE OLT NOTE: GRID PARTS ARE MADE FROM 2x2 STOCK |


