88, страница 21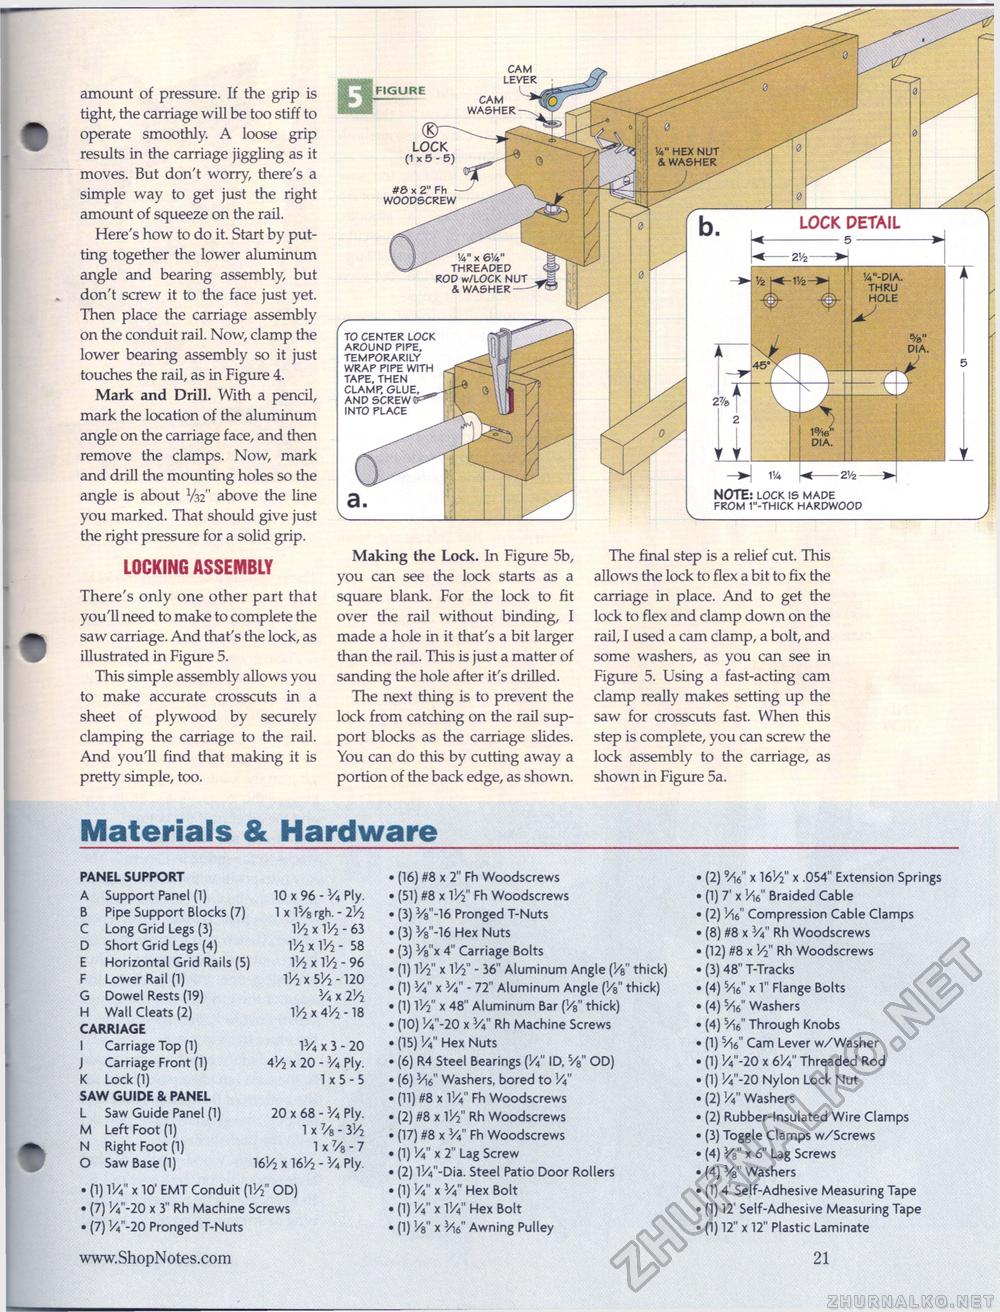
amount of pressure. If the grip is tight, the carriage will be too stiff to operate smoothly. A loose grip results in the carriage jiggling as it moves. But don't worry, there's a simple way to get just the right amount of squeeze on the rail. Here's how to do it. Start by putting together the lower aluminum angle and bearing assembly, but don't screw it to the face just yet. Then place the carriage assembly on the conduit rail. Now, clamp the lower bearing assembly so it just touches the rail, as in Figure 4. Mark and Drill. With a pencil, mark the location of the aluminum angle on the carriage face, and then remove the clamps. Now, mark and drill the mounting holes so the angle is about V32" above the line you marked. That should give just the right pressure for a solid grip. LOCKING ASSEMBLY There's only one other part that you'll need to make to complete the saw carriage. And that's the lock, as illustrated in Figure 5. This simple assembly allows you to make accurate crosscuts in a sheet of plywood by securely clamping the carriage to the rail. And you'll find that making it is pretty simple, too. Making the Lock. In Figure 5b, you can see the lock starts as a square blank. For the lock to fit over the rail without binding, I made a hole in it that's a bit larger than the rail. This is just a matter of sanding the hole after it's drilled. The next thing is to prevent the lock from catching on the rail support blocks as the carriage slides. You can do this by cutting away a portion of the back edge, as shown. The final step is a relief cut. This allows the lock to flex a bit to fix the carriage in place. And to get the lock to flex and clamp down on the rail, I used a cam clamp, a bolt, and some washers, as you can see in Figure 5. Using a fast-acting cam clamp really makes setting up the saw for crosscuts fast. When this step is complete, you can screw the lock assembly to the carriage, as shown in Figure 5a. Materials & Hardware PANEL SUPPORT PANEL SUPPORT
• (1) V/4" x 10' EMT Conduit [V/7 OD) • (7) Va"-20 x 3" Rh Machine Screws • (7) !/4"-20 Pronged T-Nuts • (1) V/4" x 10' EMT Conduit [V/7 OD) • (7) Va"-20 x 3" Rh Machine Screws • (7) !/4"-20 Pronged T-Nuts • (16) #8 x 2" Fh Woodscrews • (51) #8 x V/2" Fh Woodscrews • (3) 3/8"-16 Pronged T-Nuts • (3) 3/8"-16 Hex Nuts • (3) H"x 4" Carriage Bolts • (1) l1// x V/2" - 36" Aluminum Angle {Va thick) • (1) ¥4" x 3/4" - 72" Aluminum Angle (H" thick) • (1) V/2" x 48" Aluminum Bar (V8" thick) • (10) Va-20 x 3/4" Rh Machine Screws • (15) V4" Hex Nuts • (6) R4 Steel Bearings (W ID, 5/8" OD) • (6) 3/i6" Washers, bored to Va" • (11) #8 x V/4" Fh Woodscrews • (2) #8 x V/2 Rh Woodscrews • (17) #8 x Va Fh Woodscrews • (1) Va" x 2" Lag Screw • (2) 1K"-Dia. Steel Patio Door Rollers • (1) Va" x V4" Hex Bolt • (1) Va" x 1V," Hex Bolt • (1) Va" x Vw," Awning Pulley • (2) Vie," x 161/2" x .054" Extension Springs • (1) 7' x V\6" Braided Cable • (2) V-\e Compression Cable Clamps • (8) #8 x V4" Rh Woodscrews • (12) #8 x Vi Rh Woodscrews • (3) 48" T-Tracks • (4) Vi6" x 1" Flange Bolts • (4) 5/16" Washers • (4) bAb Through Knobs • (1) ¥}(," Cam Lever w/Washer • (1) Va- 20 x 6 V4" Threaded Rod • (1) Va-2 0 Nylon Lock Nut • (2) V4" Washers • (2) Rubber-Insulated Wire Clamps • (3) Toggle Clamps w/Screws • (4) Va" x 6" Lag Screws • (4) 3/8" Washers • (1) 4' Self-Adhesive Measuring Tape • (1) 12' Self-Adhesive Measuring Tape • (1) 12" x 12" Plastic Laminate 21 LOCK DETAIL -5->\ V-DIA THRU HOLE NOTE: lock is made from 1"-thick hardwood rod w/lock nut & washer #0 x 2" Fh woodscrew to center lock around pipe, temporarily wrap pipe with tape. then clamp, glue, and screw into place FIGURE cam cam washer |
|||||||||||||||||||||||||||||||||||||||||||||||||||


