88, страница 23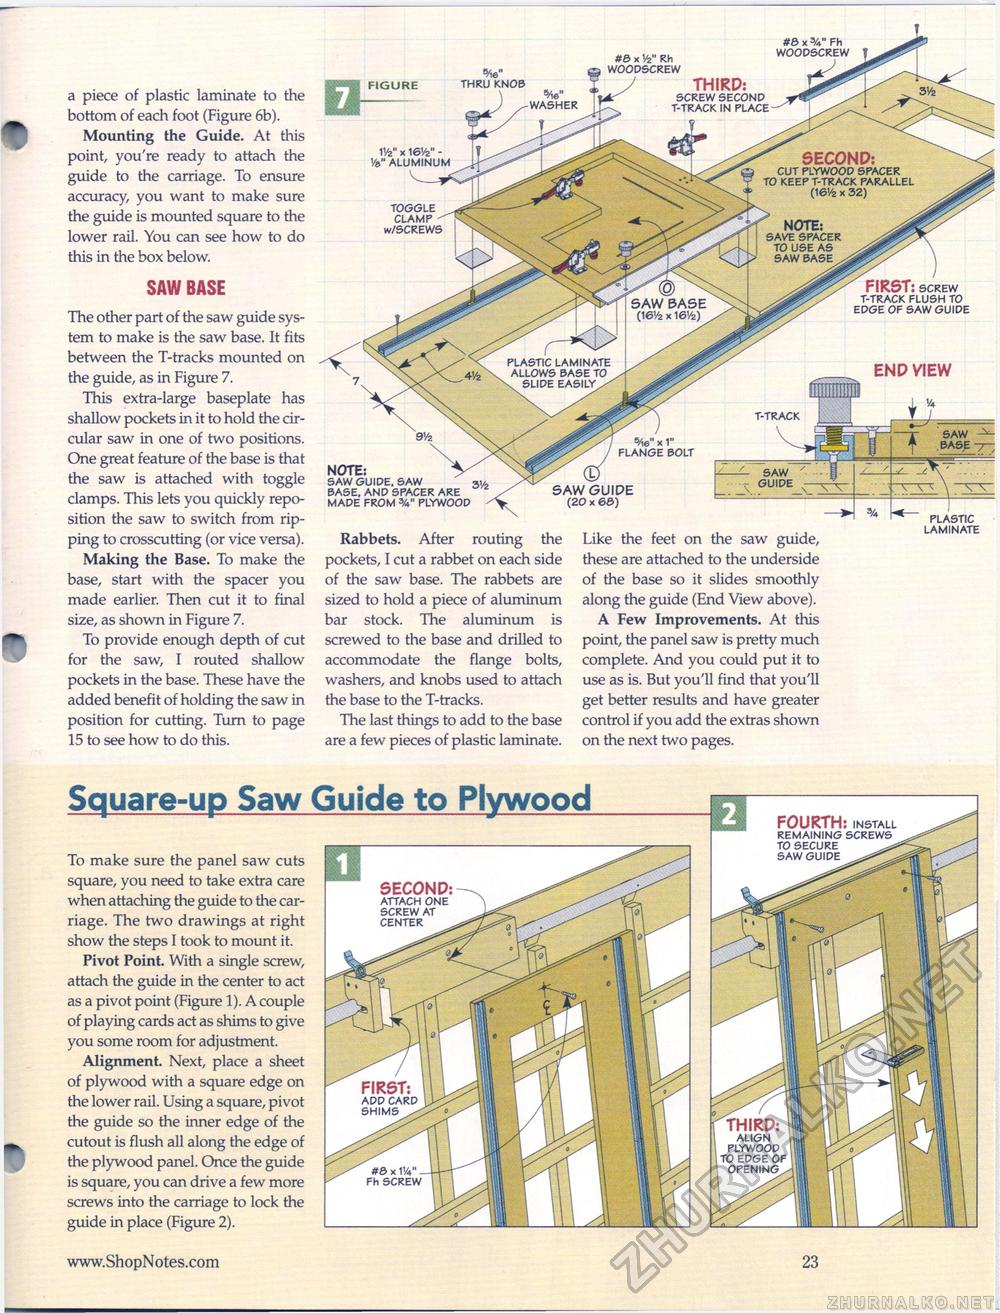
a piece of plastic laminate to the bottom of each foot (Figure 6b). Mounting the Guide. At this point, you're ready to attach the guide to the carriage. To ensure accuracy, you want to make sure the guide is mounted square to the lower rail. You can see how to do this in the box below. SAW BASE The other part of the saw guide system to make is the saw base. It fits between the T-tracks mounted on the guide, as in Figure 7. This extra-large baseplate has shallow pockets in it to hold the circular saw in one of two positions. One great feature of the base is that the saw is attached with toggle clamps. This lets you quickly reposition the saw to switch from ripping to crosscutting (or vice versa). Making the Base. To make the base, start with the spacer you made earlier. Then cut it to final size, as shown in Figure 7. To provide enough depth of cut for the saw, I routed shallow pockets in the base. These have the added benefit of holding the saw in position for cutting. Turn to page 15 to see how to do this. NOTE: saw guide, saw base, and spacer are made from plywood Rabbets. After routing the pockets, I cut a rabbet on each side of the saw base. The rabbets are sized to hold a piece of aluminum bar stock. The aluminum is screwed to the base and drilled to accommodate the flange bolts, washers, and knobs used to attach the base to the T-tracks. The last things to add to the base are a few pieces of plastic laminate. Like the feet on the saw guide, these are attached to the underside of the base so it slides smoothly along the guide (End View above). A Few Improvements. At this point, the panel saw is pretty much complete. And you could put it to use as is. But you'll find that you'll get better results and have greater control if you add the extras shown on the next two pages. Square-up Saw Guide to PlywoodTo make sure the panel saw cuts square, you need to take extra care when attaching the guide to the carriage. The two drawings at right show the steps I took to mount it. Pivot Point. With a single screw, attach the guide in the center to act as a pivot point (Figure 1). A couple of playing cards act as shims to give you some room for adjustment. Alignment. Next, place a sheet of plywood with a square edge on the lower rail. Using a square, pivot the guide so the inner edge of the cutout is flush all along the edge of the plywood panel. Once the guide is square, you can drive a few more screws into the carriage to lock the guide in place (Figure 2). SECOND: attach one screw at center add card shims FOURTH: install remaining screws to secure saw guide 23 |


