91 - Planer Stand, страница 17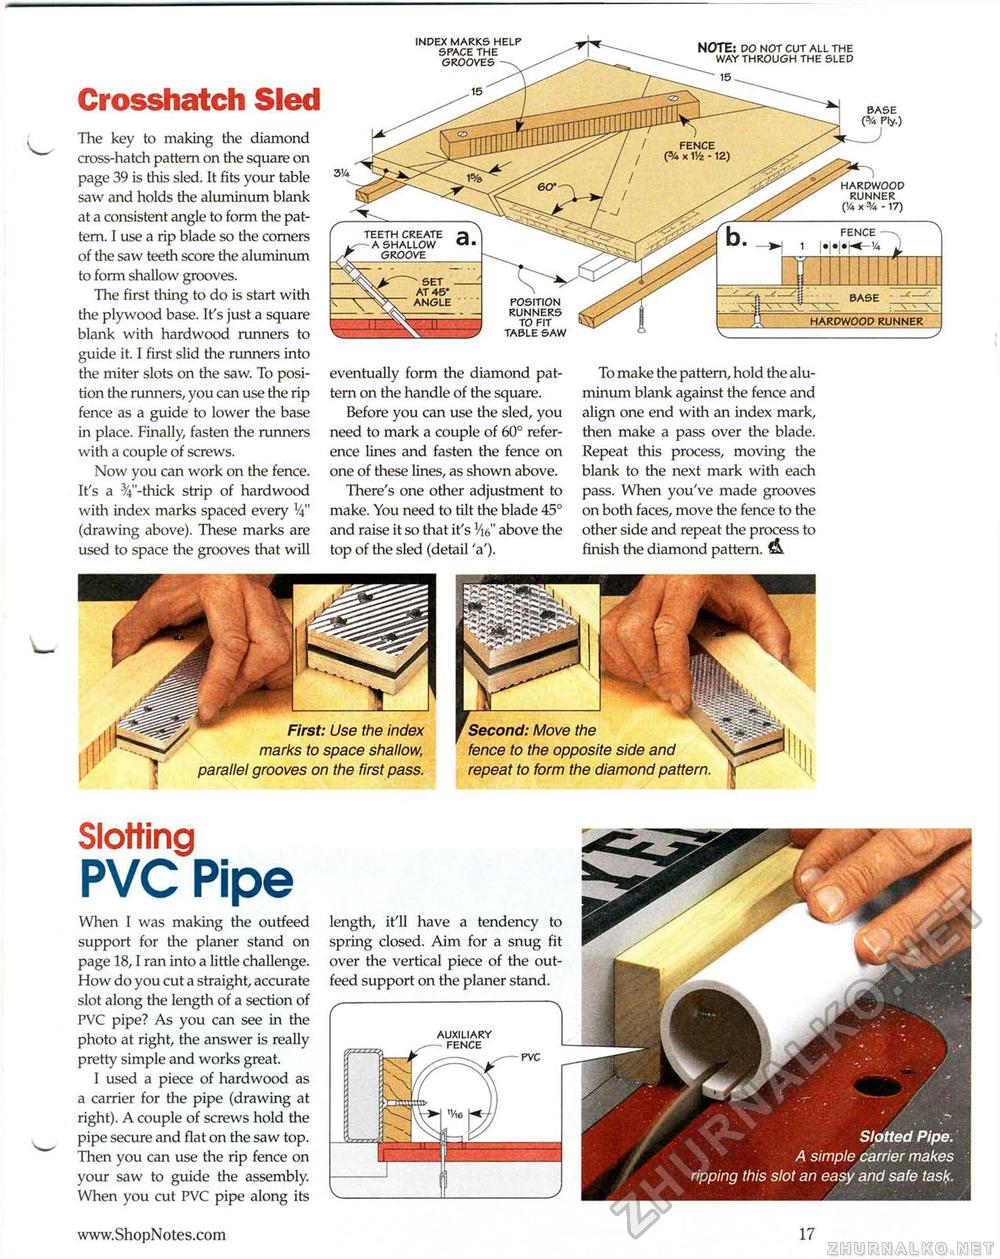
Crosshatch Sled The key to making the diamond cross-hatch pattern on the square on page 39 is this sled. It fits your table saw and holds the aluminum blank at a consistent angle to form the pattern. I use a rip blade so the corners of the saw teeth score the aluminum to form shallow grooves. The first thing to do is start with the plywood base. It's just a square blank with hardwood runners to guide it. I first slid the runners into the miter slots on the saw. To position the runners, you can use the rip fence as a guide to lower the base in place. Finally, fasten the runners with a couple of screws. Now you can work on the fence. It's a %"-thick strip of hardwood with index marks spaced every 14" (drawing above). These marks are used to space the grooves that will index marks help space the grooves NOTE: do not cut all the way through the sled eventually form the diamond pattern on the handle of the square. Before you can use the sled, you need to mark a couple of 60° reference lines and fasten the fence on one of these lines, as shown above. There's one other adjustment to make. You need to tilt the blade 45° and raise it so that it's V|6" above the top of the sled (detail 'a'). To make the pattern, hold the aluminum blank against the fence and align one end with an index mark, then make a pass over the blade. Repeat this process, moving the blank to the next mark with each pass. When you've made grooves on both faces, move the fence to the other side and repeat the process to finish the diamond pattern. hardwood runner (V* x % -17) position runners to fit table saw teeth create a a shallow c* • GROOVE hardwood runner set at 45' angle First: Use the index marks to space shallow, parallel grooves on the first pass. fence to the opposite side and repeat to form the diamond pattern. Slotting PVC Pipe When I was making the outfeed support for the planer stand on page 18,1 ran into a little challenge. How do you cut a straight, accurate slot along the length of a section of PVC pipe? As you can see in the photo at right, the answer is really pretty simple and works great. I used a piece of hardwood as a carrier for the pipe (drawing at right). A couple of screws hold the pipe secure and flat on the saw top. Then you can use the rip fence on your saw to guide the assembly. When you cut PVC pipe along its Slotted Pipe. A simple carrier makes ripping this slot an easy and safe task. length, it'll have a tendency to spring closed. Aim for a snug fit over the vertical piece of the out-feed support on the planer stand. |


