92, страница 37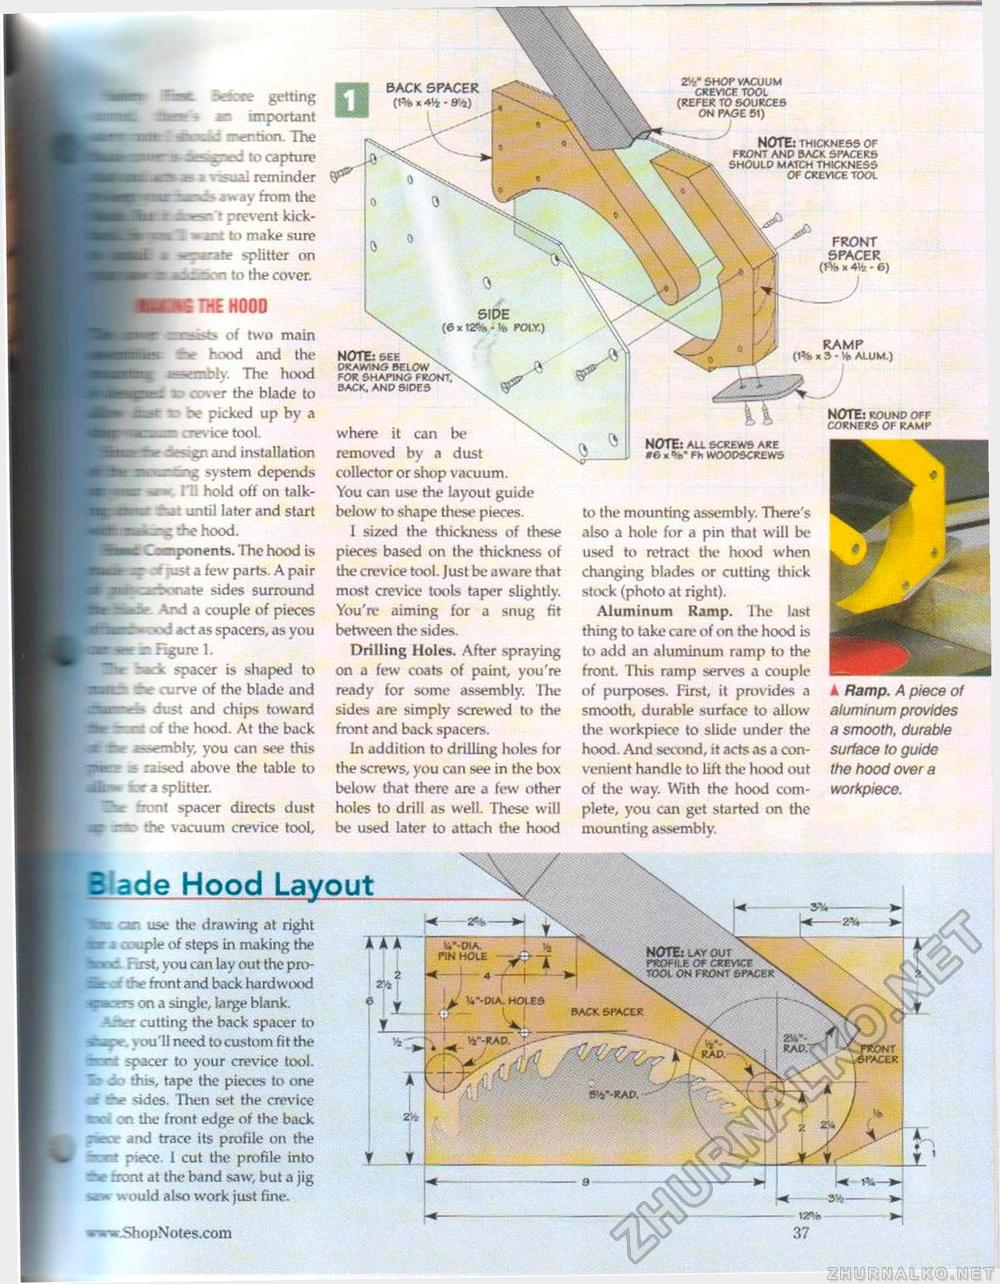
ZYp" shop vacuum crevice tool (refer to sources on page 51) NOTE: SEE \ DRAWING BELOW \ FOR SHAPING FRONT.' BACK, AND SIDES 5e3c-re getting £3 important mention. The to capture "sua; reminder away from the : prevent kick-to make sure splitter on to the cover. THE H000 of two main hood and the [a~s«nbly. The hood >. v er the blade to picked up by a i crevice tool. i and installation system depends 111 hold off on talk-that until later and start --he hood, t exponents. The hood is ■ _st a few parts. A pair Jte sides surround -rd a couple of pieces I act as spacers, as you Figure 1. spacer is shaped to e curve of the blade and dust and chips toward of the hood. At the back -.-embly, you can see this .i- raised above the table to ty a splitter. front spacer directs dust the vacuum crevice tool, back spacer (t% x Ms - ate) NOTE: thickness of front and back spacers should match thickness of crevice tool front spacer (1% x 4V> - 6) where it can be removed by a dust collector or shop vacuum. You can use the layout guide below to shape these pieces. 1 sized the thickness of these pieces based on the thickness of the crevice tool. Just be aware that most crevice tools taper slightly. You're aiming for a snug fit between the sides. Drilling Holes. After spraying on a few coats of paint, you're ready for some assembly. The sides are simply screwed to the front and back spacers. In addition to drilling holes for the screws, you can see in the box below that there are a few other holes to drill as well. These will be used later to attach the hood ramp (1% x 3 • Vo ALUM.) NOTE: round off corners of ramp NOTE: au screws are 06 X Ofe* Fh WOODSCREWS to the mounting assembly. There's also a hole for a pin that will be used to retract the hood when changing blades or cutting thick stock (photo at right). Aluminum Ramp. The last thing to take care of on the hood is to add an aluminum ramp to the front. This ramp serves a couple of purposes. First, it provides a smooth, durable surface to allow the workpiece to slide under the hood. And second, it acts as a convenient handle to lift the hood out of the way. With the hood complete, you caii get started on the mounting assembly. A Ramp. A piece of aluminum provides a smooth, durable surface to guide the hood over a workpiece. ade Hood Layout car. use the drawing at right uple of steps in making the xst, you can lay out the pro-ihe front and back hardwood on a single, large blank, cutting the back spacer to f. you'll need to custom fit the spacer to your crevice tool, c this, tape the pieces to one sides. Then set the crevice -re* on the front edge of the back and trace its profile on the - piece. I cut the profile into nont at the band saw, but a jig >. a ould also work just fine. K-ShopNotes.com 37 |


