Woodworker's Journal 1982-6-5, страница 38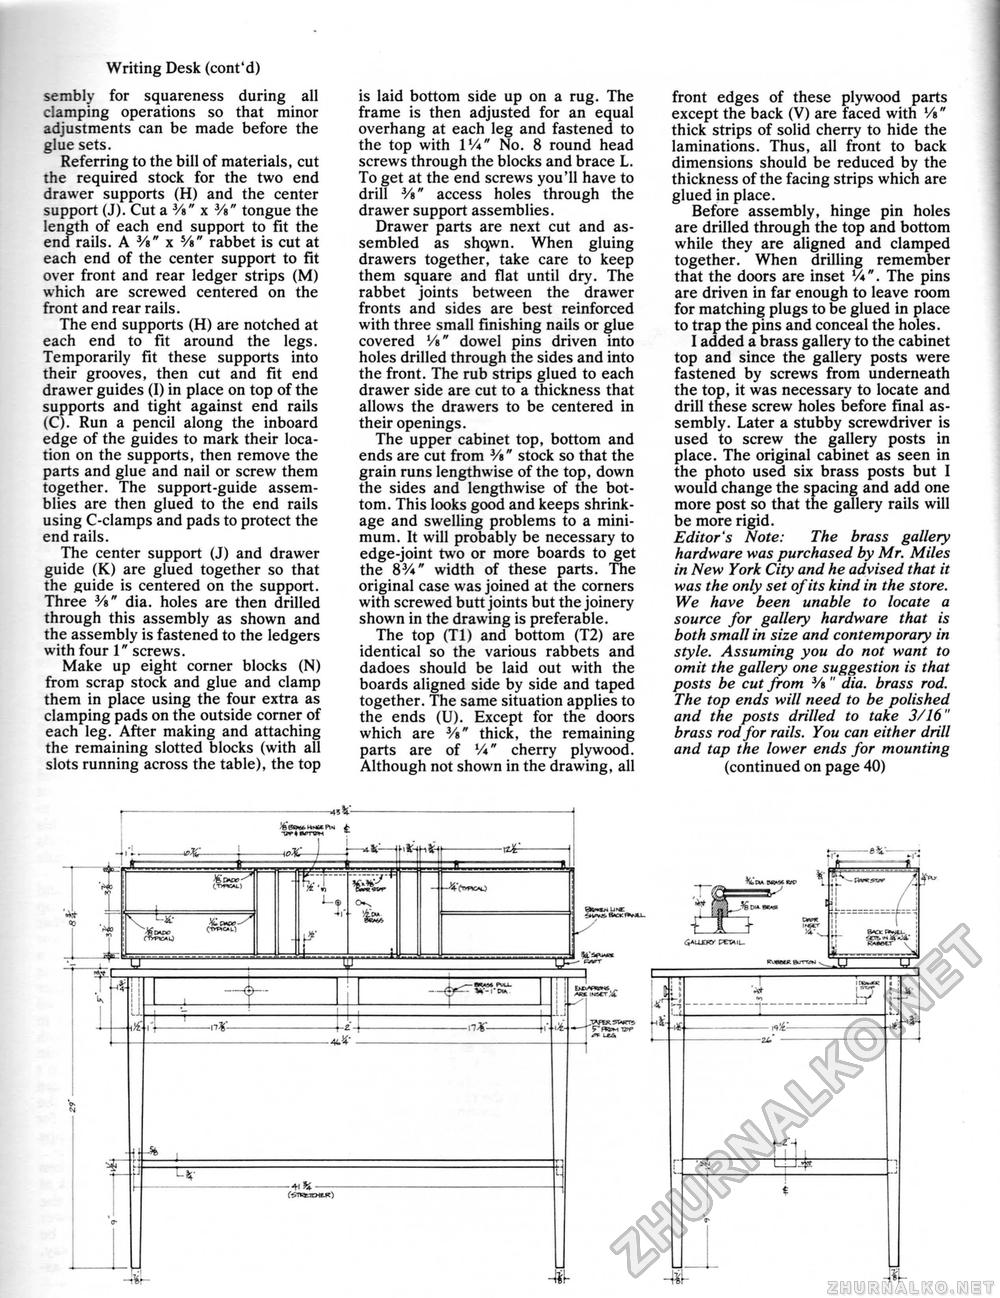
Writing Desk (cont'd) sembly for squareness during all clamping operations so that minor adjustments can be made before the glue sets. Referring to the bill of materials, cut the required stock for the two end drawer supports (H) and the center support (J). Cut a Vt" x V»" tongue the length of each end support to fit the en d rails. A 3/«" x Y»" rabbet is cut at each end of the center support to fit over front and rear ledger strips (M) which are screwed centered on the front and rear rails. The end supports (H) are notched at each end to fit around the legs. Temporarily fit these supports into their grooves, then cut and fit end drawer guides (I) in place on top of the supports and tight against end rails (C). Run a pencil along the inboard edge of the guides to mark their location on the supports, then remove the parts and glue and nail or screw them together. The support-guide assemblies are then glued to the end rails using C-clamps and pads to protect the end rails. The center support (J) and drawer guide (K) are glued together so that the guide is centered on the support. Three Va" dia. holes are then drilled through this assembly as shown and the assembly is fastened to the ledgers with four 1" screws. Make up eight corner blocks (N) from scrap stock and glue and clamp them in place using the four extra as clamping pads on the outside corner of each leg. After making and attaching the remaining slotted blocks (with all slots running across the table), the top is laid bottom side up on a rug. The frame is then adjusted for an equal overhang at each leg and fastened to the top with ll/i" No. 8 round head screws through the blocks and brace L. To get at the end screws you'll have to drill V»" access holes through the drawer support assemblies. Drawer parts are next cut and assembled as shqwn. When gluing drawers together, take care to keep them square and flat until dry. The rabbet joints between the drawer fronts and sides are best reinforced with three small finishing nails or glue covered V»" dowel pins driven into holes drilled through the sides and into the front. The rub strips glued to each drawer side are cut to a thickness that allows the drawers to be centered in their openings. The upper cabinet top, bottom and ends are cut from V»" stock so that the grain runs lengthwise of the top, down the sides and lengthwise of the bottom. This looks good and keeps shrinkage and swelling problems to a minimum. It will probably be necessary to edge-joint two or more boards to get the 8V*" width of these parts. The original case was joined at the corners with screwed butt joints but the joinery shown in the drawing is preferable. The top (Tl) and bottom (T2) are identical so the various rabbets and dadoes should be laid out with the boards aligned side by side and taped together. The same situation applies to the ends (U). Except for the doors which are Vt" thick, the remaining parts are of V*" cherry plywood. Although not shown in the drawing, all front edges of these plywood parts except the back (V) are faced with Vt" thick strips of solid cherry to hide the laminations. Thus, all front to back dimensions should be reduced by the thickness of the facing strips which are glued in place. Before assembly, hinge pin holes are drilled through the top and bottom while they are aligned and clamped together. When drilling remember that the doors are inset A". The pins are driven in far enough to leave room for matching plugs to be glued in place to trap the pins and conceal the holes. I added a brass gallery to the cabinet top and since the gallery posts were fastened by screws from underneath the top, it was necessary to locate and drill these screw holes before final assembly. Later a stubby screwdriver is used to screw the gallery posts in place. The original cabinet as seen in the photo used six brass posts but I would change the spacing and add one more post so that the gallery rails will be more rigid. Editor's Note: The brass gallery hardware was purchased by Mr. Miles in New York City and he advised that it was the only set of its kind in the store. We have been unable to locate a source for gallery hardware that is both small in size and contemporary in style. Assuming you do not want to omit the gallery one suggestion is that posts be cut from 3/s " dia. brass rod. The top ends will need to be polished and the posts drilled to take 3/16" brass rod for rails. You can either drill and tap the lower ends for mounting (continued on page 40) -It "W - fettajtHtK) .WiRSWrrs |


