Woodworker's Journal 1983-7-2, страница 58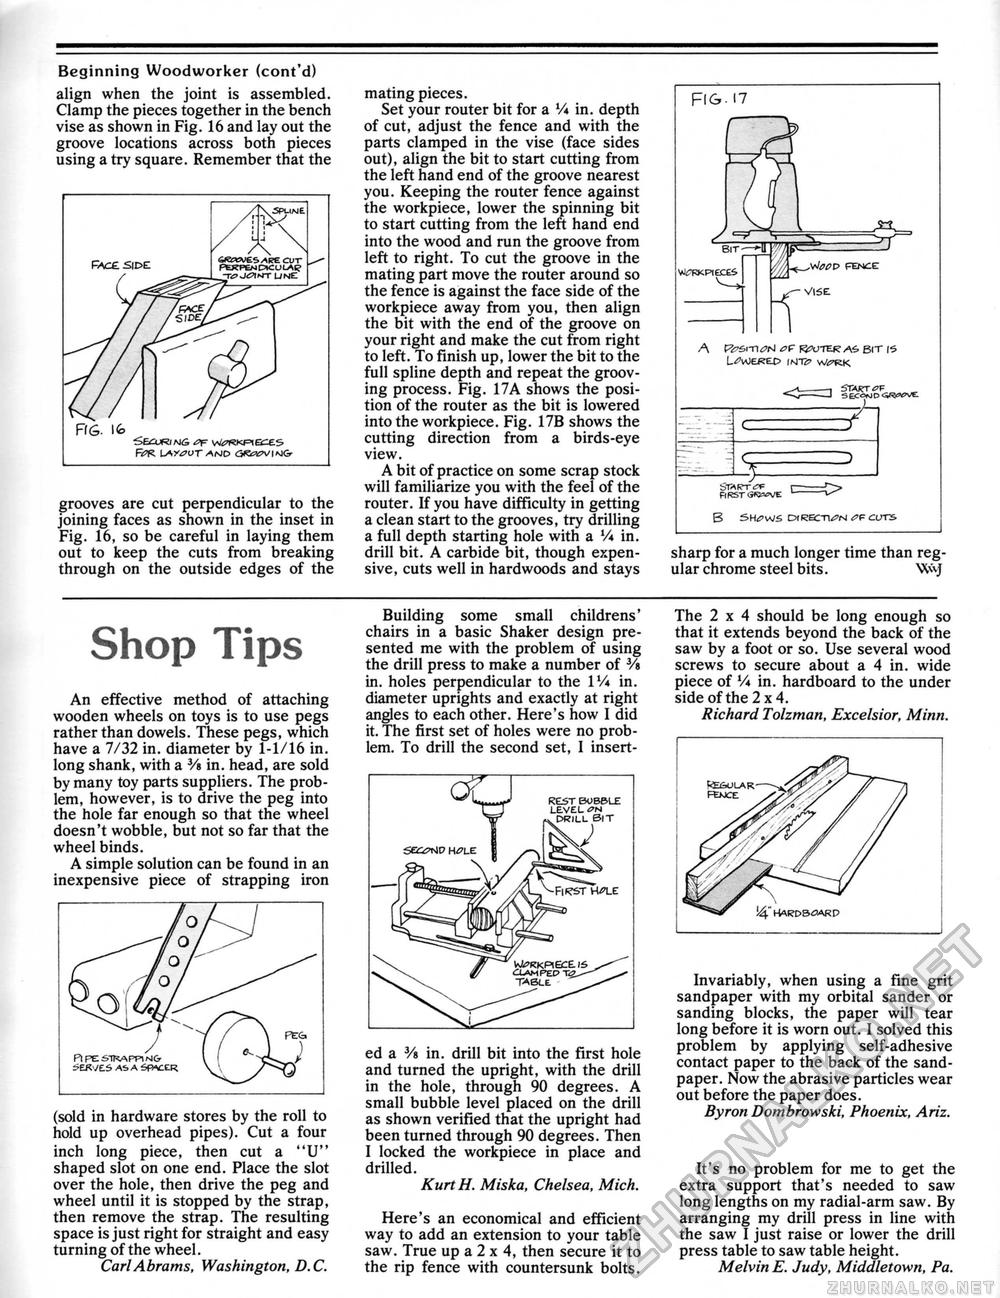
Beginning Woodworker (cont'd) align when the joint is assembled. Clamp the pieces together in the bench vise as shown in Fig. 16 and lay out the groove locations across both pieces using a try square. Remember that the grooves are cut perpendicular to the joining faces as shown in the inset in Fig. 16, so be careful in laying them out to keep the cuts from breaking through on the outside edges of the mating pieces. Set your router bit for a V* in. depth of cut, adjust the fence and with the parts clamped in the vise (face sides out), align the bit to start cutting from the left hand end of the groove nearest you. Keeping the router fence against the workpiece, lower the spinning bit to start cutting from the left hand end into the wood and run the groove from left to right. To cut the groove in the mating part move the router around so the fence is against the face side of the workpiece away from you, then align the bit with the end of the groove on your right and make the cut from right to left. To finish up, lower the bit to the full spline depth and repeat the grooving process. Fig. 17A shows the position of the router as the bit is lowered into the workpiece. Fig. 17B shows the cutting direction from a birds-eye view. A bit of practice on some scrap stock will familiarize you with the feel of the router. If you have difficulty in getting a clean start to the grooves, try drilling a full depth starting hole with a V* in. drill bit. A carbide bit, though expensive, cuts well in hardwoods and stays sharp for a much longer time than regular chrome steel bits. W\j Shop Tips An effective method of attaching wooden wheels on toys is to use pegs rather than dowels. These pegs, which have a 7/32 in. diameter by 1-1/16 in. long shank, with a 3/« in. head, are sold by many toy parts suppliers. The problem, however, is to drive the peg into the hole far enough so that the wheel doesn't wobble, but not so far that the wheel binds. A simple solution can be found in an inexpensive piece of strapping iron PlPeSTRAPPlNO ^EKVE.5 AS A SfWCER (sold in hardware stores by the roll to hold up overhead pipes). Cut a four inch long piece, then cut a "U" shaped slot on one end. Place the slot over the hole, then drive the peg and wheel until it is stopped by the strap, then remove the strap. The resulting space is just right for straight and easy turning of the wheel. CarlAbrams, Washington, D.C. Building some small childrens' chairs in a basic Shaker design presented me with the problem of using the drill press to make a number of 3/« in. holes perpendicular to the 1'/* in. diameter uprights and exactly at right angles to each other. Here's how I did it. The first set of holes were no problem. To drill the second set, I insert ed a V* in. drill bit into the first hole and turned the upright, with the drill in the hole, through 90 degrees. A small bubble level placed on the drill as shown verified that the upright had been turned through 90 degrees. Then I locked the workpiece in place and drilled. Kurt H. Miska, Chelsea, Mich. Here's an economical and efficient way to add an extension to your table saw. True up a 2 x 4, then secure it to the rip fence with countersunk bolts. The 2x4 should be long enough so that it extends beyond the back of the saw by a foot or so. Use several wood screws to secure about a 4 in. wide piece of V* in. hardboard to the under side of the 2x4. Richard Tolzman, Excelsior, Minn. !4" hardb^ARP Invariably, when using a fine grit sandpaper with my orbital sander or sanding blocks, the paper will tear long before it is worn out. I solved this problem by applying self-adhesive contact paper to the back of the sandpaper. Now the abrasive particles wear out before the paper does. Byron Dombrowski, Phoenix, Ariz. It's no problem for me to get the extra support that's needed to saw long lengths on my radial-arm saw. By arranging my drill press in line with the saw I just raise or lower the drill press table to saw table height. Melvin E. Judy, Middletown, Pa. |


