Woodworker's Journal 1985-9-1, страница 25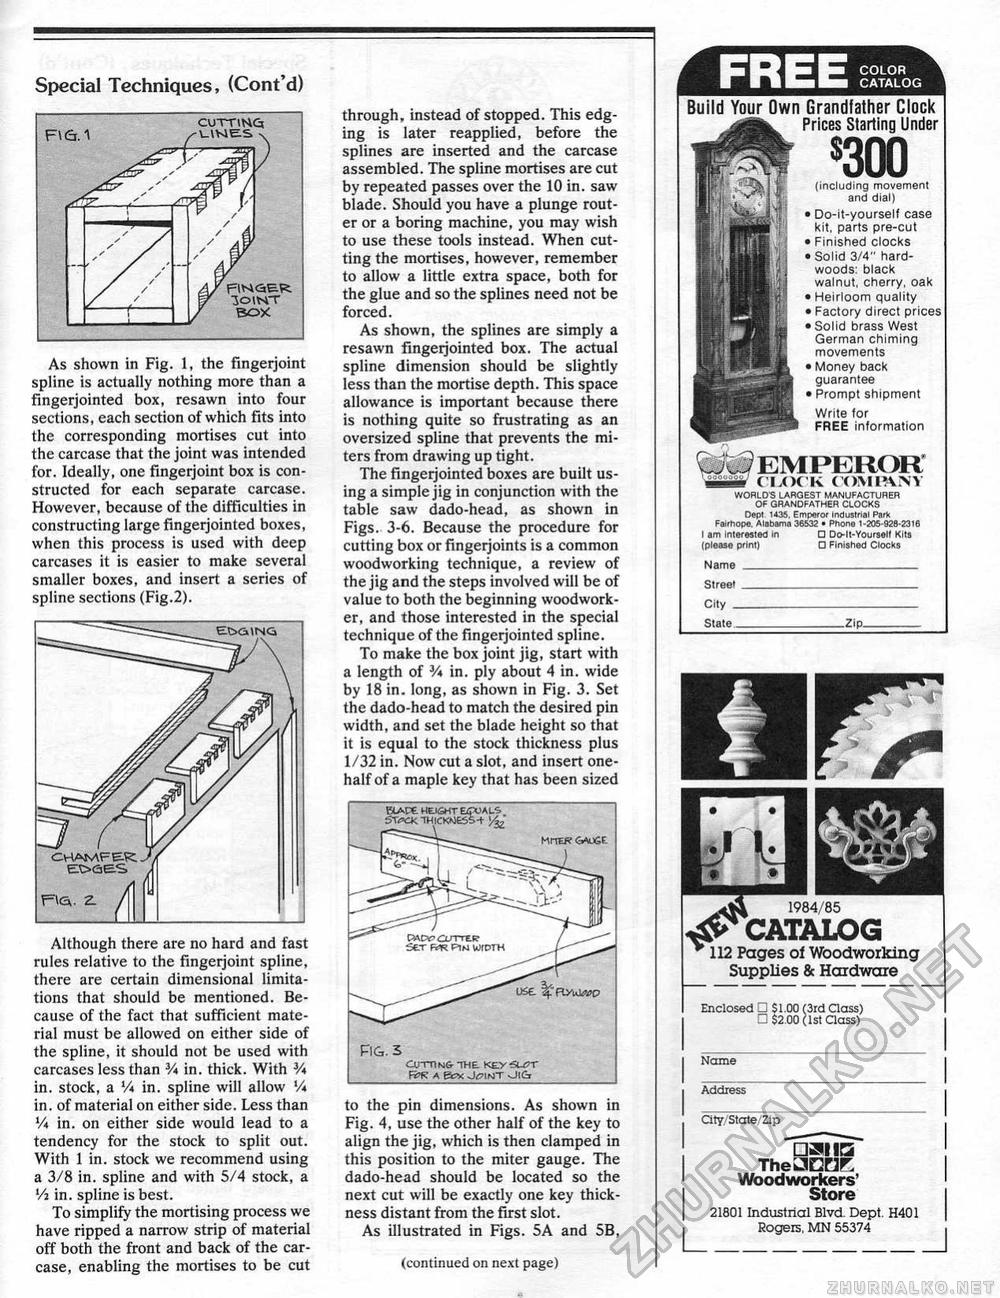
Special Techniques, (Cont'd) As shown in Fig. 1, the fingerjoint spline is actually nothing more than a fingerjointed box, resawn into four sections, each section of which fits into the corresponding mortises cut into the carcase that the joint was intended for. Ideally, one fingerjoint box is constructed for each separate carcase. However, because of the difficulties in constructing large fingerjointed boxes, when this process is used with deep carcases it is easier to make several smaller boxes, and insert a series of spline sections (Fig.2). Although there are no hard and fast rules relative to the fingerjoint spline, there are certain dimensional limitations that should be mentioned. Because of the fact that sufficient material must be allowed on either side of the spline, it should not be used with carcases less than 3A in. thick. With V* in. stock, a V* in. spline will allow V* in. of material on either side. Less than Vt in. on either side would lead to a tendency for the stock to split out. With 1 in. stock we recommend using a 3/8 in. spline and with 5/4 stock, a Vj in. spline is best. To simplify the mortising process we have ripped a narrow strip of material off both the front and back of the carcase, enabling the mortises to be cut through, instead of stopped. This edging is later reapplied, before the splines are inserted and the carcase assembled . The spline mortises are cut by repeated passes over the 10 in. saw blade. Should you have a plunge router or a boring machine, you may wish to use these tools instead. When cutting the mortises, however, remember to allow a little extra space, both for the glue and so the splines need not be forced. As shown, the splines are simply a resawn fingerjointed box. The actual spline dimension should be slightly less than the mortise depth. This space allowance is important because there is nothing quite so frustrating as an oversized spline that prevents the miters from drawing up tight. The fingerjointed boxes are built using a simple jig in conjunction with the table saw dado-head, as shown in Figs. 3-6. Because the procedure for cutting box or fingerjoints is a common woodworking technique, a review of the jig and the steps involved will be of value to both the beginning woodworker, and those interested in the special technique of the fingerjointed spline. To make the box joint jig, start with a length of 3A in. ply about 4 in. wide by 18 in. long, as shown in Fig. 3. Set the dado-head to match the desired pin width, and set the blade height so that it is equal to the stock thickness plus 1/32 in. Now cut a slot, and insert one-half of a maple key that has been sized to the pin dimensions. As shown in Fig. 4, use the other half of the key to align the jig, which is then clamped in this position to the miter gauge. The dado-head should be located so the next cut will be exactly one key thickness distant from the first slot. As illustrated in Figs. 5A and 5B, (continued on nest page) FI&.3 CuTtlNfr IKE K£y SL^T ftJR A Scv. Ji?INT JIG MriER&VjGE Build Your Own Grandfather Clock Prices Starting Under s300 (including movement and dial) Street City _ State_Zip. WORLD'S LARGEST MANUFACTURER OF GRANDFATHER CLOCKS Oept 1435, Emperor industrial Park Fairhope. Alabama 3653? ■ Phone 1-205-928-2316 I am Interested in □ Do-lt-Youraell Kits (please print) □ Finished Clocks Name _ EMPEROR C'IjOC'K COMPANY Write for FREE information ■ Do-it-yourseff case kit, parts pre-cut • Finished clocks • Solid 3/4" hardwoods: black walnut, cherry, oak • Heirloom quality • Factory direct prices • Solid brass West German chiming movements • Money back guarantee • Prompt shipment 1984/85 CATALOG 112 Pages of Woodworking Supplies & Hardware Enclosed □ S1.C0 (3rd Class) □ $2.00 (1st Class) Name Address Ctty/State/Zlp □BjlBf Theamr. Woodworkers' Store 21801 Industrial Blvd. Dept. H401 Rogers, MN 55374 |


