Woodworker's Journal 1985-9-4, страница 28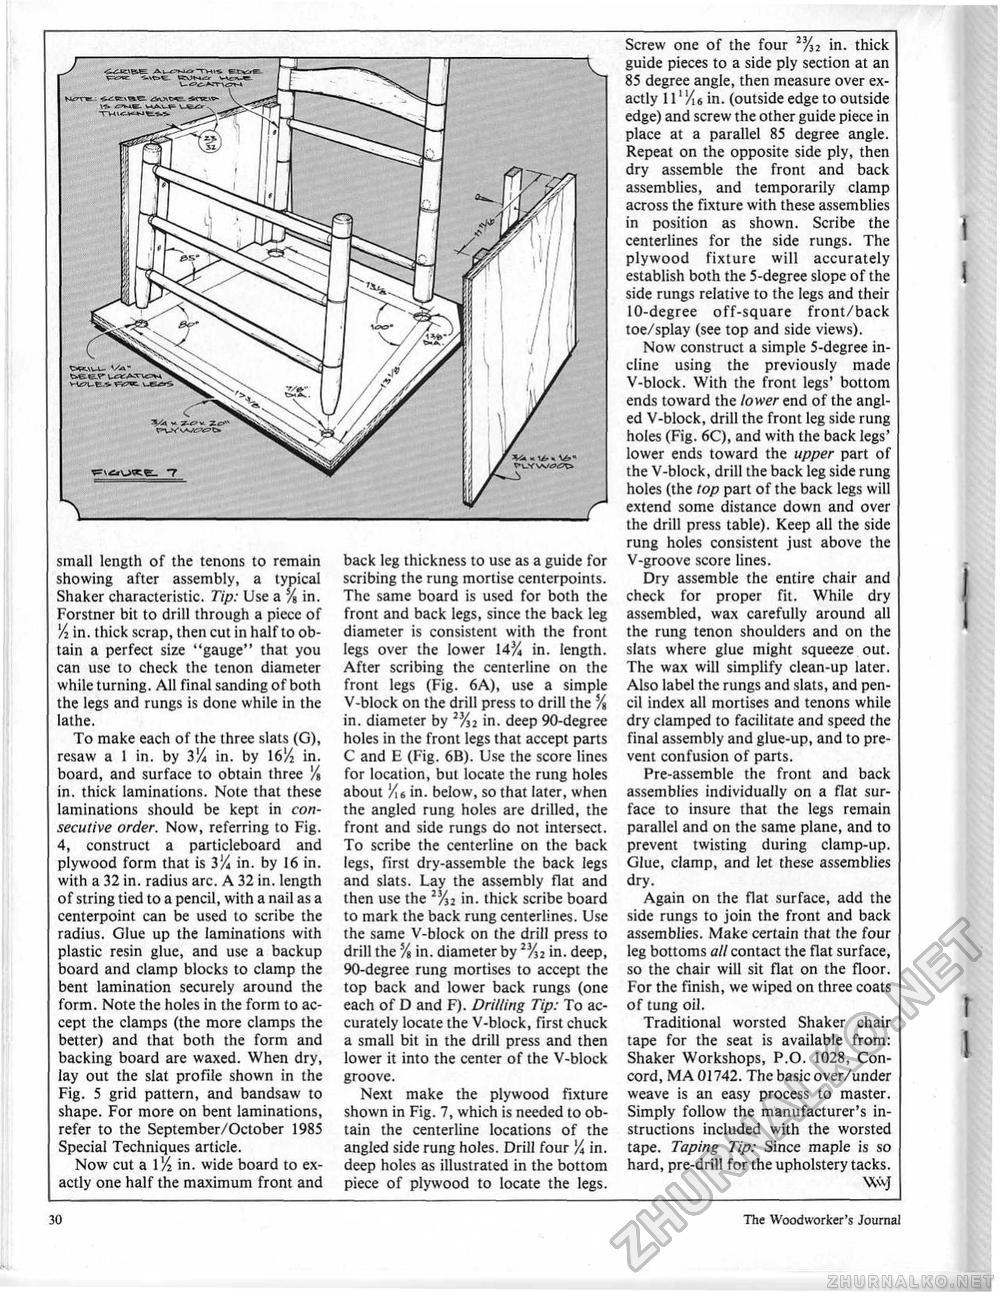
small length of the tenons to remain showing after assembly, a typical Shaker characteristic. Tip: Use a % in. Forstner bit to drill through a piece of % in. thick scrap, then cut in half to obtain a perfect size "gauge" that you can use to check the tenon diameter while turning. All final sanding of both the legs and rungs is done while in the lathe. To make each of the three slats (G), resaw a 1 in. by 3V* in. by 16'A in. board, and surface to obtain three % in. thick laminations. Note that these laminations should be kept in consecutive order. Now, referring to Fig. 4, construct a particleboard and plywood form that is in. by 16 in. with a 32 in. radius arc. A 32 in. length of string tied to a pencil, with a nail as a centerpoint can be used to scribe the radius. Glue up the laminations with plastic resin glue, and use a backup board and clamp blocks to clamp the bent lamination securely around the form. Note the holes in the form to accept the clamps (the more clamps the better) and that both the form and backing board are waxed. When dry, lay out the slat profile shown in the Fig. 5 grid pattern, and bandsaw to shape. For more on bent laminations, refer to the September/October 1985 Special Techniques article. Now cut a 1% in. wide board to exactly one half the maximum front and back leg thickness to use as a guide for scribing the rung mortise centerpoints. The same board is used for both the front and back legs, since the back leg diameter is consistent with the front legs over the lower 14% in. length. After scribing the centerline on the front legs (Fig. 6A), use a simple V-block on the drill press to drill the % in. diameter by % in. deep 90-degree holes in the front legs that accept parts C and E (Fig. 6B). Use the score lines for location, bul locate the rung holes about 'At in. below, so that later, when the angled rung holes are drilled, the front and side rungs do not intersect. To scribe the centerline on the back legs, first dry-assemble the back legs and slats. Lay the assembly flat and then use the in. thick scribe board to mark the back rung centerllnes. Use the same V-block on the drill press to drill the % in. diameter by 2%2 in. deep, 90-degree rung mortises to accept the top back and lower back rungs (one each of D and F). Drilling Tip: To accurately locate the V-block, first chuck a small bit in the drill press and then lower it into the center of the V-block groove. Next make the plywood fixture shown in Fig. 7, which is needed to obtain the centerline locations of the angled side rung holes. Drill four % in. deep holes as illustrated in the bottom piece of plywood to locate the legs. Screw one of the four 2l/n in. thick guide pieces to a side ply section at an 85 degree angle, then measure over exactly II1 Vi6 in. (outside edge to outside edge) and screw the other guide piece in place at a parallel 85 degree angle. Repeat on the opposite side ply, then dry assemble the front and back assemblies, and temporarily clamp across the fixture with these assemblies in position as shown. Scribe the centerlines for the side rungs. The plywood fixture will accurately establish both the 5-degree slope of the side rungs relative to the legs and their 10-degree off-square front/back toe/splay (see top and side views). Now construct a simple 5-degree incline using the previously made V-block. With the front legs' bottom ends toward the lower end of the angled V-block, drill the front leg side rung holes (Fig. 6C), and with the back legs' lower ends toward the upper part of the V-block, drill the back leg side rung holes (the top part of the back legs will extend some distance down and over the drill press table). Keep all the side rung holes consistent just above the V-groove score lines. Dry assemble the entire chair and check for proper fit. While dry assembled, wax carefully around all the rung tenon shoulders and on the slats where glue might squeeze out. The wax will simplify clean-up later. Also label the rungs and slats, and pencil index all mortises and tenons while dry clamped to facilitate and speed I he final assembly and glue-up, and to prevent confusion of parts. Pre-assemble the front and back assemblies individually on a fiat surface to insure that the legs remain parallel and on the same plane, and to prevent twisting during clamp-up. Glue, clamp, and let these assemblies dry. Again on the fiat surface, add the side rungs to join the front and back assemblies. Make certain that the four leg bottoms all contact the fiat surface, so the chair will sit fiat on the floor. For the finish, we wiped on three coats of tung oil. Traditional worsted Shaker chair tape for the seat is available from: Shaker Workshops, P.O. 1028, Concord, MA 01742. The basic over/under weave is an easy process to master. Simply follow the manufacturer's instructions included with the worsted tape. Taping, Tip: Since maple is so hard, pre-drill for the upholstery tacks. Wwf 30 The Woodworker's Journal |


