Woodworker's Journal 1985-9-6, страница 22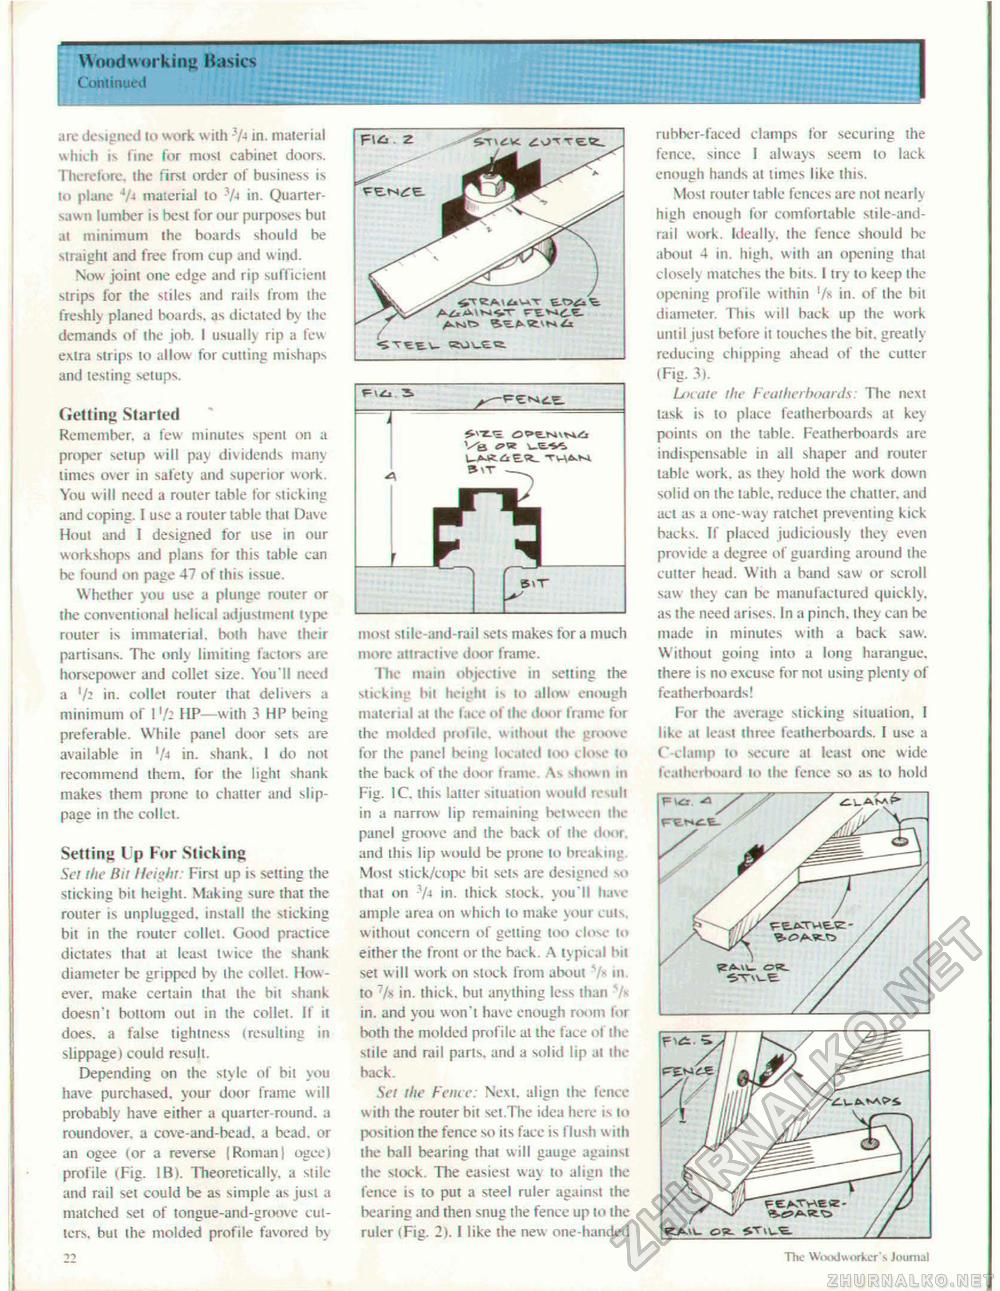
Woodworking Basics Continued are designed lo work with V* in. material which is fine for most cabinet doors. Therefore, the first order of business is to plane 4A material to V-< in. Quarter-saw n lumber is best for our purposes but at minimum Ihe boards should he straight and free from cup and wind. Now joint one edge and rip sufficient strips for the stiles and rails from the freshly planed boards, as dictated by the demands of the job. I usually rip a few extra strips to allow for cutting mishaps and testing setups. Getting Started Remember, a few minutes spent on a proper setup will pay dividends many limes over in safety and superior work. You will need a router table for sticking and coping. I use a rouler table thai Dave Hout and I designed for use in our workshops and plans for this table can be found on page 47 of this issue. Whether you use a plunge rouler or the conventional helical adjustment type router is immaterial, both have their partisans. The only limiting factors are horsepower and collel size. You'll need a '/i in, collel router (hat delivers a minimum of 1'/2 HP—with 3 HP being preferable. While panel door sets are available in '/» in. shank. I do not recommend them, for the light shank makes them prone to chatter and slippage in the collet. Setting I p For Sticking Sel the Hit Height Fit si up is setting the sticking bit height. Making sure that the router is unplugged, insiall the slicking bit in ihe router collet. Good practice dictates that at least Iwice the shank diameter be gripped by ihe collet. However. make certain lhai ihe hit shank doesn't bottom out in the collet. If it does, a false tightness (resulting in slippage) could result. Depending on ihe style of bii you have purchased, your door frame will probably have either a quarter-round, a roundover. a cove-and-bead. a bead, or an ogee (or a reverse (Roman) ogee I profile (Fig. IB I. Theoretically, a stile and rail sel could be as simple as just a matched set of tongue-and-groove cutters, but ihe molded profile favored by A^i AIN^T C-E-Vl^t ^Tttv- tsovEia. mosi siile-and-rail seis makes for a much more attractive door frame. The main objective in setting the sticking hit height is lo allow enough material al ihe face of the door frame for the molded profile, without the groove for ihe panel being located loo close to the back of ihe door frame. As shown in Fig. IC. this latter situation would result in a nanow lip remaining between the panel groove and the back of the door, and this lip would be prone lo breaking Most stick/cope bit sei> are designed so that on Vj in. thick slock, you'll have ample area on w hich lo make your cuts, without concern of getting too close lo either the front or the hack A typical bii set w ill work on slock from about 7- in. to 7/» in. thick, but anything less than 7* in. and you won't have enough room for both ihe molded profile al the face ol the slile and rail pans, and a solid lip at the hack. Set the Fence: Next, align the fence w ith the router bit set.Thc idea here is to position the fence so its face is flush w iih the ball bearing that will gauge againsi the stock. The easiest way to align the fence is to put a steel ruler against the bearing and then snug the fence up to the ruler (Fie. 2). I like the new one handed rubber-faced clamps lor securing the fence, since I always seem lo lack enough hands al times like ihis. Most rouler table fences are not nearly high enough for comfortable stile-and-rail work. Ideally, the fence should he about 4 in. high, wiih an opening thai closels matches the hits, t try to keep the opening profile within '/* in. of the hit diameter. This will back up the work until jusl before it touches the bit, greatly reducing chipping ahead of the cutler (Fig. 3|. Locate the Featherboards: The next lask is to place featherboards at key points on the table. Featherboards are indispensable in al! shaper and router lable work, as they hold the work down solid on the table, reduce the chatter, and act as a one-way raichet preventing kick hacks. If placed judiciously they even provide a degree of guarding around the culler head. With a band saw or scroll saw they can be manufactured quickly, as the need arises. In a pinch, they can be made in minutes with a back saw. Without going into a long harangue, there is no excuse for not using plenly of featherboards! For the average sticking situation. I like at leasi three featherboards. I use a t clamp lo secure al least one wide feaiherhoard lo the fence so as to hold The Wixulmirker's Journal Fli! 3. |


