Woodworker's Journal 1985-9-6, страница 59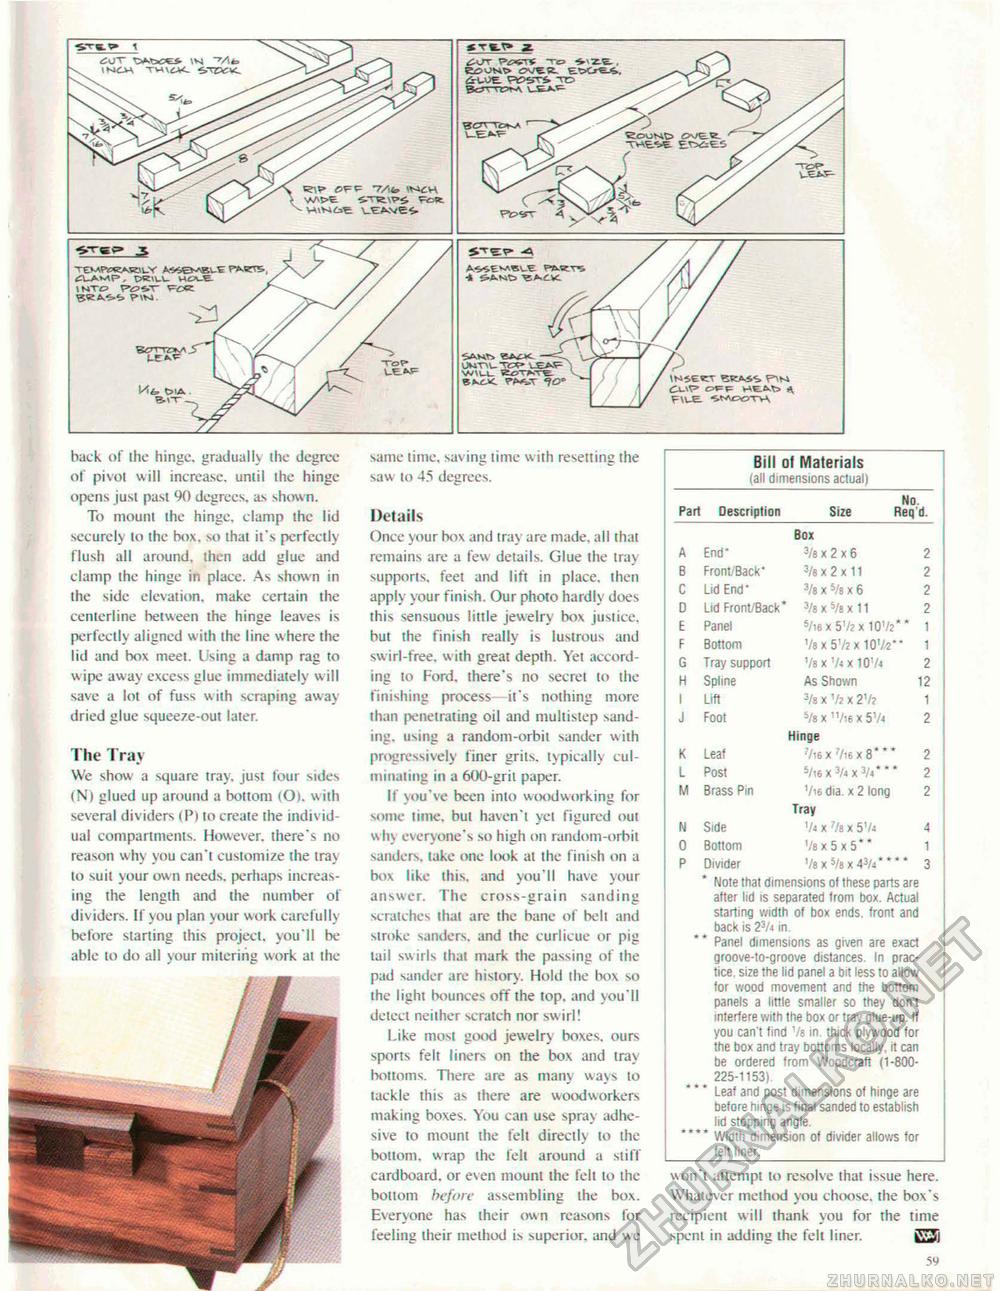
Bill of Materials (all dimensions actual) Bill of Materials (all dimensions actual)
N Side V< x 7/a x 5V4 4 0 Bottom V8 x 5 x 5** 1 P Divider Vs x 5/e x 43At* ** * 3 N Side V< x 7/a x 5V4 4 0 Bottom V8 x 5 x 5** 1 P Divider Vs x 5/e x 43At* ** * 3 * Note that dimensions of these parts are after lid is separated from box. Actual starting width of box ends, front and back is 23/» in. Panel dimensions as given are exact groove-to-groove distances. In practice. size the lid panel a bit less to allow for wood movement and the bottom panels a little smaller so they don't interfere with the box or tray glue-up. If you can't find 7e in thick plywood for the box and tray bottoms locally, it can be ordered from Woodcraft (1-800-^ 225-1153) Leaf and post dimensions of hinge are before hinge is final sanded to establish lid stopping angle. Width dimension of divider allows for felt liner. same time, saving time with resetting the saw to 45 degrees. Details Once your box and tray are made, all that remains are a few details. Glue the tray supports, feet and lift in place, then apply your finish. Our photo hardly does this sensuous little jewelry box justice, but the finish really is lustrous and swirl-free, with great depth. Yet according to Ford, there's no secret to the finishing process it's nothing more than penetrating oil and multistep sanding, using a randoin-orbit sander with progressively finer grits, typically culminating in a 600-grit paper. If you've been into woodworking for some lime, but haven't yet figured out why everyone's so high on random-orbit sanders, take one look at the finish on a box like this, and you'll have your answer. The cross-grain sanding scratches that are the bane of belt and stroke sanders. and the curlicue or pig tail swirls that mark the passing of the pad sander are history. Hold the box so the light bounces off the top. and you'll detect neither scratch nor swirl! Like most good jewelry boxes, ours sports felt liners on the box and tray bottoms. There are as many ways to tackle this as there are woodworkers making boxes. You can use spray adhesive to mount the felt directly to the bottom, wrap the felt around a stiff cardboard, or even mount the felt to the boitom before assembling ihe box. Everyone has their own reasons for feeling their method is superior, and we won't attempt to resolve that issue here. Whatever method you choose, the box's recipient will thank you for the time spent in adding the felt liner. kV-5i 59 wcass PIM FNJE. -StACPOTV\ back of ihe hinge, gradually the degree of pivot will increase, until the hinge opens just past 90 degrees, as shown. To mount the hinge, clamp the lid securely lo the box. so that it's perfectly flush all around, then add glue and clamp the hinge in place. As shown in the side elevation, make certain the centerline between the hinge leaves is perfectly aligned with the line where the lid and box meet. I sing a damp rag to w ipe away excess glue immediately will save a lot of fuss with scraping away dried glue squeeze-out later. I he Tray We show a square tray, just four sides (N) glued up around a bottom (O). with several dividers (Pi to create the individual compartments. However, there's no reason why you can't customize the tra\ to suit your own needs, perhaps increasing the length and the number of dividers. If you plan your work carefully before starting this project, you'll be able to do all your mitering work at the 3 v nto FOK -ft ^AMts •^A.dVC TOP ue*J= -7/i(o |
||||||||||||||||||||||||||||||||||||||||||||||||||||||||||||||||||||


