Woodworker's Journal 1985-9-6, страница 66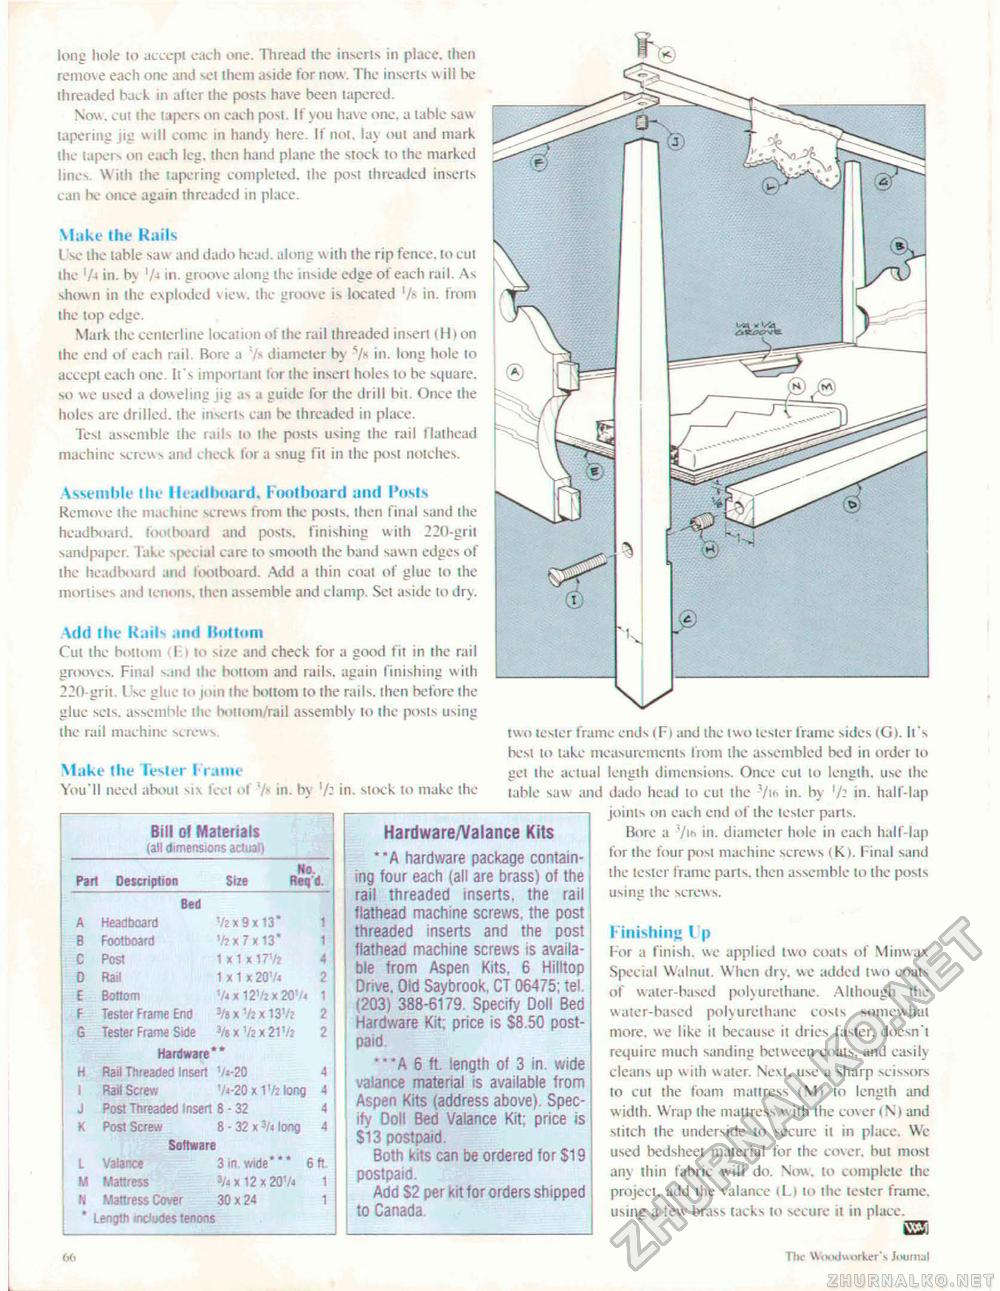
long hole to accept each one. Thread the inserts in place, then remove each one an J set them aside for now. The inserts w ill be threaded back in after the posts have been tapered. Now. cut the tapers on each post. If you have one, a table saw tapering jig will come in hand} here. Jf not. lay out and mark the tapers on each leg. then hand plane ihe stock to the marked lines With the tapering completed, the post threaded inserts can be once again threaded in place. Make the Kails Use the table saw and dado head, along w ith the rip fence, to cut the '/j in. b\ '/-• in. groove along the iiiMde edge of each rail. An shown in the exploded view, the groove is located 'A in. from the top edge. Mark the centerline location of the rail threaded insert (H) on the end of each rail. Bore a /k diameter by 7* in. long hole to accept each one. It's important for the insert holes to be square, so we used a doweling jig as a guide for the drill bit. Once the holes are drilled, the inserts can be threaded in place. Test assemble the rails lo ihe posts using the rail flalhead machine screws and check for a snug fit in the post notches. Assemble the Headboard, Footboard and Posls Remove the machine screws from the posts, then final sand the headboard, footboard and posts, finishing with 220-grii sandpaper, lake spo. sal care to smooth the band sawn edges of ihe headboard and fooiboard. Add a thin coal of glue to the mortises and tenons, then assemble and clamp. Set aside to dry Add the Kails and Bottom Cul the bottom I ■ to si/e and check tor a good fit in the rail grooves. Final sand the bottom and rails, again finishing w ith 220-grit. Use glue to join ihe bottom to the rails, then before the glue sels. assemble the bottom/rail assembly to the posls using the rail machine screws. Make the Tester Frame You'll need about six feel ol ■ in. b\ in. stock to make ihe Bill of Materials (all dimensions actual) Part Description Size NO. Heq d. Bed Part Description Size Bed
Length indwJes tenons Length indwJes tenons Hardware/Valance Kits *"A hardware package containing four each (all are brass) of the rail threaded inserts, the rail flathead machine screws, the post threaded inserts and the post flathead machine screws is available from Aspen Kits. 6 Hilltop Drive. Old Saybrook, CT 06475; tel. (203) 388-6179. Specify Doll Bed Hardware Kit; price is $8.50 postpaid. "•A 6 ft. length of 3 in. wide valance material is available from Aspen Kits (address above). Specify Doll Bed Valance Kit; price is S13 postpaid. Both kits can be ordered for $19 postpaid. Add S2 per kit lor orders shipped to Canada. two tevicr frame ends (Fi and the tun lestcr frame sides (G). It's best lo Lake measurements from ihe assembled bed in order lo get the actual length dimensions. Once cul lo length, use ihe lable saw and dado head io cut the Vift in. by 7? in. half-lap joints on each end of ihe tester parts. Bore a V'" in. diameter hole in each half-lap for the four post machine screws (K). l-inal sand the tester frame parts, then assemble to the posls usina the screws. Finishin» t p For a finish, we applied two coats of Minwax Special Walnut. When dry, we added two coals of water-based polyurcthane. Although ihe water-based polyurcthane costs somewhat more, we like ii because ii dries faster, doesn't require much sanding between Coats, and easily cleans up with water. Next, use a sharp scissors to cut the foam mattress (M) to length and w idth. Wrap the mattress with ihe cover (N) and stitch the underside lo secure ii in place. We used bedsheei material for the cover, but most any lliin fabric will do. Now. to complete the project, add the valance iL) to the tester frame, using a feu brass tacks io secure it in place. w> Tht" Wntnimirter's Juiim.il |
||||||||||||||||||||||||||||||||||||||||||||||||||||||||||||||||


