Woodworker's Journal 1993-17-1, страница 19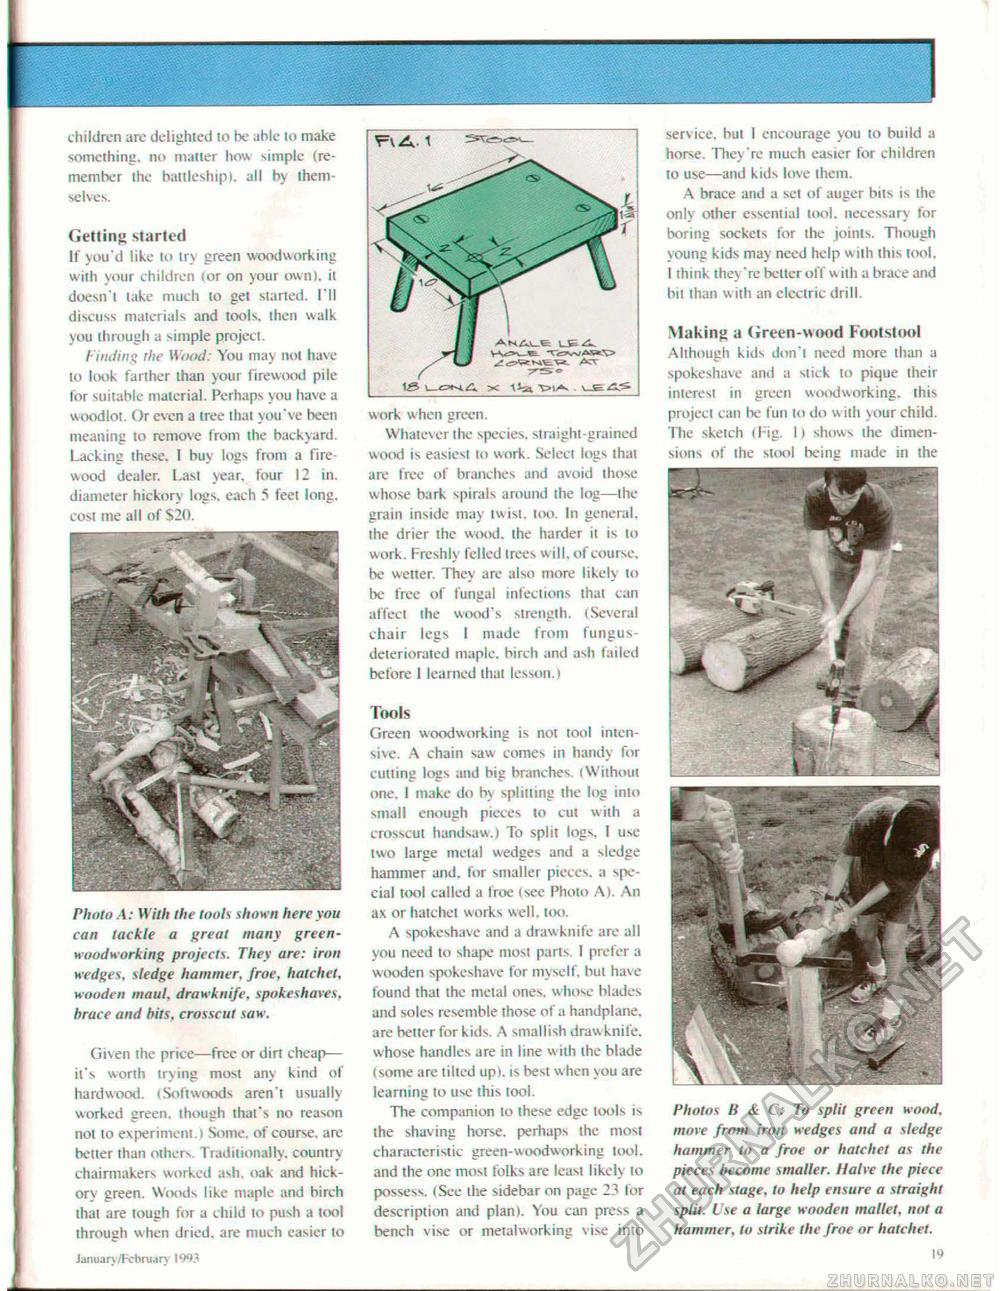
children arc delighted to be able lo make something, no matter how simple (remember the battleship I. all by themselves. Getting started If you'd like to try green woodworking with your children (or on your own), it doesn't lake much to get started. I'll discuss materials and tools, then walk you through a simple project. Finding the Wood: You may not have to look farther than your firewood pile for suitable material. Perhaps you have a woodlot. Or even a tree that you've been meaning to remove from the backyard. Lacking these. I buy logs from a firewood dealer. Last year, four 12 in. diameter hickory logs, each 5 feet long, cost me all of S20. Photo .4: With the tools shown here you can tackle a great many green-woodworking projects. They are: iron wedges, sledge hammer, froe, hatchet, wooden maul, drawknife, spokeshaves, brace and hits, crosscut saw. Given the price—free or dirt cheap— it's worth trying most any kind of hardwood. (Softwoods aren't usually worked green, though that's no reason not to experiment.) Some, of course, arc better than other-,. Traditionally, country chairmakers worked ash. oak and hickory green. Woods like maple and birch that are tough for a child to push a tool through when dried, are much easier to January /February 1993 work when green. Whatever the species, straight-grained wood is easiest to work. Select logs that are free of branches and avoid those whose bark spirals around the log—the grain inside may twist, too. In general, the drier the wood, the harder it is to work. Freshly felled trees will, of course, be welter. They are also more likely to be free of fungal infections thai can affect the wood's strength. (Several chair legs I made from fungus-deteriorated maple, birch and ash failed before 1 learned thai lesson.) Tools Green woodworking is not tool intensive. A chain saw comes in handy for culling logs and big branches. (Without one. I make do by splitting the log into small enough pieces to cut with a crosscut handsaw.) To split logs, I use two large meLal wedges and a sledge hammer and. for smaller pieces, a special tool called a froe (see Photo A). An ax or hatchet works well. too. A spokeshave and a drawknife are all you need to shape most parts. I prefer a wooden spokeshave for myself, but have found that the metal ones, whose blades and soles resemble those of a handplane, are better for ktds. A smallish drawknife, whose handles are in line with the blade (some are tilted up), is best when you are learning to use this tool. The companion lo these edge tools is the shaving horse, perhaps the most characteristic green-woodworking tool, and the one most folks are least likely to possess. (See the sidebar on page 23 for description and plan). You can press a bench vise or metalworking vise into serv ice, but I encourage you to build a horse. They're much easier for children to use—and kids love them. A brace and a set of auger bits is the only other essentia! tool, necessary for boring sockcts for the joinis. Though young kids may need help with this loci. I think they're better off w till a brace and bit than with an electric drill. Making a Green-wood Footstool Although kids don't need more than a spokeshave and a stick to pique their interest in green woodworking, this project can be fun lo do \yilh \our child. The sketch d ig. 1) shows the dimensions of ihe siool being made in the Photos B <£ C: To split green wood, move from iron wedges and a sledge hammer to a froe or hatchet as the pieces become smaller. Halve the piece at each stage, to help ensure a straight split. Use a large wooden mallet, not a hammer, to strike the froe or hatchet. 19 |


