Woodworker's Journal 1993-17-1, страница 42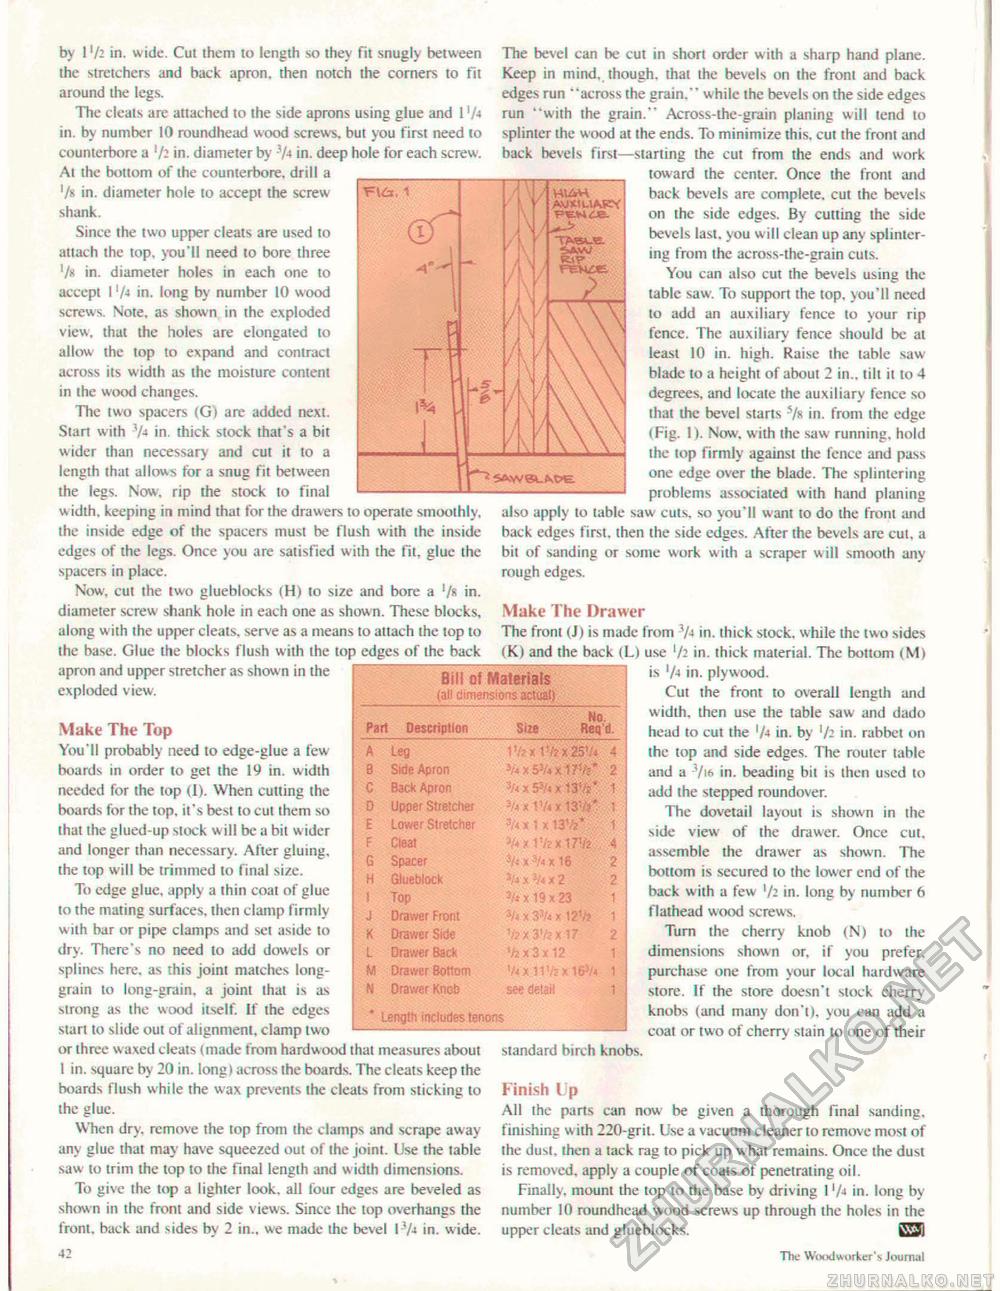
by 1V- in. wide. Cut them to length so they fit snugly between the stretchers and hack apron, then notch the corners to fit around the legs. The cleats are attached to the side aprons using glue and 1 '/4 in. by number 10 roundhead wood screws, but you first need to counterbore a '/-in. diameter by '/4 in. deep hole for each screw. At the bottom of the counterbore. drill a '/« in. diameter hole to accept the screw shank. Since the two upper cleats are used to attach the lop. you'll need to bore three 7» in. diameter holes in each one to accept 1 '/* in. long by number 10 wood screws. Note, as shown in the exploded view, thai the holes are elongated to allow the top to expand and contract across its width as the moisture content in the wood changes. The two spacers (G) are added next. Start with 3/« in thick stock that's a bit wider than necessary and cut it to a length that allows for a snug fit between the legs. Now. rip the stock to final width, keeping in mind that for the drawers to operate smoothly, the inside edge of the spacers must be flush with the inside edges of the legs. Once you are satisfied with the fit, glue the spacers in place. Now, cut the two glueblocks (H) to size and bore a '/« in. diameter screw shank hole in each one as shown. These blocks, along with the upper cleats, serve as a means to attach the top to the base. Glue the blocks flush with the top edges of the back apron and upper stretcher as shown in the exploded view. Make The Top You'll probably steed to edge-glue a few boards in order lo get the 19 in. width needed for the top (1). When cutting the boards for the top. it's best to cut them so that the glued-up stock w ill be a bit w ider and longer than necessary. After gluing, the top will be trimmed to final size. To edge glue, apply a thin coat of glue to the mating surfaces, then clamp firmly with bar or pipe clamps and set aside to dry. There's no need to add dowels or splines here, as this joint matches long-grain lo long-grain, a joint that is as strong as the wood itself. If the edges start to slide out of alignment, clamp two or three waxed cleats (made from hardwood that measures about 1 in. square by 20 in. long) across the boards. The cleats keep the boards flush while the wax prevents the cleats from sticking to the glue. When dry, remove the top front the clamps and scrape away any glue that may have squeezed out of the joint. Use the table saw to trim the top to the final length and u idth dimensions. To give ihe top a lighter look, all lour edges are beveled as shown in the front and side views. Since the top overhangs the front, back and sides by 2 in., we made the bevel IV-" in. wide. 42 Bill of Materials (all dimensions actual)
Length includes tenons Length includes tenons The bevel can be cut in short order with a sharp hand plane. Keep in mind, thoueh. that the bevels on the front and back edges run "across the grain." while the bevels on the side edges run "with the grain." Across-the-grain planing will tend to splinter the wood at the ends. To minimize this, cut the front and back bevels first—starting the cut from the ends and work toward the center. Once the front and back bevels are complete, cut the bevels on the side edges. By cutting the side bevels last, you w ill clean up any splintering from ihe across-the-grain cuts. You can also cut the bevels using the table saw. To support the top, you'll need to add an auxiliary fence lo your rip fence. The auxiliary fence should be at least 10 in. high. Raise ihe table saw blade to a height of about 2 in., tilt it to 4 degrees, and locate the auxiliary fence so thai the bevel starts s/g in. from the edge (Fig. I). Now. with the saw running, hold the top firmly against the fence and pass one edge over the blade. The splintering problems associated with hand planing also apply lo table saw cuts, so you'll want to do the front and back edges first, then the side edges. After the bevels are cut. a bit of sanding or some work with a scraper will smooth any rough edges. Make The Drawer The from (J) is made from 7-» in, thick stock, while the two sides (K) and the back (L) use 7a in. thick material. The bottom (Ml is V-i in. plywood, Cut the front to overall length and width, then use the table saw and dado head to cut the '/»in. by 7; in. rabbet on ihe top and side edges. The rouler table and a 3/» in. beading bit is then used lo add the stepped roundover. The dovetail layout is shown in the side view of the drawer. Once cut, assemble the drawer as shown. The bottom is secured to the tower end of the back with a few 7; in. long by number 6 flathead wood screws. Tum the cherry knob (N) to the dimensions shown or. if you prefer, purchase one from your local hardware store. If the store doesn't stock cherry knobs (and many don't), you can add a coat or two of cherry stain to one of their standard birch knobs. Finish Up All the pans can now be given a thorough final sanding, finishing w ith 220-grit. Use a vacuum cleaner lo remove most of Ihe dust, ihen a tack rag to pick up what remains. Once ihe dust is removed, apply a couple of coats of penetrating oil. Finally, mount the top to the base by driving 17* in. long by number 10 roundhead wood screws up through ihe holes in the upper cleats and glueblocks. lVJ; The Woodworkers Journal |
||||||||||||||||||||||||||||||||||||||||||||||||||||||||||||


