Woodworker's Journal 1993-17-3, страница 39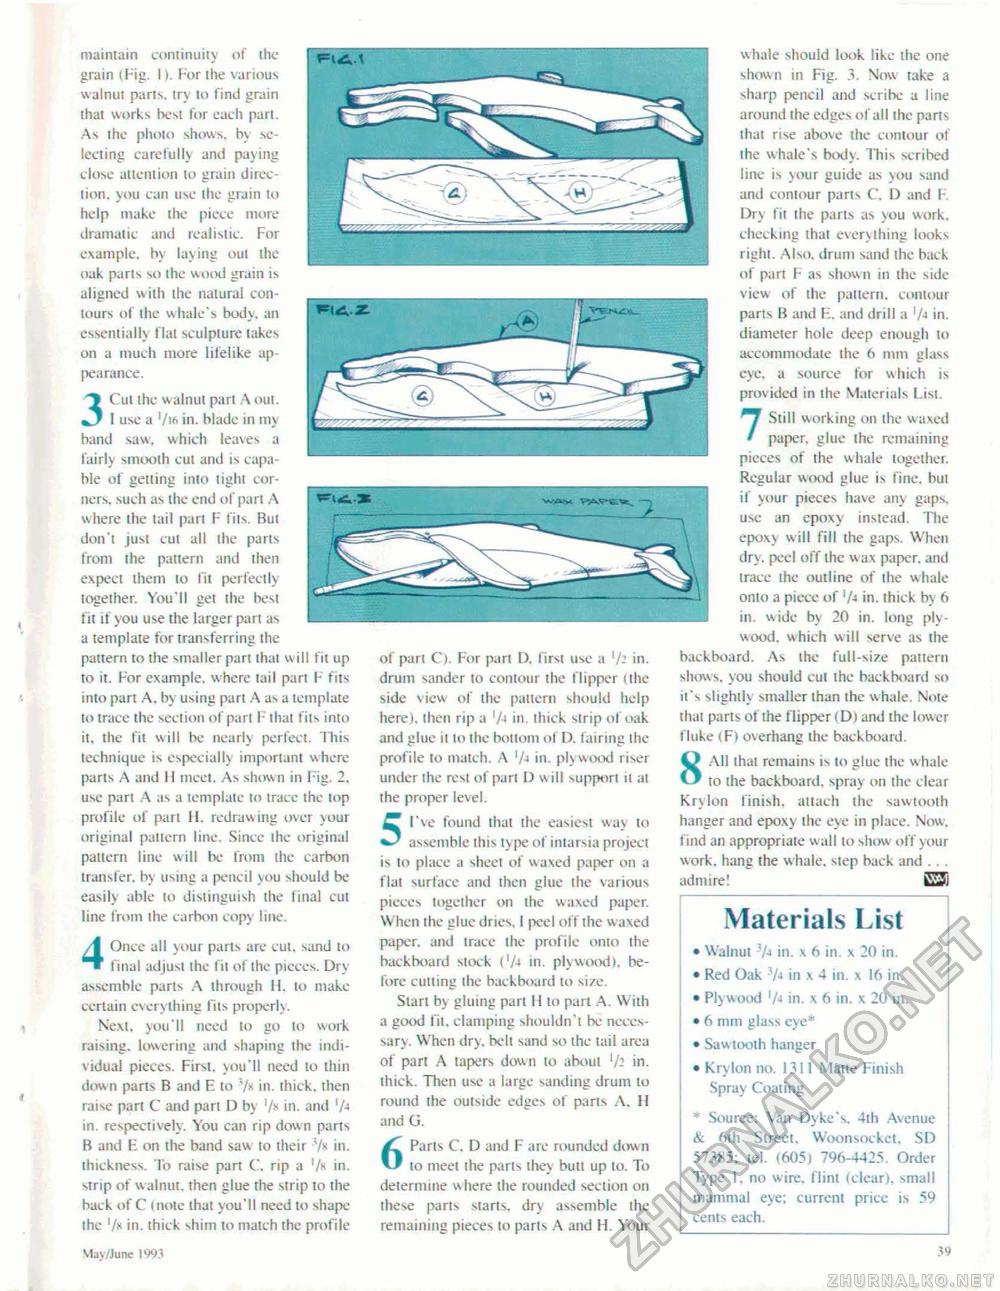
maintain continuity of the grain (Fig. 1). For the various walnut parts, try to find grain that works best for each pari. As the photo shows, by selecting carefully ami paying close attention to grain direction. you can use the grain to help make the piece more dramatic and realistic. For example, by laying out the oak parts so the wood gram is aligned with the natural contours of the whale's body, an essentially flat sculpture lakes on a much more litelike appearance. 3 Cut the walnut part A out. I use a '/ia in. blade in my fairly smooth cut and is capable of gelling into light corners. such as the end of part A where the tail part F fits, Bui don't just cut all the parts from the pattern and then expeci them to lit perfectly together. You'll gel the best fit if you use the larger part as a template for transferring the pattern to the smaller pari that will fit up to it. For example, where lail pari I- fits into part A. by using part A as a template to trace the section of part F that fits into it. the fit will be nearly perfect. This technique is especially important where parts A and H meet. As shown in Fig. 2. use pari A as a template to trace the top profile of pari 11. redrawing over your original pattern line. Since ihe original pattern line will be from the carbon transfer, by using a pencil you should be easily able to distinguish (he final cut line from the carbon copy line. 4 Once all \our parts are cut. sand to final adjust ihe In of the pieces. Dry assemble parts A through !i. to make certain everything fits properly. Next, you'll need 10 go to work raising, lowering and shaping the indi-\idual pieces. First, you'll need to thin down parts B and E to 7* in. ihick. then raise pari C and part D by '/* in. and in. respectively. You can rip down parts B and E on the band saw to their 7* in. thickness. To raise part C. rip a 7* in. strip of walnut, then glue the strip to the back of C (note that you'll need to shape the '/«in. thick shim to match the profile
of pari C). For pan D, first use a l/i in. drum sander lo contour the flipper (the side view of the pattern should help here), then rip a '/■4 in. thick sirip of oak and glue it lo the bottom of D. fairing the profile to match. A '/-> in. plywood riser under ihe resl of pari D will suppori ii al the proper level. ^ I've found thai the easiest way to assemble this type of intarsia project is to place a sheet of waxed paper on a flat surface and then glue ihe various pieces together on the waxed paper. When ihe glue dries. I peel off the w axed paper, and trace the profile onto the backboard stock ('/■» in. plywood), before cutting the backboard to size. Start b> gluing part II to part A. With a good fit, clamping shouldn't be necessary. When dry. belt sand so the tail area of part A tapers down lo about '/- in. ihick. Then use a large sanding drum to round the outside edges of parts A. H and G. 6 Parts C. D and F are rounded down to meet the parts they bull up to. To determine where the rounded section on ihese parts starts, dry assemble the remaining pieces to parts A and H. Your whale should look tike the one shown in Fig. 3. Now take a sharp pencil and scribe a line around the edges of all ihe parts lhat rise above the contour of the whale's body. This scribed line is your guide as you sand and contour parts C. 1) and F. Dry fit the parts as you work, checking lhal everything looks right. Also, drum sand ihe back of part F as shown in the side view of the pattern, contour parts B and E. and drill a '/-i in. diameter hole deep enough to accommodate the 6 mm glass eye, a source for which is provided in the Materials List. 7 Still working on the waxed paper, glue Ihe remaining pieces of the whale together. Regular wood glue is line, but if your pieces have any gaps, use an cpoxy instead. The epoxv will fill ihe gaps. When dry. peel off the wax paper, and trace the outline of the whale onto a piece of 7-> in. thick by 6 in. wide by 20 in. long plywood. which will serve as the backboard. As the full-size pattern shows, you should cut the backboard so it's slightly smaller lhan the whale. Note that parts of the flipper (D) and the lower fluke (I )overhang ihe backboard. 8 All that remains is to glue the w hale to the backboard, spray on the clear Krylon finish, attach (lie sawtooth hanger and epoxy ihe eye in place. Now, find an appropriate wall to show off your work, hang the whale, siep back and . . . admire! E3i Materials List • Walnui 7» in. x 6 in. x 20 in. • Red Oak in x 4 in. x 16 in. • Plywood '/*> in. x 6 in. x 20 in. • 6 mm glass eye* • Sawtooth hanger • Krylon no. 1311 Matte Finish Spray Coaling • Source: Van Dyke's, 4th Avenue & 6th Street, Woonsocket, SD 57385; tel. (605) 796-4425. Order Type 1. no wire, flint (clear), small mammal eye; current price is 59 cents each. May/June 1993 39 |
||||||||


