Woodworker's Journal 1993-17-3, страница 59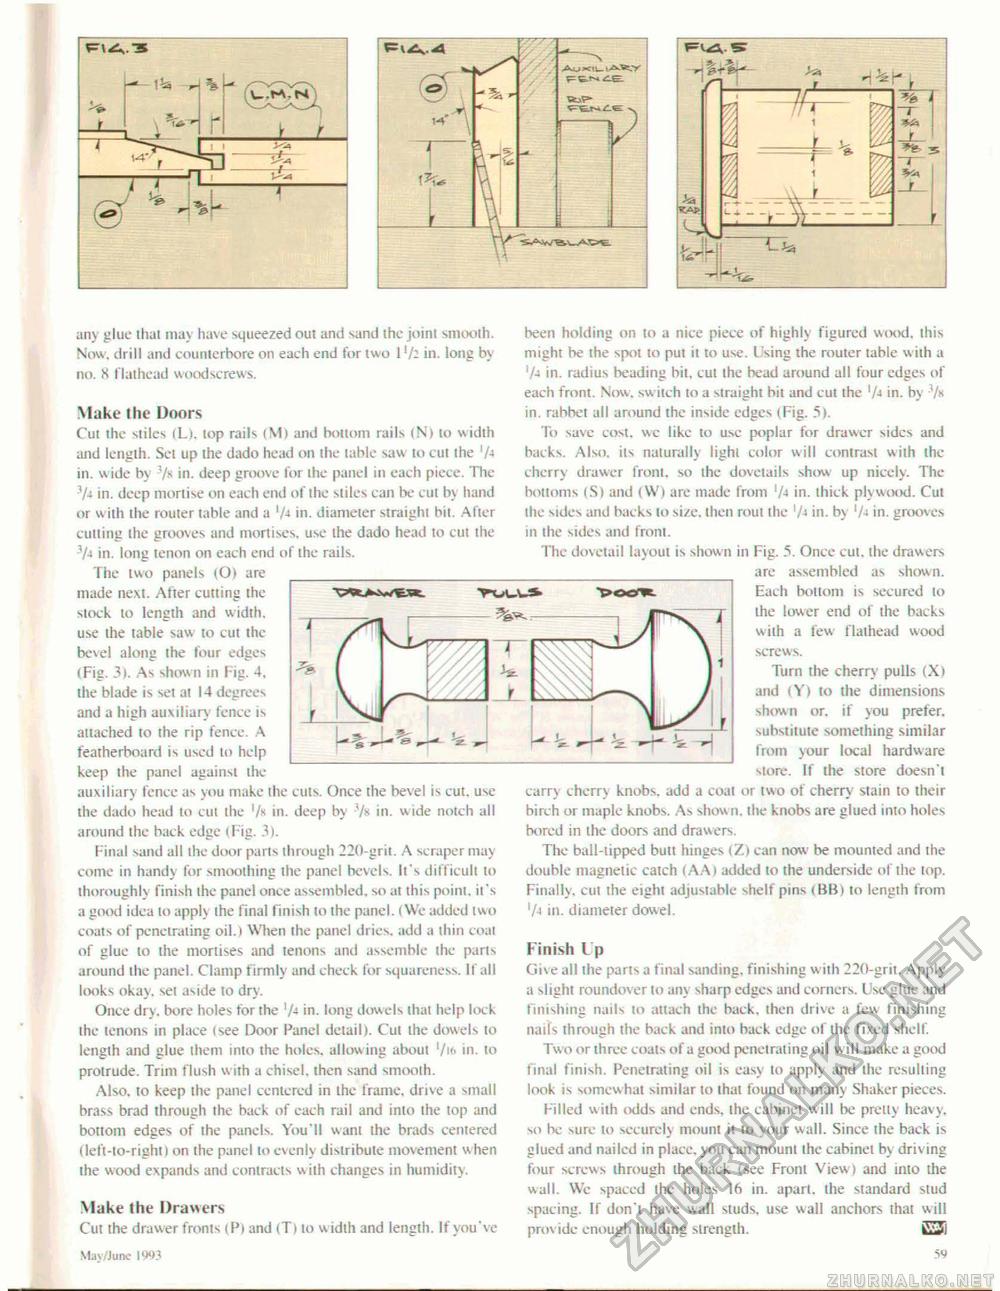
any glue that may have squeezed out and sand the joint smooth. Now, drill and counterbore on each end for two 1 [/i in. long by no. 8 flathead woodscrews. Make the Doors Cut the stiles (Li. top rails (M) and bottom rails (N> to width and length. Set up the dado head on ihe table saw to cut ihe '/-» in. wide by 3/s in. deep groove for the panel in each piece. The '/-i in. deep mortise on each end of the stiles can be cut by hand or with ihe router table and a '/-»in. diameter straight bit. After cutting the grooves and mortises, use the dado head to cut the in. long tenon on each end of the rails. The two panels (Of are made next. After cutting the stock lo length and width, use the table saw to cui the bevel along the four edges (Fig. 3). As shown in Fig. 4. ihe blade is set at 14 degrees and a high auxiliary fence is attached to the rip fence. A featherboard is used lo help keep the pane! against the auxiliary fence as you make the cuts. Once the bevel is cut. use the dado head to cut the '/« in. deep by Y» in. wide notch all around the back edge (Fig. 3). Final sand all the door parts through 220-grii. A scraper may come in handy for smoothing the panel bevels, li s difficult lo thoroughly finish ihe panel once assembled, so at this point, it's a good idea to apply ihe final finish lo the panel. (We added two coals of penetrating oil.) When ihe panel dries, add a thin coat of glue lo the mortises and tenons and assemble the parts around the panel. Clamp firmly and check lor squareness. If all looks okay, set aside to dry. Once dry. bore holes tor the '/< in. long dowels thai help lock the tenons in place (see Door Panel detail I. Cut the dowels lo length and glue them into the holes, allowing about in- lo protrude. Trim flush with a chisel, then sand smooth. Also, to keep the panel centered in the frame, drive a small brass brad through the back of each rail and into the top and bottom edges of ihe panels. You'll want the brads centered (left-to-right) on the panel to evenly distribute movement when the wood expands and contracts with changes in humidity. Make the Drawers Cut the drawer fronts (P) and (T) to w idlh and length. If you've Mav/June 1993 been holding on to a nice piece of highly figured wood, this might be the spot to put it to use. Using the router table w iih a x!a in. radius beading bit. cut the bead around all four edges of each front. Now switch to a straight bit and cut the '/-» in. by '/* in. rabbet all around the inside edges (Fig. 51. To save cost, we like lo use poplar for drawer sides and backs. Also, its naturally lighl color will contrast wiih ihe cherry drawer front, so the dovetails show up nicely. The bottoms (S) and (W) are made from '/-»in. thick plywood. Cul the sides and backs to size. then rout the '/-< in. by in. grooves in the sides and front. The dovetail layout is shown in Fig. 5. Once cut. the drawers are assembled as shown. Each bottom is secured to the lower end of the backs with a few flathead wood screws. Turn the cherry pulls (X) and (Y) to the dimensions shown or. if you prefer, substitute something similar from your local hardware store. If the store doesn't carrv cherry knobs, add a coal or two of cherry stain to their birch or maple knobs. As show n. the knobs are glued into holes bored in the doors and drawers. The ball-lipped bull hinges (Z) can now be mounted and the double magnetic catch (AA) added to the underside of the top. Finally, cul the eight adjustable shelf pins (BID to length from '/■» in. diameter dowel. Finish I p Give ail ihe parts a final sanding, finishing with 220-grit. Apply a slight roundover to any sharp edges and corners. Use glue and finishing nails to attach the back, then drive a few finishing nails through the back and into back edge of the fixed shelf. Two or three coats of a good penetrating oil w ill make a good final finish. Penetrating oil is easy to apply and the resulling look is somew hat similar to that found on many Shaker pieces. Filled with odds and ends, the cabinet will be pretly heavy, so be sure lo securely mount it to your wall. Since the back is glued and nailed in place, you can mount Ihe cabinet by driving four screws through the back (see Front View i and into the wall. We spaced ihe holes 16 in. apart, the standard stud spacing. If don't have wall studs, use wall anchors that will provide enough holding slrenglh. GJi 59 |


