Woodworker's Journal 1993-17-4, страница 32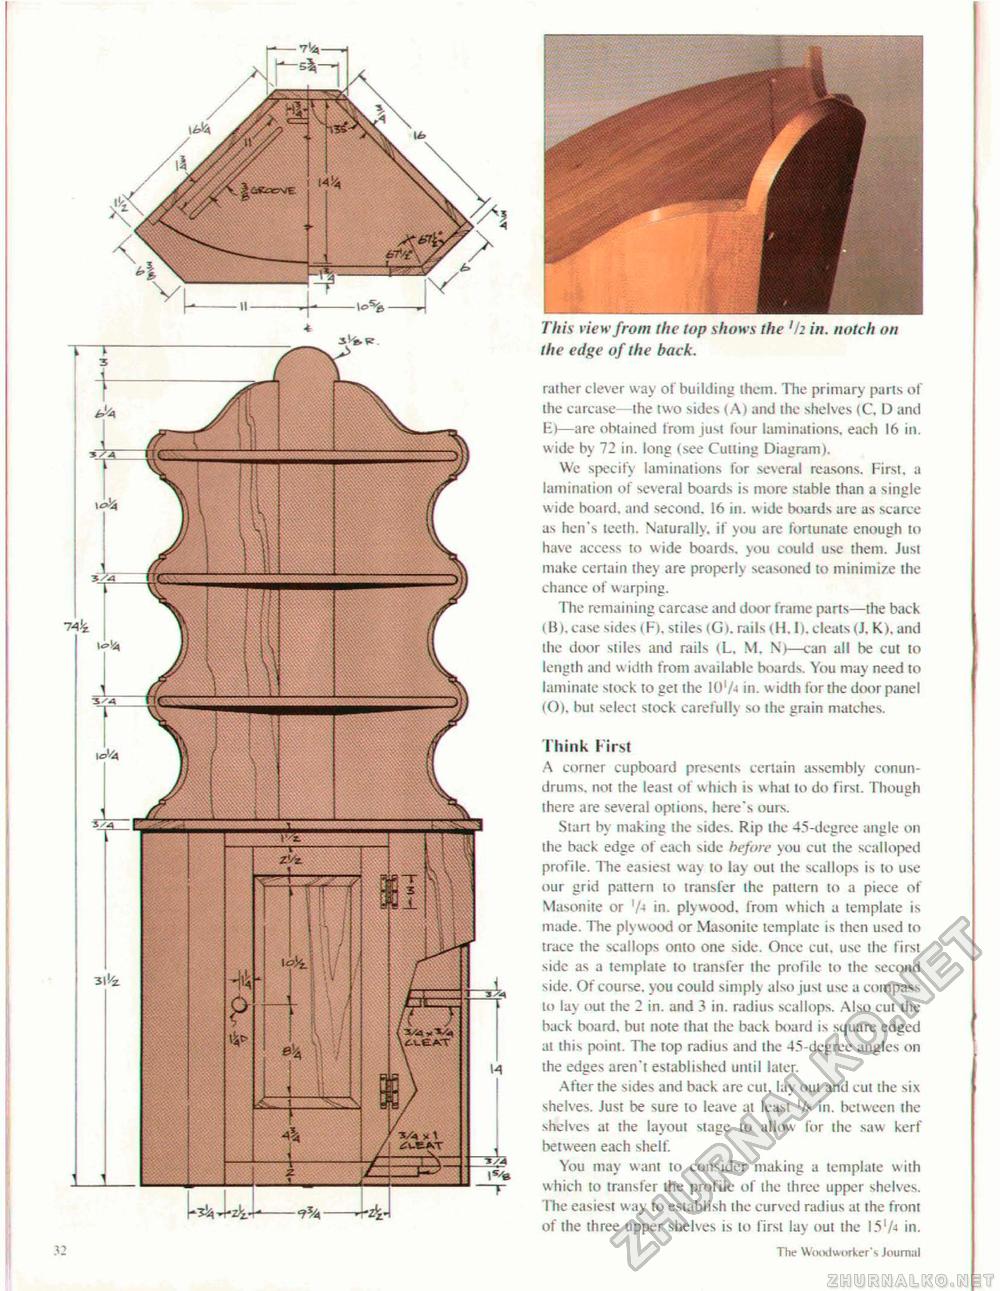
32 This view from the top shows the '/: in. notch on the edge of the hack. rather clever way of building them. The primary parts of the carcase the two sides (A) and the shelves (C. D and E>—are obtained from just four laminations, each 16 in. w ide by 72 in. long (see Cutting Diagram). We specify laminations for several reasons. First, a lamination of several boards is more stable than a single wide board, and second. 16 in. wide boards are as scarce as hen's teeth. Naturally, if you are fortunate enough to have access to wide boards, you could use them. Just make certain they are properly seasoned to minimize the chance of Warping, The remaining carcase and door frame parts—the back (II I. case sides i F I, stiles <G I. rails (H.I), cleats (J. K). and the dtxir stiles and rails (L. \1. N)—can all be cut to length and width from available boards. You may need to laminate stock to get the 10'/■» in. w idth for the door panel (O). bul select stock carefully so the grain matches. Think First A corner cupboard presents certain assembly conundrums, not the least of which is what to do first. Though there are several options, here's ours. Start by making the sides. Rip the 45-degree angle on the back edge of each side before you cut the scalloped profile. The easiest way to lay out the scallops is to use our grid pattern to transfer the pattern to a piece of Masonite or 'A in. plywood, from which a template is made. The plywood or Masonite template is then used to trace the scallops onto one side. Once cut. use the first side as a template to transfer the profile to the second side. Of course, you could simply also just use a compass lo lay out the 2 in. and 3 in. radius scallops. Also cut the back board, but note that the back board is square edged at this point. The top radius and the 45-degree angles on the edges aren't established until later. After ihe sides and back are cut. lay out and cui the six shelves. Just be sure to leave al least in. between the shelves at the layout stage to allow for the saw kerf between each shelf. You may want to consider making a template w ith which to transfer the profile of the three upper shelves. The easiest way to esiablish the curved radius at the front of the three upper shelves is lo first lay oul the 15lA in. The WiHxtworker's Journal |


