Woodworker's Journal 1994-18-5, страница 49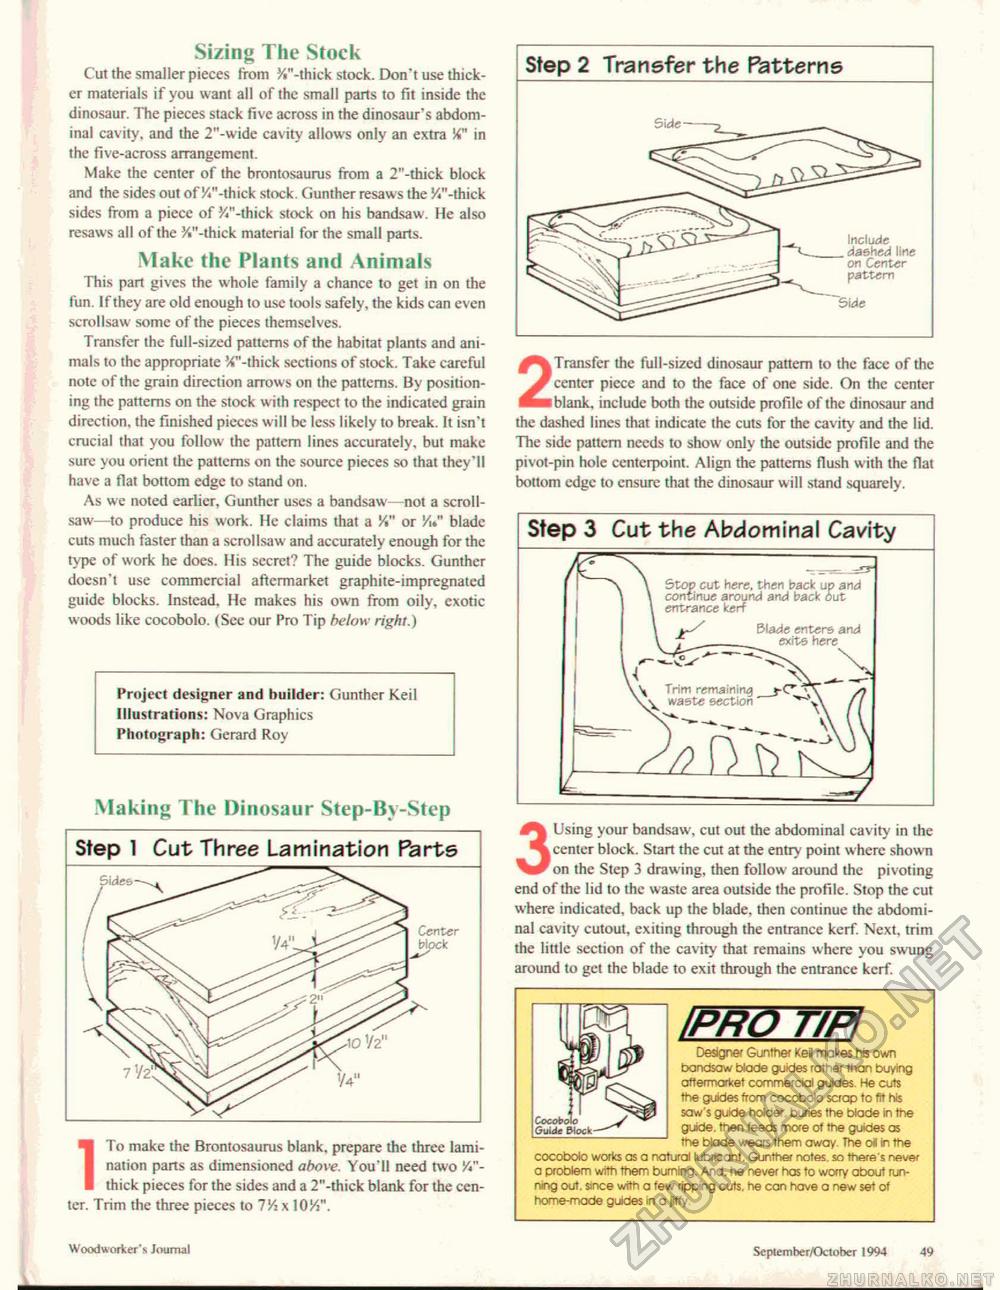
Sizing The Stock Cut the smaller pieces from y«"-thick stock. Don't use thicker materials if you want all of the small parts to fit inside the dinosaur. The pieces stack five across in the dinosaur's abdominal cavity, and the 2"-wide cavity allows only an extra in the five-across arrangement. Make the center of the brontosaunis from a 2"-thick block and the sides out of V"-thick stock Ciunther resaws the !4"-thick sides from a piece of JC-thick stock on his handsaw. He also resaws all of the >i"-thick material for the small parts. Make the Plants and Animals This part gives the whole family a chance to get in on the fun. If they are old enough to use tools safely, the kids can even scrollsaw some of the pieces themselves. Transfer the full-sized patterns of the habitat plants and animals to the appropriate '/f'-thick sections of stock. Take careful note of the grain direction arrows on the patterns. By positioning the patterns on the stock with respect to the indicated grain direction, the finished pieces will be less likely to break. It isn't crucial that you follow the pattern lines accurately, but make sure you orient the patterns on the source pieces so that they'll have a flat bottom edge to stand on. As we noted earlier, Gunthcr uses a handsaw—not a scroll-sawto produce his work. He claims that a 'A" or 'At" blade cuts much faster than a scrollsaw and accurately enough for the type of work he does. His secret? The guide blocks. Gunther doesn't use commercial aftcrmarket graphite-impregnated guide blocks. Instead. He makes his own from oily, exotic woods like cocobolo. (See our Pro Tip below right.) Project designer and builder: Gunther Keil Illustrations: Nova Graphics Photograph: Gerard Roy Making The Dinosaur Step-By-Step Step 1 Cut Three Lamination Parts ITo make the Brontosaurus blank, prepare the three lamination parts as dimensioned above. You'll need two /»"-thick pieces for the sides and a 2"-thick blank for the center. Trim the three pieces to 7!4 x lO/i", 2Transfer the full-sized dinosaur pattern to the face of the center piece and to the face of one side. On the center blank, include both the outside profile of the dinosaur and the dashed lines that indicate the cuts for the cavity and the lid. The side pattern needs to show only the outside profile and the pivot-pin hole centcrpoint. Align the patterns flush with the flat bottom edge to ensure that the dinosaur will stand squarely.
3 Using your bandsaw, cut out the abdominal cavity in the center block. Start the cut at the entty point where shown on the Step 3 drawing, then follow around the pivoting end of the lid to the waste area outside the profile. Stop the cut where indicated, back up the blade, then continue the abdominal cavity cutout, exiting through the entrance kerf. Next, trim the little section of the cavity that remains where you swung around to get the blade to exit through the entrance kerf. IPRO TIB Designs? Gunther KeS mokes his own bandsaw blade guides rather than buying affermari<et commercial guides. He cuts the guides from cocoboto scrap to fit his saw's guide holder. buries the blade in the guide, then feeds more of the guides as the blade wears them away- The oil in the cocoboto works as a natural lubricant. Gunther notes, so there's never a problem with them burning. And. he never has to worry about running out. since with a few ripprng cuts, he can have a new set of home-made guides in a jiffy Woodworker" < Journal September/October 1904 49 |
|||||||


