Woodworker's Journal 1994-18-5, страница 54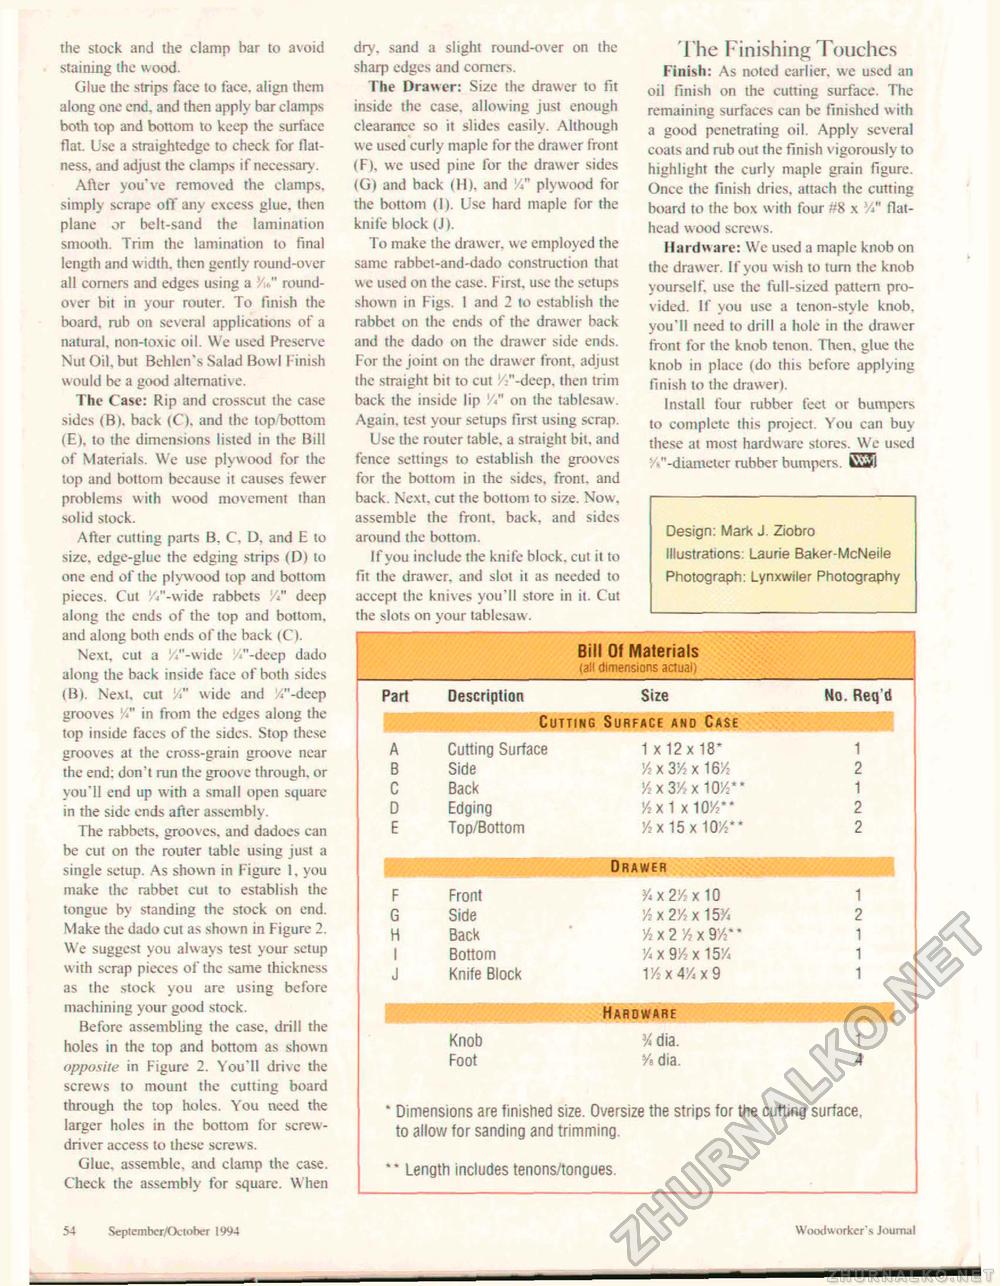
the stock and the clamp bar to avoid staining the wood. Glue the strips face to face, align them along one end. and then apply bar clamps both top and bottom to keep the surface flat. Use a straightedge to check for flatness. and adjust the clamps if necessary. After you've removed the clamps, simply scrape off any excess glue, then plane or belt-sand the lamination smooth. Trim the lamination to final length and width, then gently round-over all comers and edges using a V*" round-over bit in your router. To finish the board, rub on several applications of a natural, non-toxic oil. We used Preserve Nut Oil, but Behlcn's Salad Bowl f inish would be a good alternative. The Case: Rip and crosscut the case sides (B). back (C). and the top/bottom (E), to the dimensions listed in the Bill of Materials. We use plywood for the lop and bottom because it causes fewer problems with wood movement than solid stock. After cutting parts B. C. D. and E to size, edge-glue the edging strips (D) to one end of the plywood top and bottom pieces. Cut '//'-wide rabbets V" deep along the ends of the top and bottom, and along both ends of the back (C). Next, cut a W-widc W'-deep dado along the back inside face of both sides (B). Next, cut V" wide and V'-deep grooves " in from the edges along the top inside faces of the sides. Stop these grooves at the cross-grain groove near the end; don't run the groove through, or you'll end up with a small open square in the side ends after assembly. The rabbets, groov es, and dadoes can be cut on the router table using just a single setup. As shown in figure I. you make the rabbet cut to establish the tongue by standing the stock on end. Make the dado cut as shown in Figure 2. We suggest you always test your setup with scrap pieces of the same thickness as the stock you are using before machining your good stock. Before assembling the case, drill the holes in the top and bottom as shown opposite in Figure 2. You'll drive the screws to mount the cutting board through the top holes. You need the larger holes in the bottom for screwdriver access to these screws. Glue, assemble, and clamp the case. Check the assembly for square. W hen dry. sand a slight round-over on the sharp edges and corners. The Drawer: Size the drawer to fit inside the case, allowing just enough clearance so it slides easily. Although we used curly maple for the drawer front (F), we used pine for the drawer sides (G| and back (H). and plywood for the bottom (I). Use hard maple for the knife block (J). To make the drawer, w e employed the same rabbet-and-dado construction that we used on the case. First, use the setups shown in Figs. 1 and 2 to establish the rabbet on the ends of the drawer back and the dado on the drawer side ends. For the joint on the drawer front, adjust the straight bit to cut //'-deep, then trim back the inside lip V" on the tablesaw. Again, test your setups first using scrap. Use the router table, a straight bit. and fence settings to establish the grooves for the bottom in the sides, front, and back. Next, cut the bottom to size. Now . assemble the front, back, and sides around the bottom. If you include rhe knife block, cut it to fit the drawer, and slot it as needed to accept the knives you'll store in it. Cut the slots on your tablesaw. I he Finishing Touchcs Finish: As noted earlier, we used an oil finish on the cutting surface. The remaining surfaces can be finished with a good penetrating oil. Apply several coats and rub out the finish vigorously to highlight the curly maple grain figure. Once the finish dries, attach the cutting board to the box with four #8 x V" fiat-head w ood screws. Hardware: We used a maple knob on the drawer. If you wish to turn the knob yourself, use the full-sized pattern provided. If you use a tenon-style knob, you'll need to drill a hole in the drawer front for the knob tenon. Then, glue the knob in place (do this before applying finish to the drawer). Install four rubber feet or bumpers to complete this project. You can buy these at most hardware stores. We used /►"-diameter rubber bumpers. G31 Design: Mark J. Ziobro Illustrations: Laurie Baker-McNeile Photograph: Lynxwtler Photography
54 Seplembcr/fXlober 1994 Woodworker's Journal |
||||||||||||||||||||||||||||||||||||||||||||||||||||||||||||||||||||||||||||||||||||


