Woodworker's Journal 1994-18-5, страница 53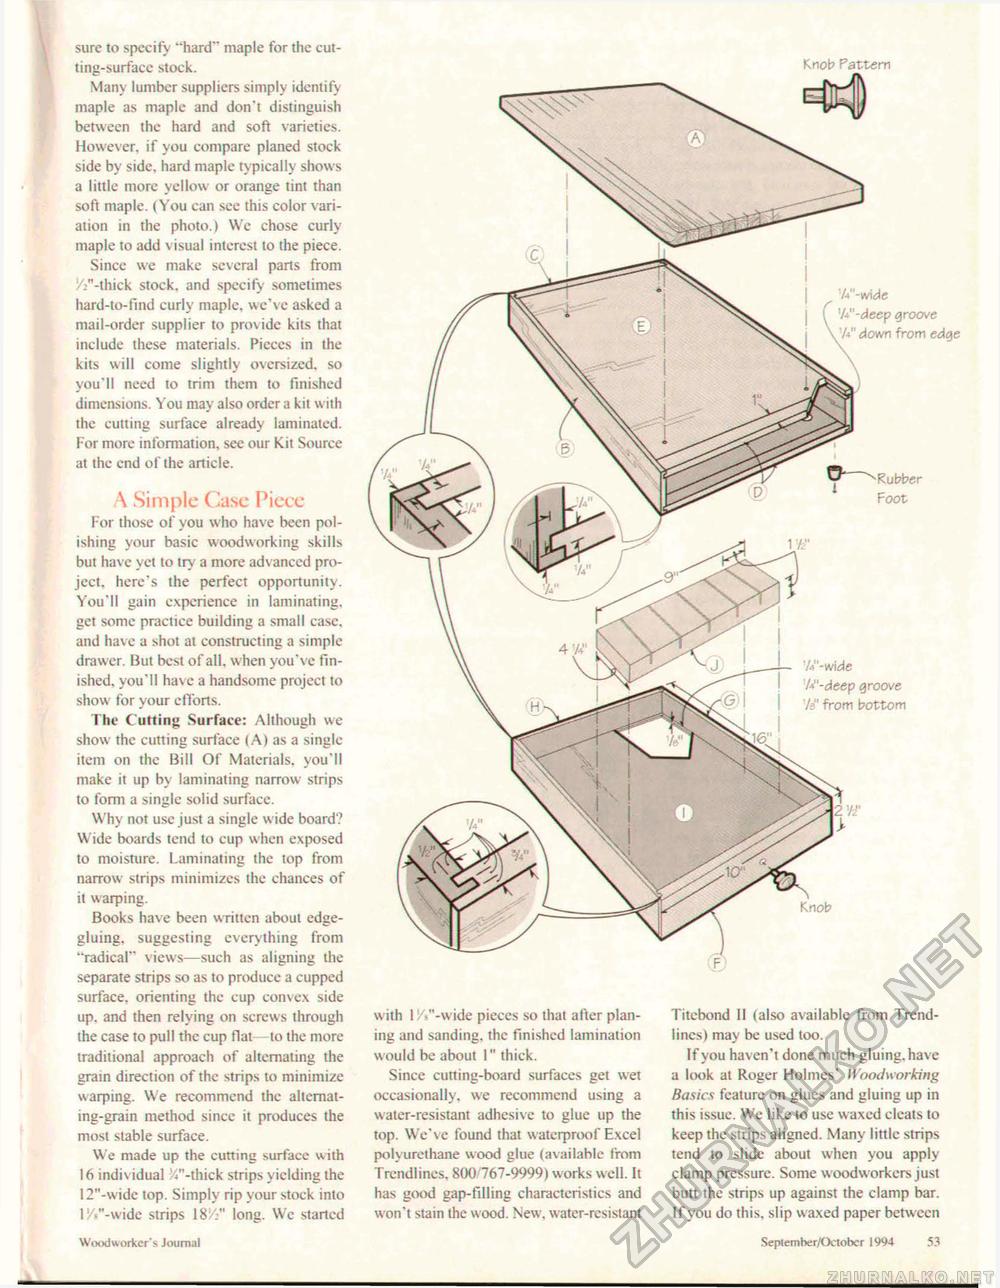
sure to spccify "hard" maple for the cut-ting-surfacc stock. Many lumber suppliers simply identify maple as maple and don't distinguish between the hard and soft varieties. However, if you compare planed stock side by side, hard maple typically shows a little more yellow or orange tint than soft maple. (You can see this color variation in the photo.) We chose curly maple to add visual interest to the piece. Since we make several parts from '/V-thick stock, and spccify sometimes hard-to-fmd curly maple, we've asked a mail-order supplier to provide kits that include these materials. Pieces in the kits will come slightly oversized, so you'll need to trim them to finished dimensions. You may also order a kit with the cutting surface already laminated. For more information, see our Kit Source at the end of the article. A Simple Case Piecc For those of you who have been polishing your basic woodworking skills but have yet to try a more advanced project, here's the perfect opportunity. You'll gain experience in laminating, get some practice building a small case, and have a shot at constructing a simple drawer. But best of all, when you've finished, you'll have a handsome project to show for your efforts. The C utting Surface: Although we show the cutting surface (A) as a single item on the Bill Of Materials, you'll make it up by laminating narrow strips to form a single solid surface. Why not use just a single wide board? Wide boards tend to cup when exposed to moisttire. Laminating the top from narrow strips minimizes the chances of it warping. Books have been written about edge-gluing. suggesting everything from "radical" views—such as aligning the separate strips so as to produce a cupped surface, orienting the cup convex side up. and then relying on screws through the case to pull the cup flat to the more traditional approach of alternating the grain direction of the strips to minimize warping. We recommend the alternating-grain method since it produces the most stable surface. We made up the cutting surface uith 16 individual >4"-thick strips yielding the 12"-wide top. Simply rip your stock into 1 W-wide strips 18/:" long. We started with lW'-vvide pieccs so that after planing and sanding, the finished lamination would be about I" thick. Since cutting-board surfaces get wet occasionally, we recommend using a water-resistant adhesive to glue up the top. We've found that waterproof Excel polyurethane wood glue (available from Trcndlines, 800767-9999) works well. It has good gap-filling characteristics and won't stain the wood. New. water-resistant Titcbond 11 (also available from Trend-lines) may be used too. If you haven't done much gluing, have a look at Roger Holmes' Woodworking Basics feature on glues and gluing up in this issue. We like to use waxed cleats to keep the strips aligned. Many little strips tend to slide about when you apply clamp pressure. Some woodworkers just butt the strips up against the clamp bar. If you do this, slip waxed paper betw een Knob Pattern W-mde W-deep groove \ U" down from edge 'A"-wide U'-deep groove Va" from bottom Woodworker" < Journal September/October 1904 53 |


