Woodworker's Journal 2002-26-3, страница 14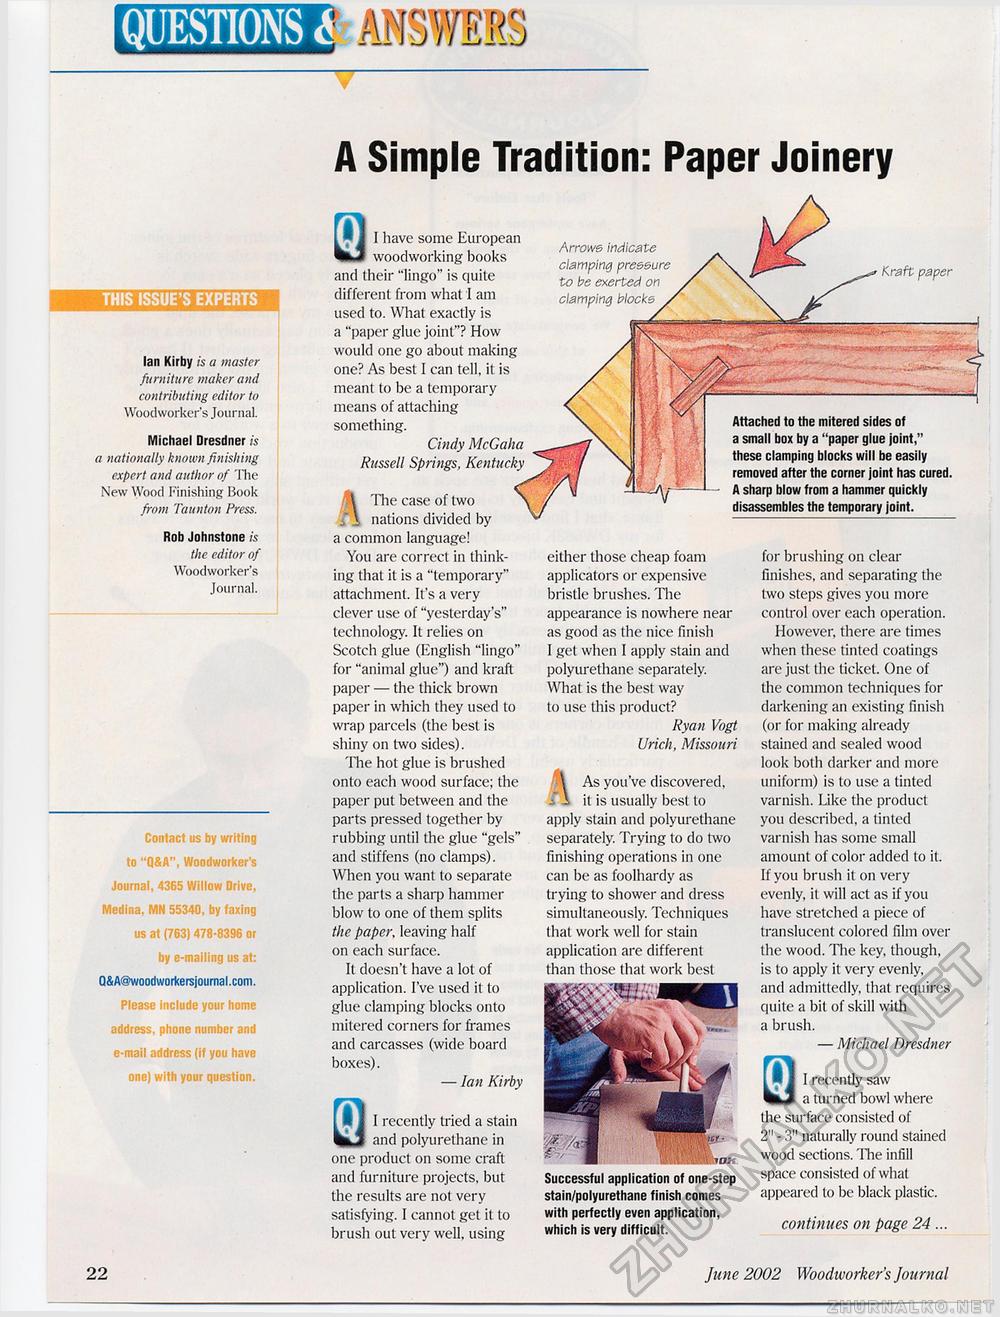
QUESTIONS I mmm A Simple Tradition: Paper JoineryTHIS ISSUE'S E Ian Kirby is a master furniture maker and contributing editor to Woodworker's Journal. Michael Dresdner is a nationally known finishing expert and author of The New Wood Finishing Book from Taunton Press. Rob Johnstone is the editor of Woodworker's Journal. Contact us by writing to "Q&A", Woodworker's Journal, 436S Willow Drive, Medina, MN 55340, by faxing us at (763) 478-8396 or by e-mailing us at: QSA@woodworkersjournal.com. Please include your home address, phone number and e-mail address (if you have one) with your question. 0 I have some European woodworking books and their "lingo" is quite different from what I am used to. What exactly is a "paper glue joint"? How would one go about making one? As best I can tell, it is meant to be a temporary means of attaching something. Cindy McGalia Russell Springs, Kentucky I The case of i j nations divic : Of tWO , divided by a common language! You are correct in thinking that it is a "temporary" attachment. It's a very clever use of "yesterday's" technology. It relies on Scotch glue (English "lingo" for "animal glue") and kraft paper — the thick brown paper in which they used to wrap parcels (the best is shiny on two sides). The hot glue is brushed onto each wood surface; the paper put between and the parts pressed together by rubbing until the glue "gels" and stiffens (no clamps). When you want to separate the parts a sharp hammer blow to one of them splits the paper, leaving half on each surface. It doesn't have a lot of application. I've used it to glue clamping blocks onto mitered corners for frames and carcasses (wide board boxes). — Ian Kirby a I recently tried a stain and polyurethane in one product on some craft and furniture projects, but the results are not very satisfying. I cannot get it to brush out very well, using Arrows indicate clamping pressure to be exerted on damping Mocks Kraft paper Attached to the mitered sides of a small box by a "paper glue joint," these clamping blocks will be easily removed after the corner joint has cured. A sharp blow from a hammer quickly disassembles the temporary joint. either those cheap foam applicators or expensive bristle brushes. The appearance is nowhere near as good as the nice finish I get when I apply stain and polyurethane separately. What is the best way to use this product? Ryan Vogt Urich, Missouri \ As you've discovered, /1 it is usually best to apply stain and polyurethane separately. Trying to do two finishing operations in one can be as foolhardy as trying to shower and dress simultaneously. Techniques that work well for stain application are different than those that work best Successful application of one-step stain/polyurethane finish comes with perfectly even application, which is very difficult. for brushing on clear finishes, and separating the two steps gives you more control over each operation. However, there are times when these tinted coatings are just the ticket. One of the common techniques for darkening an existing finish (or for making already stained and sealed wood look both darker and more uniform) is to use a tinted varnish. Like the product you described, a tinted varnish has some small amount of color added to it. If you brush it on very evenly, it will act as if you have stretched a piece of translucent colored film over the wood. The key, though, is to apply it very evenly, and admittedly, that requires quite a bit of skill with a brush. — Michael Dresdner a QhJI a turned bowl where the surface consisted of 2" - 3" naturally round stained wood sections. The infill space consisted of what appeared to be black plastic. continues on page 24 ... I recently saw 22 June 2002 Woodworker's Journal |


