Woodworker's Journal 2008-32-1, страница 21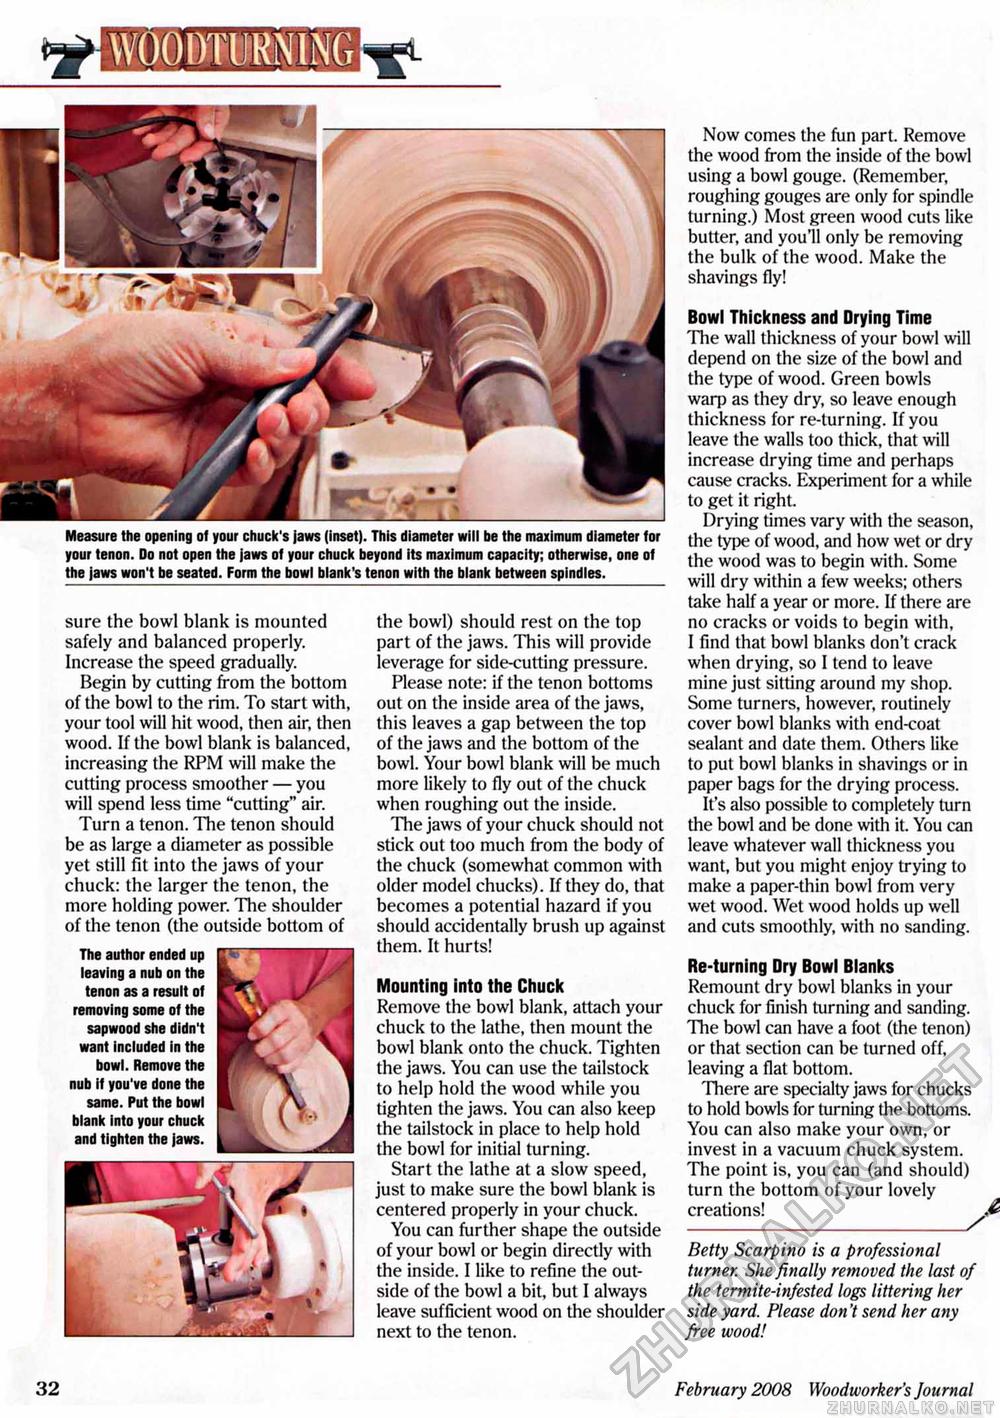
t^GKHMEB^i Measure the opening of your chuck's jaws (inset). This diameter will be the maximum diameter for your tenon. Do not open the jaws of your chuck beyond its maximum capacity; otherwise, one of the jaws won't be seated. Form the bowl blank's tenon with the blank between spindles. the bowl) should rest on the top part of the jaws. This will provide leverage for side-cutting pressure. Please note: if the tenon bottoms out on the inside area of the jaws, this leaves a gap between the top of the jaws and the bottom of the bowl. Your bowl blank will be much more likely to fly out of the chuck when roughing out the inside. The jaws of your chuck should not stick out too much from the body of the chuck (somewhat common with older model chucks). If they do, that becomes a potential hazard if you should accidentally brush up against them. It hurts! Mounting into the Chuck Remove the bowl blank, attach your chuck to the lathe, then mount the bowl blank onto the chuck. Tighten the jaws. You can use the tailstock to help hold the wood while you tighten the jaws. You can also keep the tailstock in place to help hold the bowl for initial turning. Start the lathe at a slow speed, just to make sure the bowl blank is centered properly in your chuck. You can further shape the outside of your bowl or begin directly with the inside. I like to refine the outside of the bowl a bit, but I always leave sufficient wood on the shoulder next to the tenon. sure the bowl blank is mounted safely and balanced properly. Increase the speed gradually. Begin by cutting from the bottom of the bowl to the rim. To start with, your tool will hit wood, then air, then wood. If the bowl blank is balanced, increasing the RPM will make the cutting process smoother — you will spend less time "cutting" air. Turn a tenon. The tenon should be as large a diameter as possible yet still fit into the jaws of your chuck: the larger the tenon, the more holding power. The shoulder of the tenon (the outside bottom of The author ended up leaving a nub on the tenon as a result of removing some of the sapwood she didn't want included in the bowl. Remove the nub if you've done the same. Put the bowl blank into your chuck and tighten the jaws. Now comes the fun part. Remove the wood from the inside of the bowl using a bowl gouge. (Remember, roughing gouges are only for spindle turning.) Most green wood cuts like butter, and you'll only be removing the bulk of the wood. Make the shavings fly! Bowl Thickness and Drying Time The wall thickness of your bowl will depend on the size of the bowl and the type of wood. Green bowls warp as they dry, so leave enough thickness for re-turning. If you leave the walls too thick, that will increase drying time and perhaps cause cracks. Experiment for a while to get it right. Drying times vary with the season, the type of wood, and how wet or dry the wood was to begin with. Some will dry within a few weeks; others take half a year or more. If there are no cracks or voids to begin with, I find that bowl blanks don't crack when drying, so I tend to leave mine just sitting around my shop. Some turners, however, routinely cover bowl blanks with end-coat sealant and date them. Others like to put bowl blanks in shavings or in paper bags for the drying process. It's also possible to completely turn the bowl and be done with it. You can leave whatever wall thickness you want, but you might enjoy trying to make a paper-thin bowl from very wet wood. Wet wood holds up well and cuts smoothly, with no sanding. Re-turning Dry Bowl Blanks Remount dry bowl blanks in your chuck for finish turning and sanding. The bowl can have a foot (the tenon) or that section can be turned off, leaving a flat bottom. There are specialty jaws for chucks to hold bowls for turning the bottoms. You can also make your own, or invest in a vacuum chuck system. The point is, you can (and should) turn the bottom of your lovely creations! Jb Betty Scarpino is a professional turner. She finally removed the last of the termite-infested logs littering her side yard. Please don't send her any free wood! 32 February 2008 Woodworker's Journal |


