Woodworker's Journal 2008-32-3, страница 45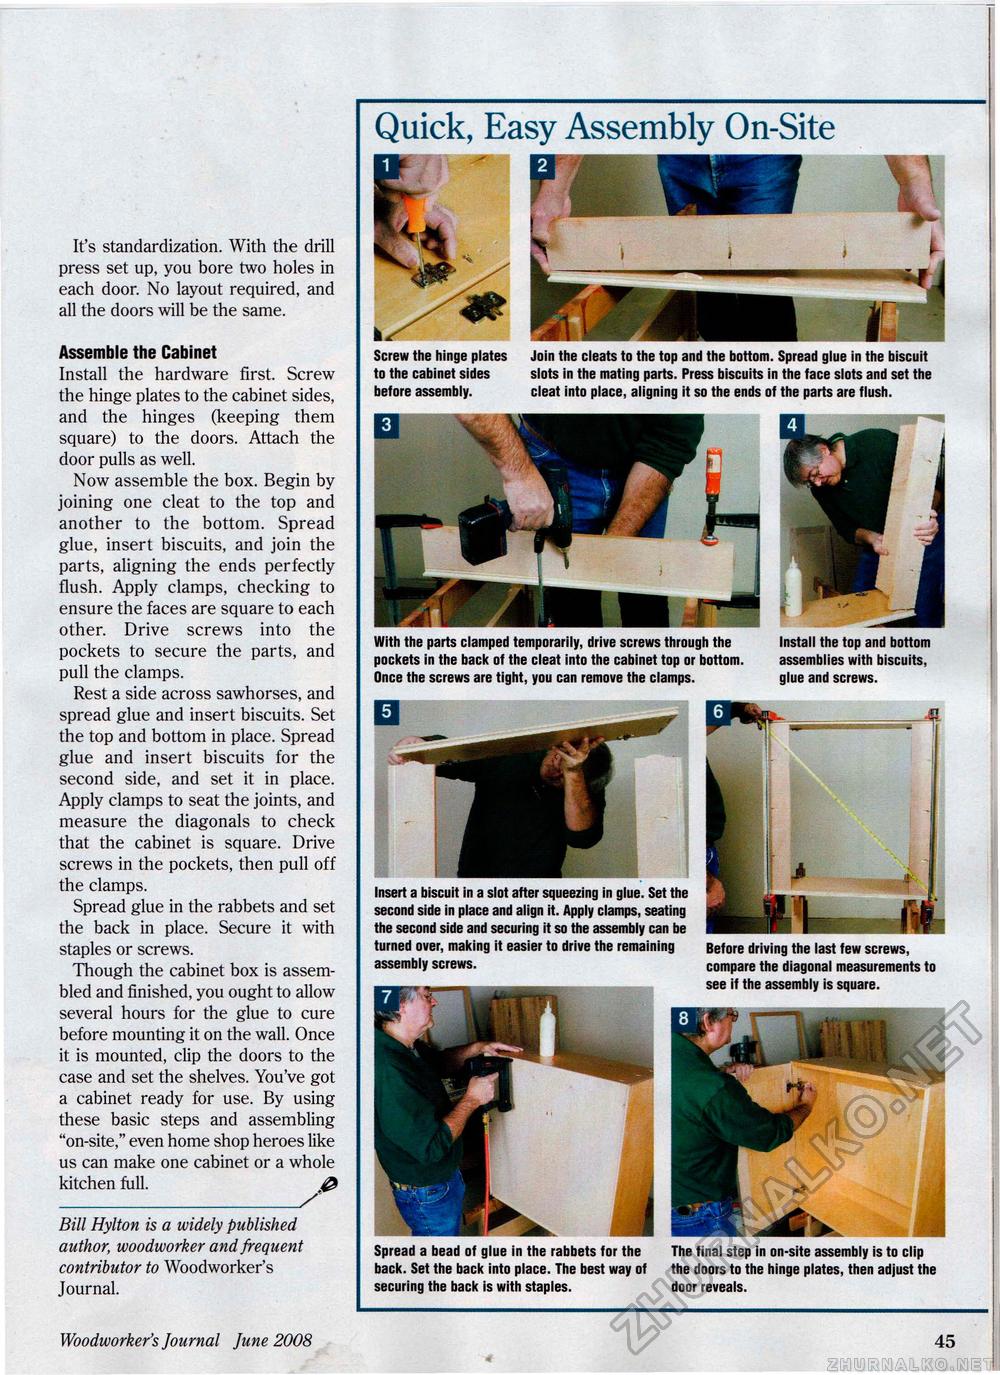
Quick, Easy Assembly On-Site It's standardization. With the drill press set up, you bore two holes in each door. No layout required, and all the doors will be the same. Assemble the Cabinet Install the hardware first. Screw the hinge plates to the cabinet sides, and the hinges (keeping them square) to the doors. Attach the door pulls as well. Now assemble the box. Begin by joining one cleat to the top and another to the bottom. Spread glue, insert biscuits, and join the parts, aligning the ends perfectly flush. Apply clamps, checking to ensure the faces are square to each other. Drive screws into the pockets to secure the parts, and pull the clamps. Rest a side across sawhorses, and spread glue and insert biscuits. Set the top and bottom in place. Spread glue and insert biscuits for the second side, and set it in place. Apply clamps to seat the joints, and measure the diagonals to check that the cabinet is square. Drive screws in the pockets, then pull off the clamps. Spread glue in the rabbets and set the back in place. Secure it with staples or screws. Though the cabinet box is assembled and finished, you ought to allow several hours for the glue to cure before mounting it on the wall. Once it is mounted, clip the doors to the case and set the shelves. You've got a cabinet ready for use. By using these basic steps and assembling "on-site," even home shop heroes like us can make one cabinet or a whole kitchen full. @ _/ Bill Hylton is a widely published author, woodworker and frequent contributor to Woodworker's Journal. Spread a bead of glue in the rabbets for the The final step in on-site assembly is to clip back. Set the back into place. The best way of the doors to the hinge plates, then adjust the securing the back is with staples. door reveals. Screw the hinge plates Join the cleats to the top and the bottom. Spread glue in the biscuit to the cabinet sides slots in the mating parts. Press biscuits in the face slots and set the before assembly. cleat into place, aligning it so the ends of the parts are flush. With the parts clamped temporarily, drive screws through the Install the top and bottom pockets in the back of the cleat into the cabinet top or bottom. assemblies with biscuits, Once the screws are tight, you can remove the clamps. glue and screws. Insert a biscuit in a slot after squeezing in glue. Set the second side in place and align it. Apply clamps, seating the second side and securing it so the assembly can be turned over, making it easier to drive the remaining assembly screws. Before driving the last few screws, compare the diagonal measurements to see if the assembly is square. Woodworker's Journal June 2008 45 |


