Woodworker's Journal 2009-33-5, страница 43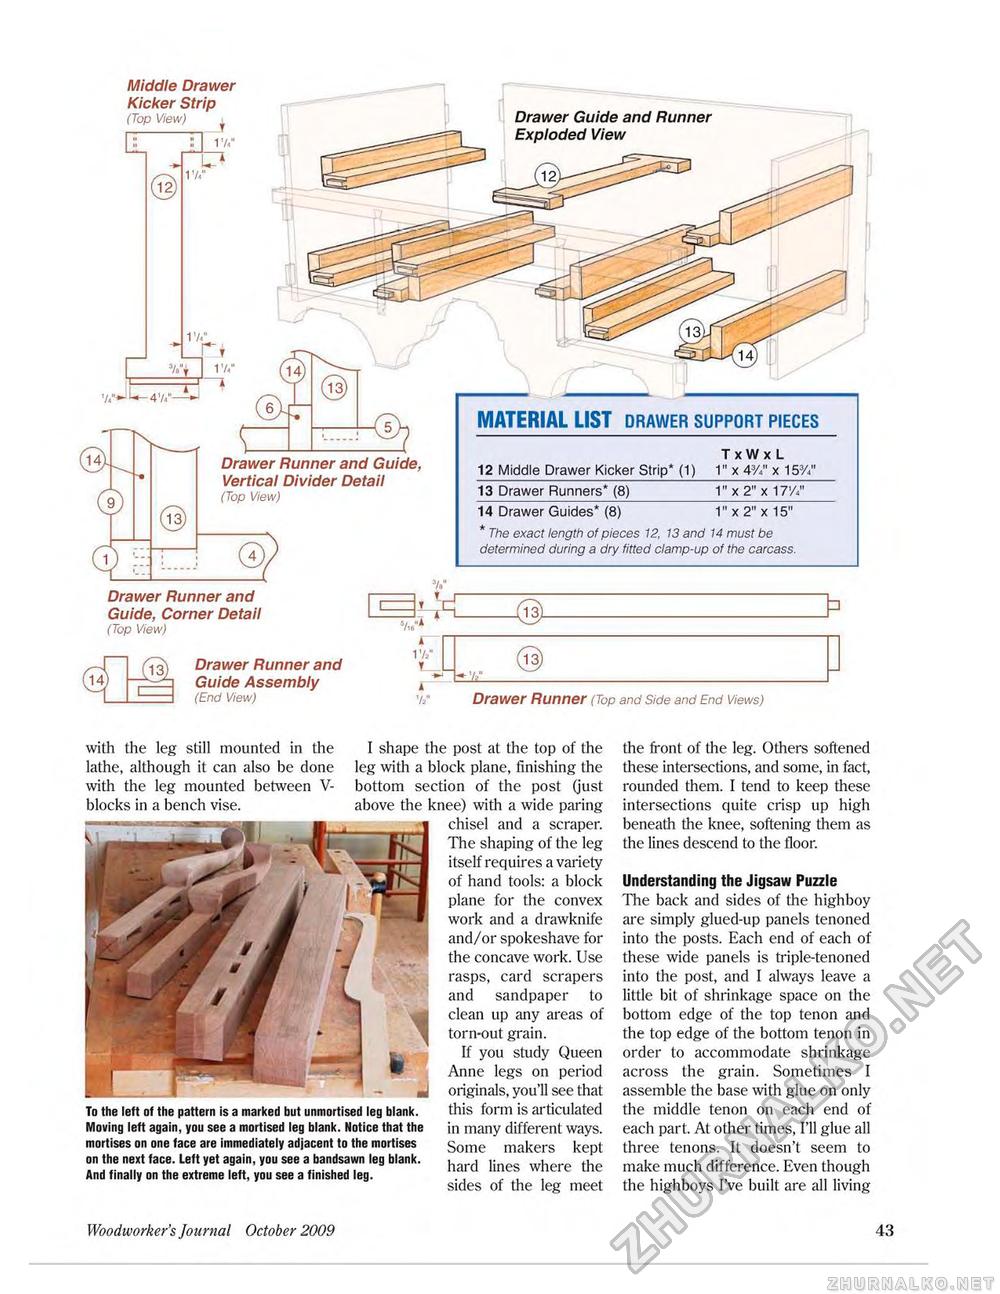
Middle Drawer Kicker Strip (Top View) JUA" u1 Drawer Runner and Guide, Vertical Divider Detail (Top View) MATERIAL LIST drawer support pieces
14 Drawer Guides* (8) 1" x 2" x 15" * The exact length of pieces 12, 13 and 14 must be determined during a dry fitted clamp-up of the carcass. 14 Drawer Guides* (8) 1" x 2" x 15" * The exact length of pieces 12, 13 and 14 must be determined during a dry fitted clamp-up of the carcass. Drawer Runner and Guide, Corner Detail (Top View) Drawer Runner and Guide Assembly (End View) Drawer Runner (Top and Side and End Views) with the leg still mounted in the I shape the post at the top of the lathe, although it can also be done leg with a block plane, finishing the with the leg mounted between V- bottom section of the post (just blocks in a bench vise. above the knee) with a wide paring chisel and a scraper. The shaping of the leg itself requires a variety of hand tools: a block plane for the convex work and a drawknife and/or spokeshave for the concave work. Use rasps, card scrapers and sandpaper to clean up any areas of torn-out grain. If you study Queen Anne legs on period originals, you'll see that this form is articulated in many different ways. Some makers kept hard lines where the sides of the leg meet the front of the leg. Others softened these intersections, and some, in fact, rounded them. I tend to keep these intersections quite crisp up high beneath the knee, softening them as the lines descend to the floor. To the left of the pattern is a marked but unmortised leg blank. Moving left again, you see a mortised leg blank. Notice that the mortises on one face are immediately adjacent to the mortises on the next face. Left yet again, you see a bandsawn leg blank. And finally on the extreme left, you see a finished leg. Understanding the Jigsaw Puzzle The back and sides of the highboy are simply glued-up panels tenoned into the posts. Each end of each of these wide panels is triple-tenoned into the post, and I always leave a little bit of shrinkage space on the bottom edge of the top tenon and the top edge of the bottom tenon in order to accommodate shrinkage across the grain. Sometimes I assemble the base with glue on only the middle tenon on each end of each part. At other times, I'll glue all three tenons. It doesn't seem to make much difference. Even though the highboys I've built are all living Woodworker's Journal October 2009 1 9 |


