Woodworker's Journal fall-2009, страница 67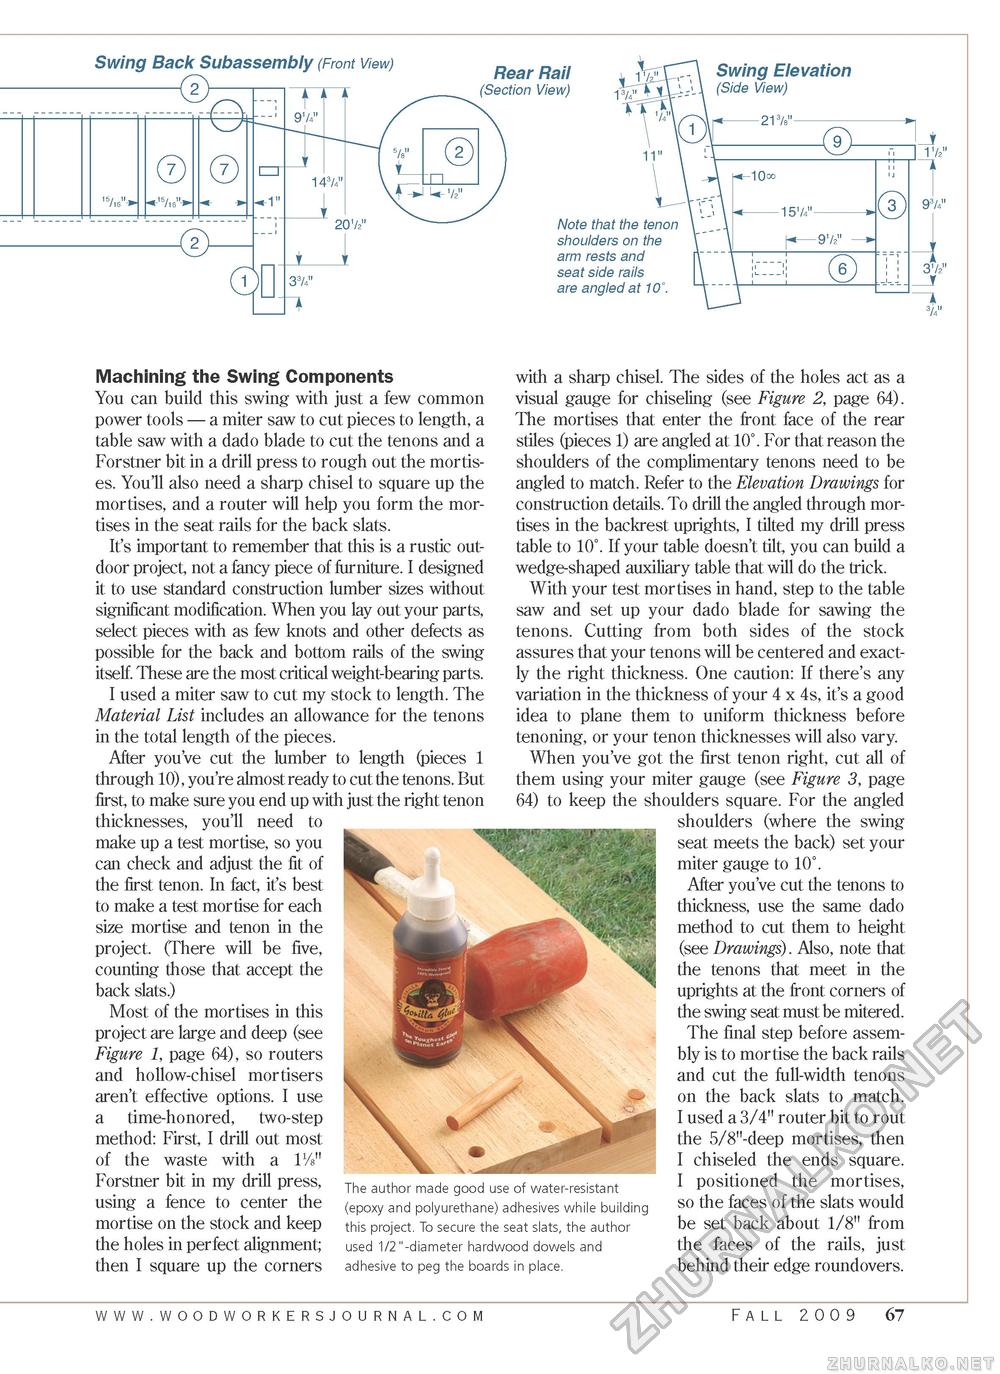
Machining the Swing Components You can build this swing with just a few common power tools — a miter saw to cut pieces to length, a table saw with a dado blade to cut the tenons and a Forstner bit in a drill press to rough out the mortises. You'll also need a sharp chisel to square up the mortises, and a router will help you form the mortises in the seat rails for the back slats. It's important to remember that this is a rustic outdoor project, not a fancy piece of furniture. I designed it to use standard construction lumber sizes without significant modification. When you lay out your parts, select pieces with as few knots and other defects as possible for the back and bottom rails of the swing itself. These are the most critical weight-bearing parts. I used a miter saw to cut my stock to length. The Material List includes an allowance for the tenons in the total length of the pieces. After you've cut the lumber to length (pieces 1 through 10), you're almost ready to cut the tenons. But first, to make sure you end up with just the right tenon thicknesses, you'll need to make up a test mortise, so you can check and adjust the fit of the first tenon. In fact, it's best to make a test mortise for each size mortise and tenon in the project. (There will be five, counting those that accept the back slats.) Most of the mortises in this project are large and deep (see Figure 1, page 64), so routers and hollow-chisel mortisers aren't effective options. I use a time-honored, two-step method: First, I drill out most of the waste with a 1V8" Forstner bit in my drill press, using a fence to center the mortise on the stock and keep the holes in perfect alignment; then I square up the corners The author made good use of water-resistant (epoxy and polyurethane) adhesives while building this project. To secure the seat slats, the author used 1/2"-diameter hardwood dowels and adhesive to peg the boards in place. with a sharp chisel. The sides of the holes act as a visual gauge for chiseling (see Figure 2, page 64). The mortises that enter the front face of the rear stiles (pieces 1) are angled at 10°. For that reason the shoulders of the complimentary tenons need to be angled to match. Refer to the Elevation Drawings for construction details. To drill the angled through mortises in the backrest uprights, I tilted my drill press table to 10°. If your table doesn't tilt, you can build a wedge-shaped auxiliary table that will do the trick. With your test mortises in hand, step to the table saw and set up your dado blade for sawing the tenons. Cutting from both sides of the stock assures that your tenons will be centered and exactly the right thickness. One caution: If there's any variation in the thickness of your 4 x 4s, it's a good idea to plane them to uniform thickness before tenoning, or your tenon thicknesses will also vary. When you've got the first tenon right, cut all of them using your miter gauge (see Figure 3, page 64) to keep the shoulders square. For the angled shoulders (where the swing seat meets the back) set your miter gauge to 10°. After you've cut the tenons to thickness, use the same dado method to cut them to height (see Drawings). Also, note that the tenons that meet in the uprights at the front corners of the swing seat must be mitered. The final step before assembly is to mortise the back rails and cut the full-width tenons on the back slats to match. I used a 3/4" router bit to rout the 5/8"-deep mortises, then I chiseled the ends square. I positioned the mortises, so the faces of the slats would be set back about 1/8" from the faces of the rails, just behind their edge roundovers. Fall 2009 67 |


