Woodworker's Journal Summer-2008, страница 71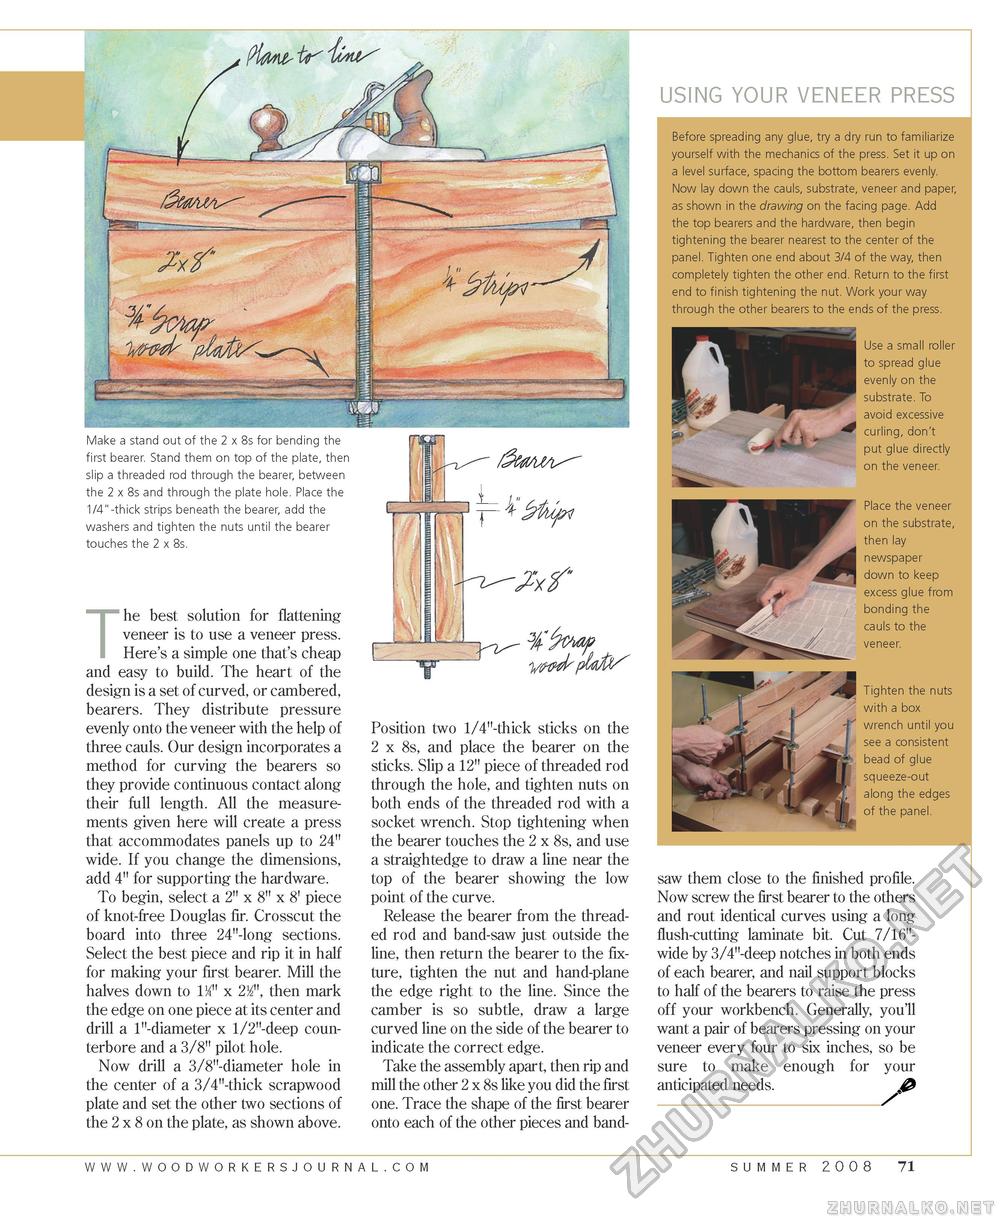
Make a stand out of the 2 x 8s for bending the first bearer. Stand them on top of the plate, then slip a threaded rod through the bearer, between the 2 x 8s and through the plate hole. Place the 1/4"-thick strips beneath the bearer, add the washers and tighten the nuts until the bearer touches the 2 x 8s. The best solution for flattening veneer is to use a veneer press. Here's a simple one that's cheap and easy to build. The heart of the design is a set of curved, or cambered, bearers. They distribute pressure evenly onto the veneer with the help of three cauls. Our design incorporates a method for curving the bearers so they provide continuous contact along their full length. All the measurements given here will create a press that accommodates panels up to 24" wide. If you change the dimensions, add 4" for supporting the hardware. To begin, select a 2" x 8" x 8' piece of knot-free Douglas fir. Crosscut the board into three 24"-long sections. Select the best piece and rip it in half for making your first bearer. Mill the halves down to 1J4" x 2J2", then mark the edge on one piece at its center and drill a 1"-diameter x 1/2"-deep coun-terbore and a 3/8" pilot hole. Now drill a 3/8"-diameter hole in the center of a 3/4"-thick scrapwood plate and set the other two sections of the 2 x 8 on the plate, as shown above. Position two 1/4"-thick sticks on the 2 x 8s, and place the bearer on the sticks. Slip a 12" piece of threaded rod through the hole, and tighten nuts on both ends of the threaded rod with a socket wrench. Stop tightening when the bearer touches the 2 x 8s, and use a straightedge to draw a line near the top of the bearer showing the low point of the curve. Release the bearer from the threaded rod and band-saw just outside the line, then return the bearer to the fixture, tighten the nut and hand-plane the edge right to the line. Since the camber is so subtle, draw a large curved line on the side of the bearer to indicate the correct edge. Take the assembly apart, then rip and mill the other 2 x 8s like you did the first one. Trace the shape of the first bearer onto each of the other pieces and band- using your veneer press Before spreading any glue, try a dry run to familiarize yourself with the mechanics of the press. Set it up on a level surface, spacing the bottom bearers evenly. Now lay down the cauls, substrate, veneer and paper, as shown in the drawing on the facing page. Add the top bearers and the hardware, then begin tightening the bearer nearest to the center of the panel. Tighten one end about 3/4 of the way, then completely tighten the other end. Return to the first end to finish tightening the nut. Work your way through the other bearers to the ends of the press. Use a small roller to spread glue evenly on the substrate. To avoid excessive curling, don't put glue directly on the veneer. Place the veneer on the substrate, then lay newspaper down to keep excess glue from bonding the cauls to the veneer. Tighten the nuts with a box wrench until you see a consistent bead of glue squeeze-out along the edges of the panel. saw them close to the finished profile. Now screw the first bearer to the others and rout identical curves using a long flush-cutting laminate bit. Cut 7/16"-wide by 3/4"-deep notches in both ends of each bearer, and nail support blocks to half of the bearers to raise the press off your workbench. Generally, you'll want a pair of bearers pressing on your veneer every four to six inches, so be sure to make enough for your anticipated needs. 0 www.woodworkersjourna l . c o m summer 2008 71 |


