Creative Woodworks & crafts 1998-07, страница 30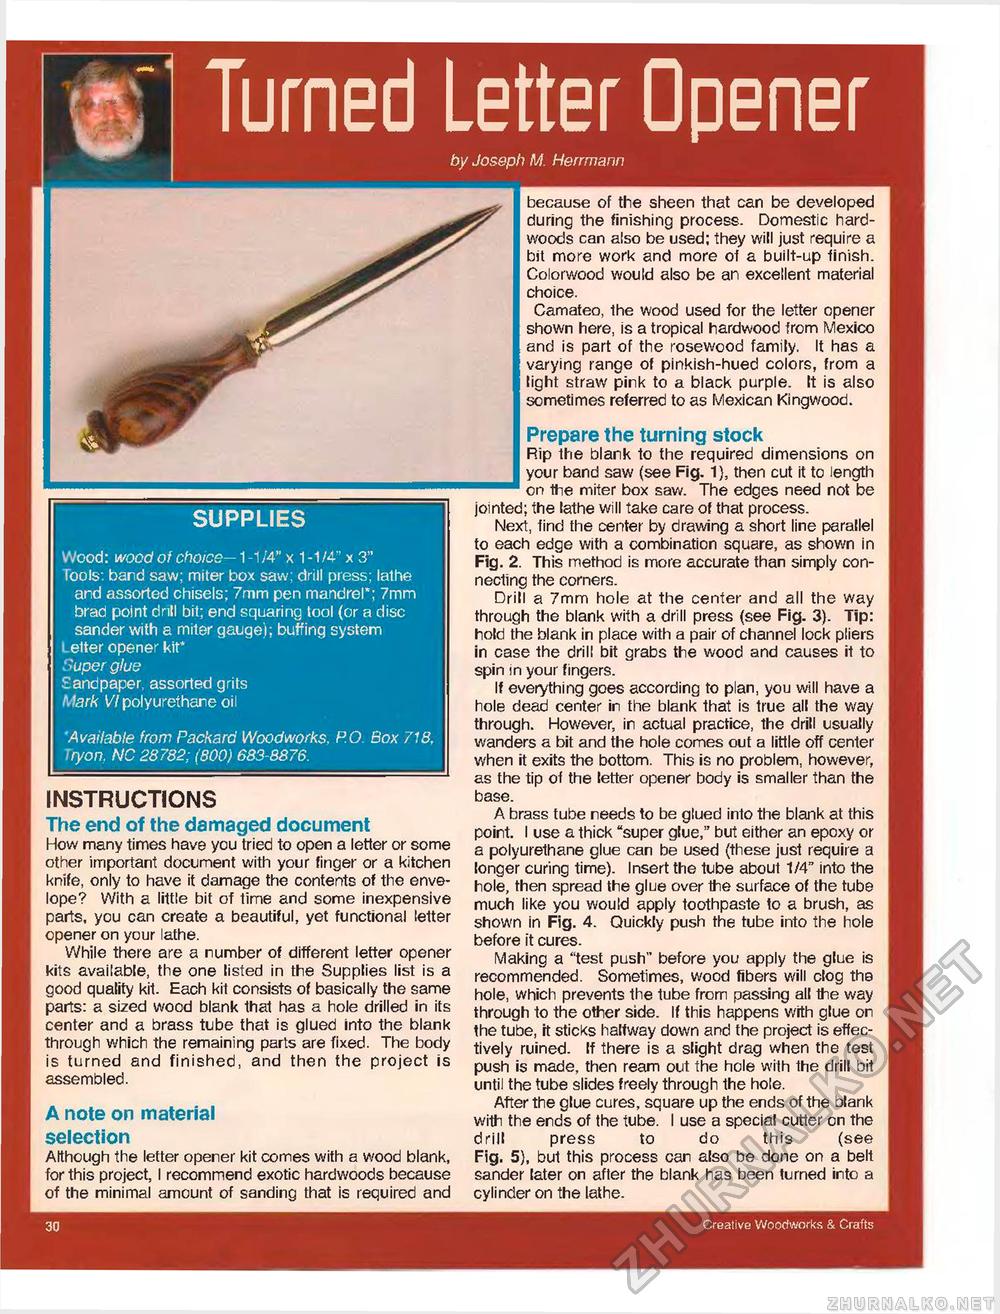
Turned Letter OpenerSUPPLIES Wood: wood of choice-1 -1/4" x 1 -1/4" x 3" Tools: bard saw; miter box saw; drill press; lathe and assorted chisels; 7mm pen mandrel"; 7mm brad point drill bit; end squaring tool (or a disc sander with a miter gauge); buffing system Letter opener kit* Super glue Eandpaper, assorted grits Mark V/polyurethane oil Available from Packard Woodworks. P.O. Box 718, ryon. NC 28782; (800) 683-8876. INSTRUCTIONS The end of the damaged document How many times have you tried to open a letter or some other important document with your finger or a kitchen knife, only to have it damage the contents of the envelope? With a little bit of time and some inexpensive parts, you can create a beautiful, yet functional letter opener on your lathe. While there are a number of different letter opener kits available, the one listed in the Supplies list is a good quality kit. Each kit consists of basically the same parts: a sized wood blank that has a hole drilled in its center and a brass tube that is glued into the blank through which the remaining parts are fixed. The body is turned and finished, and then the project is assembled. A note on material selection Although the letter opener kit comes with a wood blank, for this project, I recommend exotic hardwoods because of the minimal amount of sanding that is required and by Joseph M. Herrmann because of the sheen that can be developed during the finishing process. Domestic hardwoods can also be used; they will just require a bit more work and more of a built-up finish. Colorwood would also be an excellent material choice. Camateo, the wood used for the letter opener shown here, is a tropical hardwood from Mexico and is part of the rosewood family. It has a varying range of pinkish-hued colors, from a light straw pink to a black purple. It is also sometimes referred to as Mexican Kingwood. Prepare the turning stock Rip the blank to the required dimensions on your band saw (see Fig. 1), then cut it to length on the miter box saw. The edges need not be jointed; the lathe will take care of that process. Next, find the center by drawing a short line parallel to each edge with a combination square, as shown in Fig. 2. This method is more accurate than simply connecting the corners. Drill a 7mm hole at the center and all the way through the blank with a drill press (see Fig. 3). Tip: hold the blank in place with a pair of channel lock pliers in case the drill bit grabs the wood and causes it to spin in your fingers. If everything goes according to plan, you will have a hole dead center in the blank that is true all the way through. However, in actual practice, the drill usually wanders a bit and the hole comes out a little off center when it exits the bottom. This is no problem, however, as the tip of the letter opener body is smaller than the base. A brass tube needs to be glued into the blank at this point. I use a thick "super glue," but either an epoxy or a polyurethane glue can be used (these just require a longer curing time). Insert the tube about 1/4" into the hole, then spread the glue over the surface of the tube much like you would apply toothpaste to a brush, as shown in Fig. 4. Quickly push the tube into the hole before it cures. Making a "test push" before you apply the glue is recommended. Sometimes, wood fibers will clog the hole, which prevents the tube from passing all Hie way through to the other side. If this happens with glue on the tube, it sticks halfway down and the project is effectively ruined. If there is a slight drag when the test push is made, then ream out the hole with the drill bit until the tube slides freely through the hole. After the glue cures, square up the ends of the blank with the ends of the tube. I use a special cutter on the drill press to do this (see Fig. 5), but this process can also be done on a belt sander later on after the blank has been turned into a cylinder on the lathe. |


