Creative Woodworks & crafts 1998-07, страница 32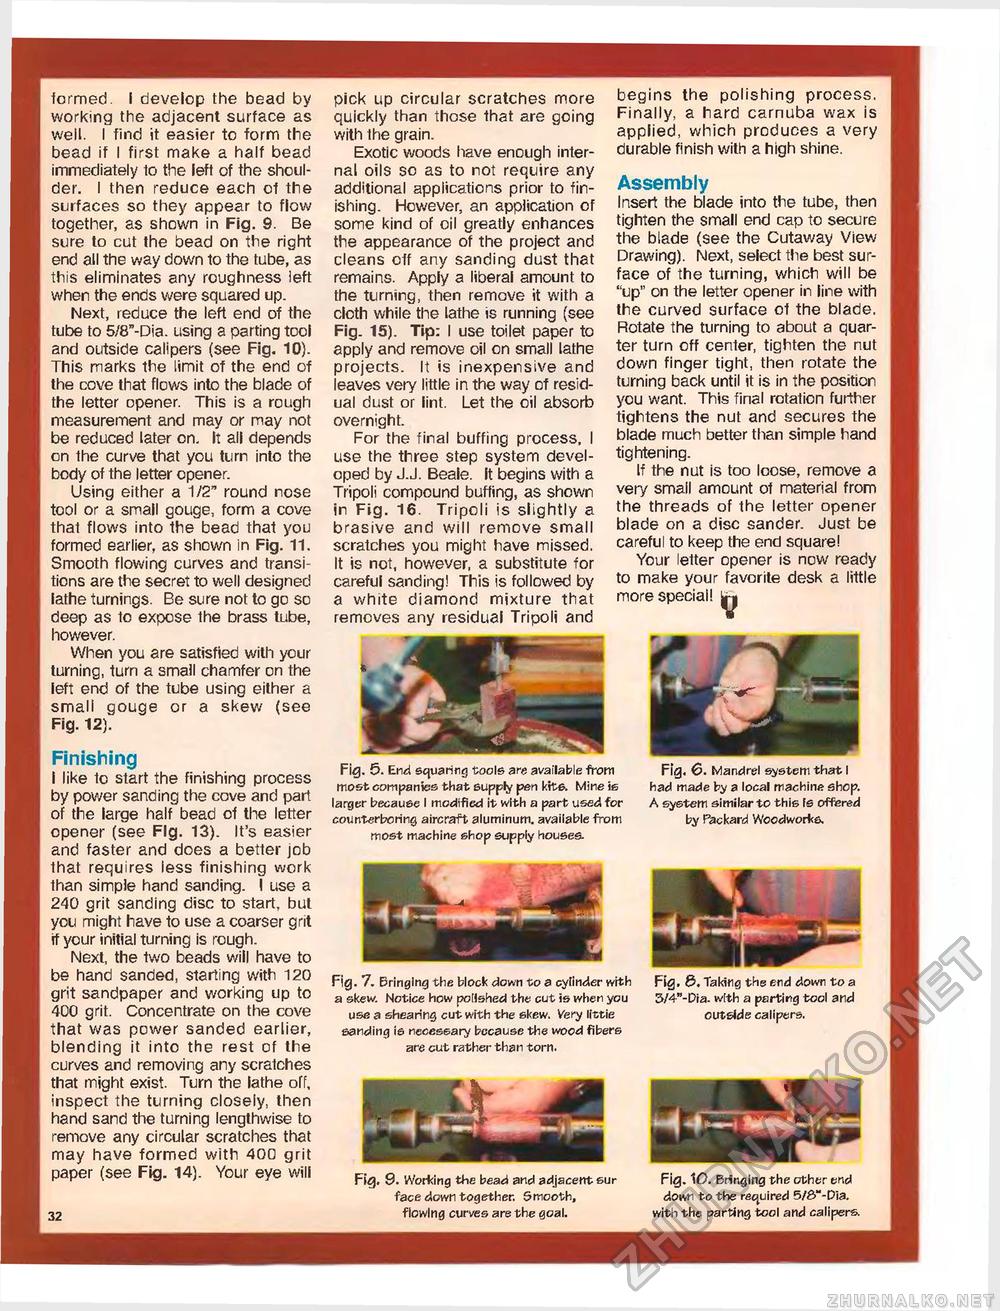
formed. I develop the bead by working the adjacent surface as well. I find it easier to form the bead if I first make a half bead immediately to the left of the shoulder. I then reduce each of the surfaces so they appear to flow together, as shown in Fig. 9. Be sure to cut the bead on the right end all the way down to the tube, as this eliminates any roughness left when the ends were squared up. Next, reduce the left end of the tube to 5/8"-Dia. using a parting tool and outside calipers (see Fig. 10). This marks the limit of the end of the cove that flows into the blade of the letter opener. This is a rough measurement and may or may not be reduced later on. It all depends on the curve that you turn into the body of the letter opener. Using either a 1/2" round nose tool or a small gouge, form a cove that flows into the bead that you formed earlier, as shown in Fig. 11. Smooth flowing curves and transitions are the secret to well designed lathe turnings. Be sure not to go so deep as to expose the brass tube, however. When you are satisfied with your turning, turn a small chamfer on the left end of the tube using either a small gouge or a skew (see Fig. 12). Finishing I like to start the finishing process by power sanding the cove and part of the large half bead of the letter opener (see Fig. 13). It's easier and faster and does a better job that requires less finishing work than simple hand sanding. I use a 240 grit sanding disc to start, but you might have to use a coarser grit if your initial turning is rough. Next, the two beads will have to be hand sanded, starting with 120 grit sandpaper and working up to 400 grit. Concentrate on the cove that was power sanded earlier, blending it into the rest of the curves and removing any scratches that might exist. Turn the lathe off, inspect the turning closely, then hand sand the turning lengthwise to remove any circular scratches that may have formed with 400 grit paper (see Fig. 14). Your eye will 32 pick up circular scratches more quickly than those that are going with the grain. Exotic woods have enough internal oils so as to not require any additional applications prior to finishing. However, an application of some kind of oil greatly enhances the appearance of the project and cleans off any sanding dust that remains. Apply a liberal amount to the turning, then remove it with a cloth while the lathe is running (see Fig. 15). Tip: I use toilet paper to apply and remove oil on small lathe projects. It is inexpensive and leaves very little in the way of residual dust or lint. Let the oil absorb overnight. For the final buffing process, I use the three step system developed by J.J. Beaie. It begins with a Tripoli compound buffing, as shown in Fig. 16. Tripoli is slightly a brasive and will remove small scratches you might have missed. It is not, however, a substitute for careful sanding! This is followed by a white diamond mixture that removes any residual Tripoli and begins the polishing process, Finally, a hard carnuba wax is applied, which produces a very durable finish with a high shine. Assembly Insert the blade into the tube, then tighten the small end cap to secure the blade (see the Cutaway View Drawing). Next, select the best surface of the turning, which will be "up" on the letter opener in line with the curved surface of the blade. Rotate the turning to about a quarter turn off center, tighten the nut down finger tight, then rotate the turning back until it is in the position you want. This final rotation further tightens the nut and secures the blade much better than simple hand tightening. If the nut is too loose, remove a very small amount of material from the threads of the letter opener blade on a disc sander. Just be careful to keep the end square! Your letter opener is now ready to make your favorite desk a little more special! ^ Fig. 5. End squaring tools are available from most companies that supply pen kits. Mine is larger because I modified it with a part used for counterboring aircraft aluminum, available from most machine shop supply houses. Fig. 6. Mandrel system that I had made by a local machine shop. A system similar to this Is offered by Packard Woodworks. Fig. 7. Bringing the block down to a cylinder with a skew. Notice How polished the cut is when you use a shearing cut with the skew. Very llttie sanding is necessary because the wood fibers are cut rather than torn. Fig. 6>. Taking the end down to a 3/4"-Dia. with a parting tool and outside calipers. Fig, 9. Working the bead and adjacent sur Fig. 10. Bringing the other end face down together. Smooth, down to the required 5/8"-Dia. flowing curves are the goal. with the parting tool and calipers. |


