Creative Woodworks & crafts 1999-01, страница 36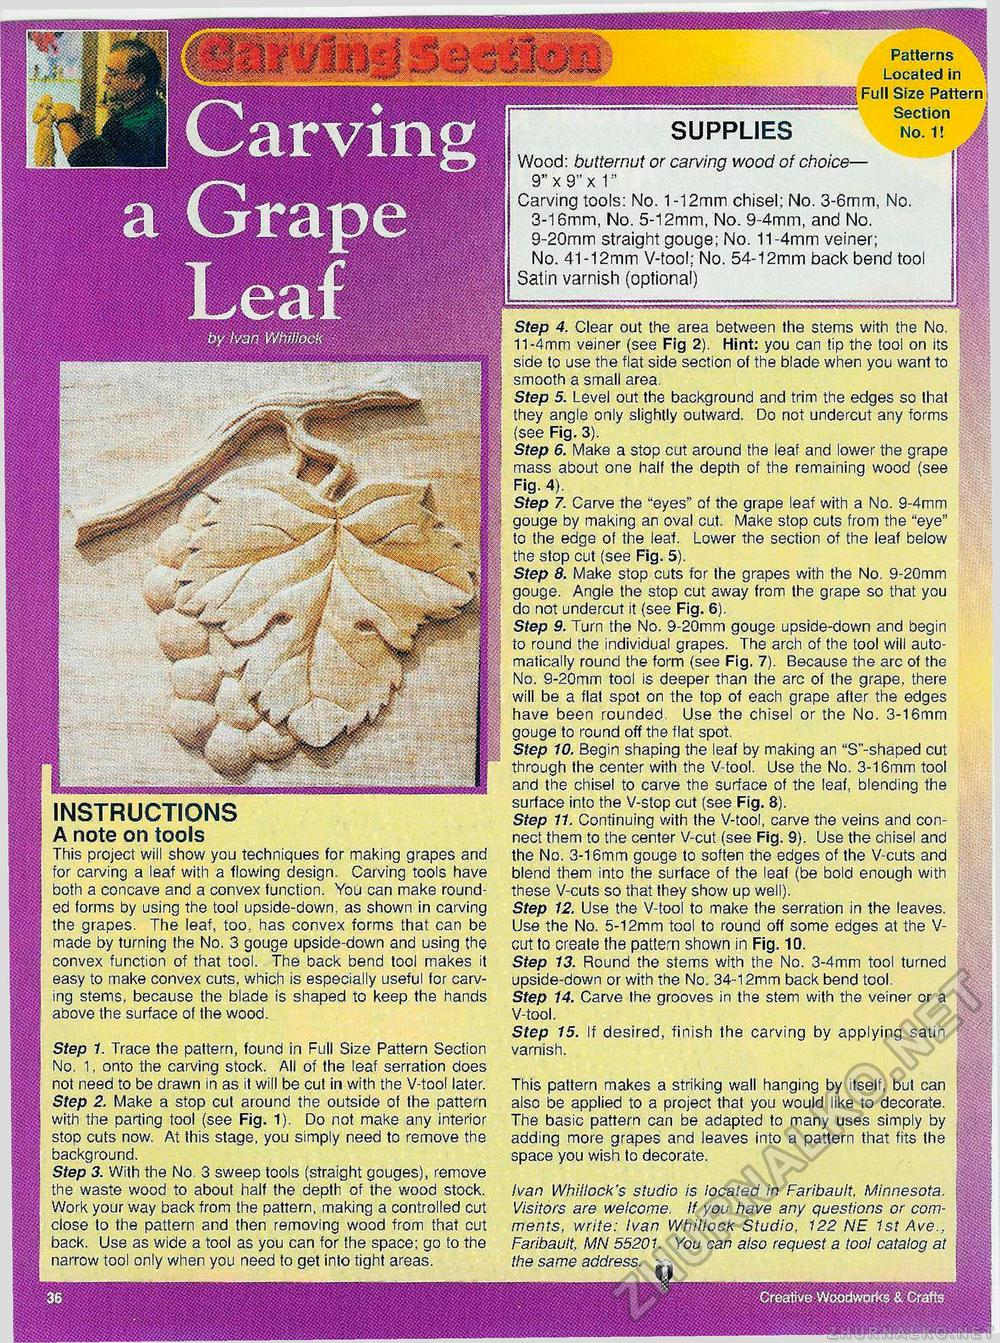
by Ivan Whillock Patterns Located in Full Size Pattern Section No. 1! J supplies instructions A note on tools This project will show you techniques for making grapes and for carving a leaf with a flowing design. Carving tools have both a concave and a convex function. You can make rounded forms by using the tool upside-down, as shown in carving the grapes. The leaf, too, has convex forms that can be made by turning the No. 3 gouge upside-down and using the convex function of that tool. The back bend tool makes it easy to make convex cuts, which is especially useful for carving stems, because the blade is shaped to keep the hands above the surface of the wood. Step 1. Trace the pattern, found in Full Size Pattern Section No. 1, onto the carving stock. All of the leaf serration does not need to be drawn in as it will be cut in with the V-tool later. Step 2. Make a stop cut around the outside of the pattern with the parting tool (see Fig. 1). Do not make any interior stop cuts now. At this stage, you simply need to remove the background. Step 3. With the No. 3 sweep tools (straight gouges), remove the waste wood to about half the depth of the wood stock. Work your way back from the pattern, making a controlled cut close to the pattern and then removing wood from that cut back. Use as wide a tool as you can for the space; go to the narrow tool only when you need to get into tight areas. Wood: butternut or carving wood of choice— 9" x 9" x 1 Carving tools: No. 1 -12mm chisel; No. 3-6mm, No. 3-16mm, No. 5-12mm, No. 9-4mm, and No. 9-20mm straight gouge; No. 11-4mm veiner; No. 41-12mm V-tool; No. 54-12mm back bend tool Satin varnish (optional) Step 4. Clear out the area between the stems with the No. 11-4mm veiner (see Fig 2). Hint: you can tip the tool on its ■■"'. side to use the flat side section of the blade when you want to smooth a small area. Step 5. Level out the background and trim the edges so that they angle only slightly outward. Do not undercut any forms (see Fig. 3). Step 6. Make a stop cut around the leaf and lower the grape mass about one half the depth of the remaining wood (see Fig. 4). Step 7. Carve the "eyes" of the grape leaf with a No. 9-4mm gouge by making an oval cut. Make stop cuts from the "eye" to the edge of the leaf. Lower the section of the leaf below the stop cut (see Fig. 5). Step 8. Make stop cuts for the grapes with the No. 9-20mm gouge. Angle the stop cut away from the grape so that you do not undercut it (see Fig. 6). Step 9. Turn the No. 9-20mm gouge upside-down and begin to round the individual grapes. The arch of the tool will automatically round the form (see Fig. 7). Because the arc of the No. 9-20mm tool is deeper than the arc of the grape, there will be a flat spot on the top of each grape after the edges have been rounded. Use the chisel or the No. 3-16mm gouge to round off the flat spot. Step 10. Begin shaping the leaf by making an "S"-shaped cut through the center with the V-tool. Use the No. 3-16mm tool and the chisel to carve the surface of the leaf, blending the surface into the V-stop cut (see Fig. 8). Step 11. Continuing with the V-tool, carve the veins and connect them to the center V-cut (see Fig. 9). Use the chisel and the No. 3-16mm gouge to soften the edges of the V-cuts and blend them into the surface of the leaf (be bold enough with these V-cuts so that they show up well). Step 12. Use the V-tool to make the serration in the leaves. Use the No. 5-12mm tool to round off some edges at the V-cut to create the pattern shown in Fig. 10. Step 13. Round the stems with the No. 3-4mm tool turned upside-down or with the No. 34-12mm back bend tool. Step 14. Carve the grooves in the stem with the veiner or a V-tool. Step 15. If desired, finish the carving by applying satin varnish. This pattern makes a striking wall hanging by itself, but can |I also be applied to a project that you would like to decorate. The basic pattern can be adapted to many uses simply by :..(■; adding more grapes and leaves into a pattern that fits the jjjl space you wish to decorate. Ivan Whillock's studio is located in Faribault, Minnesota. Visitors are welcome. If you have any questions or comments, write: Ivan Whillock Studio, 122 NE 1st Ave., Faribault, MN 55201. You can also request a tool catalog at ||| the same address. |


