Creative Woodworks & crafts 1999-01, страница 38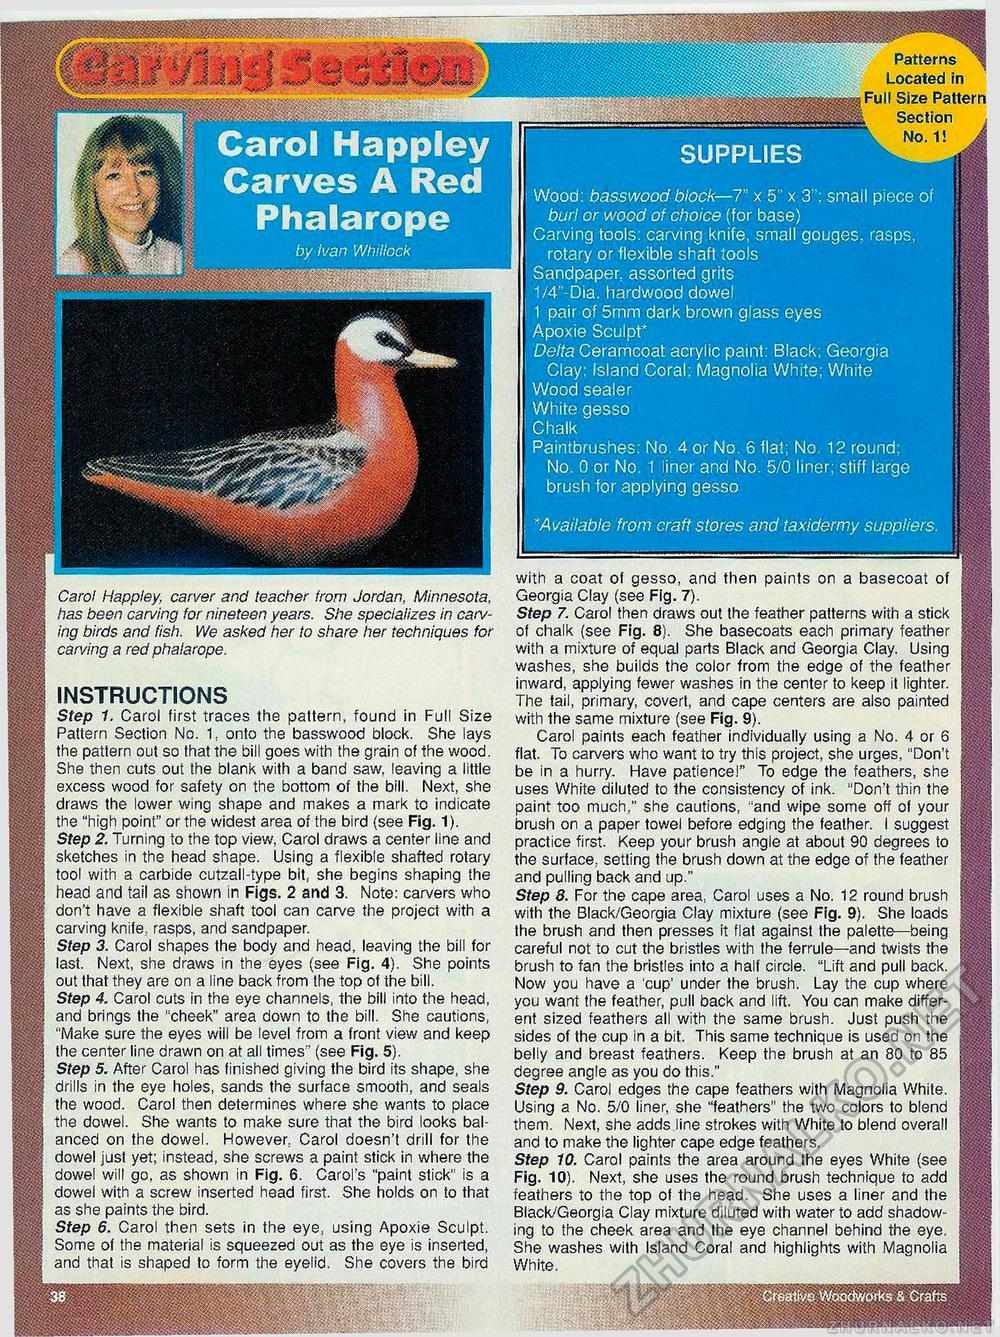
Carol Happley Carves A Red Phalarope by Ivan Whillock supplies Wood: basswood block—7" x 5" x 3"; small piece of burl or wood of choice (for base) Carving tools: carving knife, small gouges, rasps, rotary or flexible shaft tools Sandpaper, assorted grits 1/4"-Dia. hardwood dowel 1 pair of 5mm dark brown glass eyes Apoxie Sculpt* Delta Ceramcoat acrylic paint: Black; Georgia Clay; Island Coral: Magnolia White; White Wood sealer White gesso Chalk Paintbrushes: No. 4 or No. 6 flat; No. 12 round; No. 0 or No. 1 liner and No. 5/0 liner; stiff large brush for applying gesso *Available from craft stores and taxidermy suppliers. Patterns & Located in Full Size Pattern with a coat of gesso, and then paints on a basecoat of Georgia Clay (see Fig. 7). Step 7. Carol then draws out the feather patterns with a stick of chalk (see Fig. 8). She basecoats each primary feather with a mixture of equal parts Black and Georgia Clay. Using washes, she builds the color from the edge of the feather inward, applying fewer washes in the center to keep it lighter. The tail, primary, covert, and cape centers are also painted with the same mixture (see Fig. 9). Carol paints each feather individually using a No. 4 or 6 flat. To carvers who want to try this project, she urges, "Don't be in a hurry. Have patience!" To edge the feathers, she uses White diluted to the consistency of ink. "Don't thin the paint too much," she cautions, "and wipe some off of your brush on a paper towel before edging the feather. I suggest practice first. Keep your brush angle at about 90 degrees to the surface, setting the brush down at the edge of the feather and pulling back and up." Step 8. For the cape area, Carol uses a No. 12 round brush with the Black/Georgia Clay mixture (see Fig. 9). She loads the brush and then presses it flat against the palette—being careful not to cut the bristles with the ferrule—and twists the brush to fan the bristles into a half circle. "Lift and pull back. Now you have a 'cup' under the brush. Lay the cup where you want the feather, pull back and lift. You can make different sized feathers all with the same brush. Just push the sides of the cup in a bit. This same technique is used on the belly and breast feathers. Keep the brush at an 80 to 85 degree angle as you do this." Step 9. Carol edges the cape feathers with Magnolia White. Using a No. 5/0 liner, she "feathers" the two colors to blend them. Next, she adds.line strokes with White to blend overall and to make the lighter cape edge feathers. Step 10. Carol paints the area around the eyes White (see Fig. 10). Next, she uses the round brush technique to add feathers to the top of the head. She uses a liner and the Black/Georgia Clay mixture diluted with water to add shadowing to the cheek area and the eye channel behind the eye. She washes with Island Coral and highlights with Magnolia White. Carol Happley, carver and teacher from Jordan, Minnesota, has been carving for nineteen years. She specializes in carving birds and fish. We asked her to share her techniques for carving a red phalarope. instructions Step 1. Carol first traces the pattern, found in Full Size Pattern Section No. 1, onto the basswood block. She lays the pattern out so that the bill goes with the grain of the wood. She then cuts out the blank with a band saw, leaving a little excess wood for safety on the bottom of the bill. Next, she draws the lower wing shape and makes a mark to indicate the "high point" or the widest area of the bird (see Fig. 1). Step 2. Turning to the top view, Carol draws a center line and sketches in the head shape. Using a flexible shafted rotary tool with a carbide cutzall-type bit, she begins shaping the head and tail as shown in Figs. 2 and 3. Note: carvers who don't have a flexible shaft tool can carve the project with a carving knife, rasps, and sandpaper. Step 3. Carol shapes the body and head, leaving the bill for last. Next, she draws in the eyes (see Fig. 4). She points out that they are on a line back from the top of the bill. Step 4. Carol cuts in the eye channels, the bill into the head, and brings the "cheek" area down to the bill. She cautions, "Make sure the eyes will be level from a front view and keep the center line drawn on at all times" (see Fig. 5). Step 5. After Carol has finished giving the bird its shape, she drills in the eye holes, sands the surface smooth, and seals the wood. Carol then determines where she wants to place the dowel. She wants to make sure that the bird looks balanced on the dowel. However, Carol doesn't drill for the dowel just yet; instead, she screws a paint stick in where the dowel will go, as shown in Fig. 6. Carol's "paint stick" is a dowel with a screw inserted head first. She holds on to that as she paints the bird. Step 6. Carol then sets in the eye, using Apoxie Sculpt. Some of the material is squeezed out as the eye is inserted, and that is shaped to form the eyelid. She covers the bird |


